 Computer Tutorials
 Computer Knowledge
 How to set time display accurate to seconds in Win11? Win11 seconds display setting guide
How to set time display accurate to seconds in Win11? Win11 seconds display setting guide
When using the Windows 11 operating system, you may find that the default time is only displayed in minutes and does not display seconds. But what if you want to add seconds to the time display on the taskbar or desktop? Don’t worry, PHP editor Apple has brought you a tutorial on how to set the Win11 time display seconds, allowing you to easily set the time to seconds and make the time more accurate! Next, we will teach you step by step how to set up so that your Win11 system displays seconds. let's start!
How to set the win11 time to seconds
1. First, you need to update the system and upgrade to the 22H2 version.
2. After the update is completed, use the [Win X] key combination to open the Windows logo right-click menu and select the [Run] option.
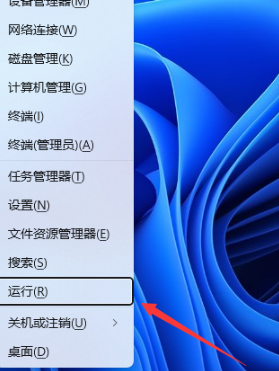
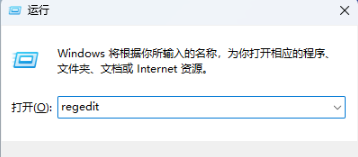
3. In the pop-up run window, enter the [regedit] command and press the [OK] or [Enter] key to open the registry editor.
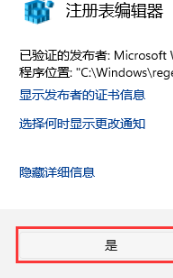
4. In the User Account Control window, if you want to allow this application to make changes to the device, click [Yes].

5. Next, in the Registry Editor window, expand the following paths: HKEY_CURRENT_USERSoftwareMicrosoftWindowsCurrentVersionExplorerAdvanced.
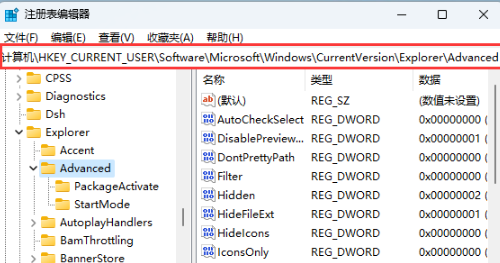
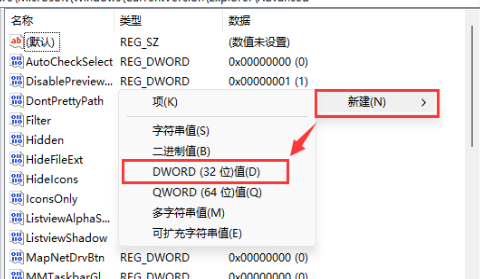
6. Click [right-click] on the blank space on the right, and select [New-DWORD (32-bit) Value (D)] from the pop-up menu item.
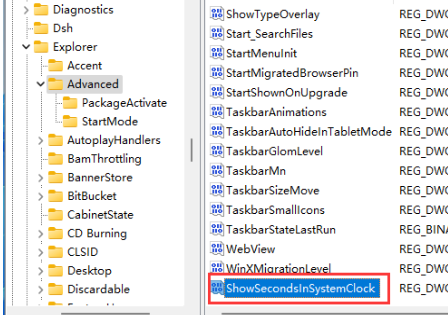
7. Name the new [DWORD (32-bit) value (D)] as [ShowSecondsInSystemClock].
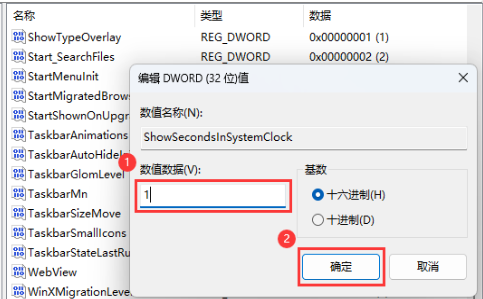
8. Double-click [ShowSecondsInSystemClock] to open the edit DWORD (32-bit) value window, change it to [1] in the numerical data, and then click [OK].
#9. Finally, we can see that the taskbar time can display seconds.

The above is the detailed content of How to set time display accurate to seconds in Win11? Win11 seconds display setting guide. For more information, please follow other related articles on the PHP Chinese website!

Hot AI Tools

Undresser.AI Undress
AI-powered app for creating realistic nude photos

AI Clothes Remover
Online AI tool for removing clothes from photos.

Undress AI Tool
Undress images for free

Clothoff.io
AI clothes remover

AI Hentai Generator
Generate AI Hentai for free.

Hot Article

Hot Tools

Notepad++7.3.1
Easy-to-use and free code editor

SublimeText3 Chinese version
Chinese version, very easy to use

Zend Studio 13.0.1
Powerful PHP integrated development environment

Dreamweaver CS6
Visual web development tools

SublimeText3 Mac version
God-level code editing software (SublimeText3)

Hot Topics
 How to Solve Windows Error Code "INVALID_DATA_ACCESS_TRAP" (0x00000004)
Mar 11, 2025 am 11:26 AM
This article addresses the Windows "INVALID_DATA_ACCESS_TRAP" (0x00000004) error, a critical BSOD. It explores common causes like faulty drivers, hardware malfunctions (RAM, hard drive), software conflicts, overclocking, and malware. Trou
 ENE SYS Maintenance: Tips and Tricks to Keep Your System Running Smoothly
Mar 07, 2025 pm 03:09 PM
This article provides practical tips for maintaining ENE SYS systems. It addresses common issues like overheating and data corruption, offering preventative measures such as regular cleaning, backups, and software updates. A tailored maintenance s
 How do I edit the Registry? (Warning: Use with caution!)
Mar 21, 2025 pm 07:46 PM
Article discusses editing Windows Registry, precautions, backup methods, and potential issues from incorrect edits. Main issue: risks of system instability and data loss from improper changes.
 5 Common Mistakes to Avoid During ENE SYS Implementation
Mar 07, 2025 pm 03:11 PM
This article identifies five common pitfalls in ENE SYS implementation: insufficient planning, inadequate user training, improper data migration, neglecting security, and insufficient testing. These errors can lead to project delays, system failures
 Discover How to Fix Drive Health Warning in Windows Settings
Mar 19, 2025 am 11:10 AM
What does the drive health warning in Windows Settings mean and what should you do when you receive the disk warning? Read this php.cn tutorial to get step-by-step instructions to cope with this situation.
 How do I manage services in Windows?
Mar 21, 2025 pm 07:52 PM
Article discusses managing Windows services for system health, including starting, stopping, restarting services, and best practices for stability.
 why won't driver asio.sys load
Mar 10, 2025 pm 07:58 PM
This article addresses the failure of the Windows asio.sys audio driver. Common causes include corrupted system files, hardware/driver incompatibility, software conflicts, registry issues, and malware. Troubleshooting involves SFC scans, driver upda
 which application uses ene.sys
Mar 12, 2025 pm 01:25 PM
This article identifies ene.sys as a Realtek High Definition Audio driver component. It details its function in managing audio hardware, emphasizing its crucial role in audio functionality. The article also guides users on verifying its legitimacy


