
 Computer Tutorials
Computer Knowledge
How to set the Win11 notebook screen to turn off but not enter hibernation mode? Detailed explanation
Computer Tutorials
Computer Knowledge
How to set the Win11 notebook screen to turn off but not enter hibernation mode? Detailed explanation
How to set the Win11 notebook screen to turn off but not enter hibernation mode? Detailed explanation

php editor Baicao will introduce to you how to set up the Win11 notebook to turn off the screen and not sleep. In the Win11 system, by default, the notebook will enter hibernation after closing the lid, which may be inconvenient for some users who need to run programs or download files in the background. However, we can achieve the effect of turning off the screen but not sleeping through some simple settings, making your notebook more flexible and efficient. Next, we will introduce the specific setup steps in detail so that you can easily master it.
How to set the win11 notebook to turn off the screen without sleeping
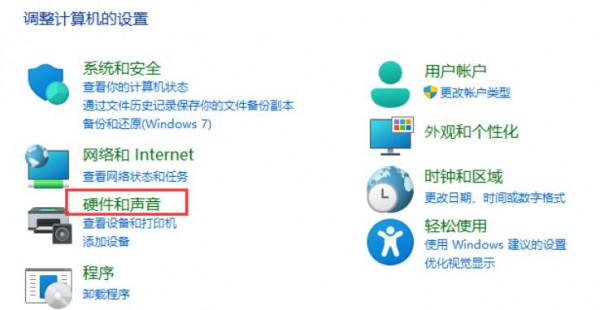
1. First, we click on the start button in the taskbar.

#2. Then enter above and open the control panel.

3. Then open the hardware and sound options.
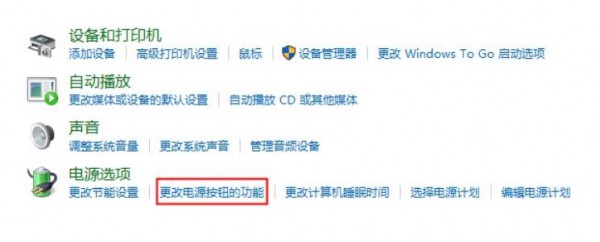
#4. Click below to change the function settings of the power button.
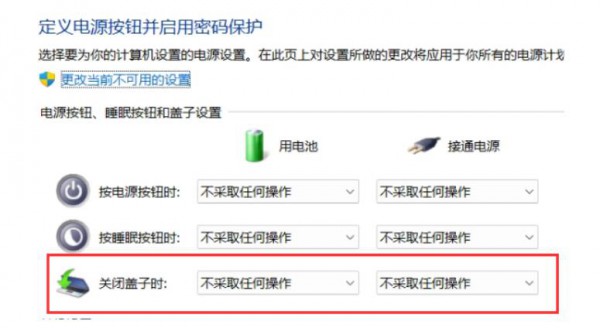
#5. Finally, change the option when closing the lid to set the lid not to sleep without taking any action.
The above is the detailed content of How to set the Win11 notebook screen to turn off but not enter hibernation mode? Detailed explanation. For more information, please follow other related articles on the PHP Chinese website!

Hot AI Tools

Undresser.AI Undress
AI-powered app for creating realistic nude photos

AI Clothes Remover
Online AI tool for removing clothes from photos.

Undress AI Tool
Undress images for free

Clothoff.io
AI clothes remover

AI Hentai Generator
Generate AI Hentai for free.

Hot Article
Hot Tools

Notepad++7.3.1
Easy-to-use and free code editor

SublimeText3 Chinese version
Chinese version, very easy to use

Zend Studio 13.0.1
Powerful PHP integrated development environment

Dreamweaver CS6
Visual web development tools

SublimeText3 Mac version
God-level code editing software (SublimeText3)
Hot Topics


 Is Win11 LTSC not suitable for individual users at all? Analysis of the advantages and disadvantages of the LTSC version
Jun 25, 2024 pm 10:35 PM
Is Win11 LTSC not suitable for individual users at all? Analysis of the advantages and disadvantages of the LTSC version
Jun 25, 2024 pm 10:35 PM
Microsoft provides multiple versions of Windows systems, each targeting different usage scenarios. In addition to the Home, Professional, Education and Enterprise editions, there is also a special LTSC edition designed for the specific needs of large businesses and organizations. Although Windows 11 LTSC has become quite popular recently, it lacks commonly used functions and is not suitable for individual users. And this version has not yet been officially launched, and is expected to be released around September in the second half of 2024. Interesting thing: From Windows 1.0 to 11, the evolution of Windows versions. What is Windows 11 LTSC? Windows11LTSC is a feature of Windows11 operating system
 Win11 24H2 will adjust security rules and NAS user access may fail
Jun 25, 2024 pm 05:23 PM
Win11 24H2 will adjust security rules and NAS user access may fail
Jun 25, 2024 pm 05:23 PM
Digital enthusiasts all know that Microsoft has released a preview version of Windows 1124H2, and the official version of Windows 1124H2 will be coming soon. This is a very important version update, and many friends are paying close attention to it. Of course, the most noteworthy thing about Windows 1124H2 is the new features and improvements in AI. It is said that Microsoft will deeply integrate Copliot. However, AI is not the subject of this article. The subject of this article is to introduce readers to two new security rule changes in the Windows 1124H2 version, which may affect some NAS users. Specifically, in the Windows 1124H2 version, Microsoft will make changes to two important network access rules:
 System Restore prompts that you must enable system protection on this drive
Jun 19, 2024 pm 12:23 PM
System Restore prompts that you must enable system protection on this drive
Jun 19, 2024 pm 12:23 PM
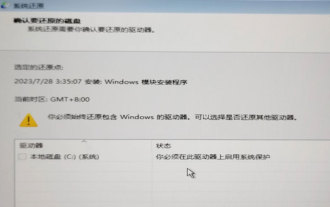
The computer has a restore point, and when the system is restored, it prompts "You must enable system protection on this drive." This usually means that the system protection function is not turned on. System protection is a feature provided by the Windows operating system that can create system restore points to back up system files and settings. That way, if something goes wrong, you can revert to a previous state. When the system fails and you cannot enter the desktop to start it, you can only try the following method: Troubleshooting-Advanced Options-Command Prompt Command 1 netstartvssrstrui.exe/offline:C:\windows=active Command 2 cd%windir%\system32 \configrenSYSTEMsy
 Acer laptop disables secure boot and removes password in Bios
Jun 19, 2024 am 06:49 AM
Acer laptop disables secure boot and removes password in Bios
Jun 19, 2024 am 06:49 AM
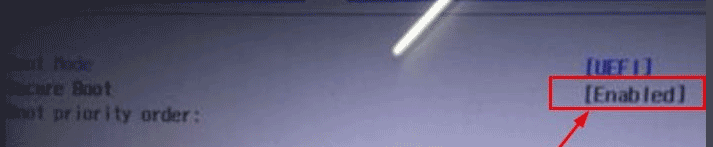
I repaired an Acer laptop and had to turn off secure boot when entering PE. I recorded how to turn off secure boot and remove the password from Bios. Turn on the computer and when the screen is not on, keep pressing the F2 key to enter the BIOS. On Acer laptops, turn off Secure Boot and press the arrow keys to switch to Boot. If SecureBoot is gray and unclickable, switch to the Security page, select SetSupervisorPassword and press Enter to set the password. Then switch to Boot, SecureBoot can be selected as Disabled, and press F10 to save. Modify and clear the BIOS password on your Acer notebook. Switch to the Security menu and select SetSupervisorPasswo.
 MHz is history! Microsoft Windows 11 memory speed unit switches to MT/s
Jun 25, 2024 pm 05:10 PM
MHz is history! Microsoft Windows 11 memory speed unit switches to MT/s
Jun 25, 2024 pm 05:10 PM
Digital hardware enthusiasts all know that in recent years there have been two memory parameter marking units, namely "MHz" and "MT/s", which may be confusing to digital novices. "MHz" and "MT/s" are both measures of memory transfer performance, but they still have significant differences. MHz represents how many millions of cycles a memory module can perform per second, and each cycle is an operation performed on the memory module, such as storing and retrieving data. But due to the rapid development of current technology, new technology allows DDR memory to increase data transfer rate without increasing clock speed, and the old memory measurement method has also
 Dell computer factory reset, dell laptop restores factory settings
Jun 19, 2024 am 04:34 AM
Dell computer factory reset, dell laptop restores factory settings
Jun 19, 2024 am 04:34 AM
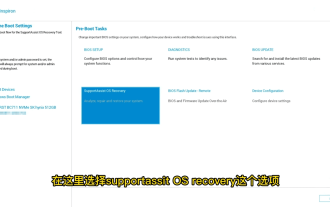
The following introduces the factory reset that comes with DELL notebooks. It restores factory settings. After the reset, the computer is restored to the state when you first bought it. It requires that the hard disk has not been partitioned and the recovery partition has not been damaged. 1. Restart the computer and keep clicking the F12 key on the keyboard until the following interface appears; 2. Select "SupportAssistOSRecovery" and click "EXIT"; 3. Click "Skip" here, or click step-by-step guidance, and there will be Introduction instructions; 4. In this interface, in the lower right corner, click "Start Reset"; 5. Select "Reset to Factory Settings" and click Next; (If you choose "Reset and Update", the network speed is not fast, it will take a long time, You also need to install the driver yourself) 6. If there is important data, select "Yes, back up my files".
 How to disable Windows Update from automatically updating drivers in win11?
Jun 26, 2024 am 12:18 AM
How to disable Windows Update from automatically updating drivers in win11?
Jun 26, 2024 am 12:18 AM
When you connect any new hardware device to the system, Windows will automatically try to install the driver for it. When the system's built-in driver package cannot be recognized, it will automatically try to connect to Windows Update to search and install the driver. Windows can also automatically update device drivers through Windows Update without user interaction. Although this function seems convenient, under certain circumstances, the feature of automatically updating drivers can cause trouble for users. For example, users' video workflows such as DaVinciResolve, Adobe Premiere, etc. need to use a specific old version of Nvidia Studio driver. As a result, Windows
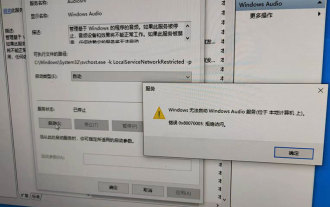 Windows cannot start the Windows Audio service Error 0x80070005
Jun 19, 2024 pm 01:08 PM
Windows cannot start the Windows Audio service Error 0x80070005
Jun 19, 2024 pm 01:08 PM
The guy's computer appears: Windows cannot start the WindowsAudio service (located on the local computer). Error 0x8007005: Access denied. This situation is usually caused by user permissions. You can try the following methods to fix it. Method 1: Modify the registry to add permissions through batch processing, create a new text document on the desktop, save it as .bat, and right-click the administrator to go far. Echo==========================EchoProcessingRegistryPermission.Pleasewait...Echo================== ========subinacl/subkey
