 Computer Tutorials
 Computer Knowledge
 Bypass network activation, try these two ASUS win11 tutorials
Bypass network activation, try these two ASUS win11 tutorials
How to skip online activation in ASUS win11? This is a problem faced by many users after upgrading their operating system. If you also encounter this problem, you might as well try the following two tutorials. The first method is to skip the online activation step by modifying the registry. The specific steps are detailed below. The second method is to use an activation tool to bypass the restrictions of online activation, so that system activation can be completed without the need for an Internet connection. No matter which method you choose, it can help you successfully skip the online activation step and enjoy the convenience and advantages brought by the ASUS win11 system.
Asus win11 skips networking method 1: enter relevant commands in the networking interface to solve the problem
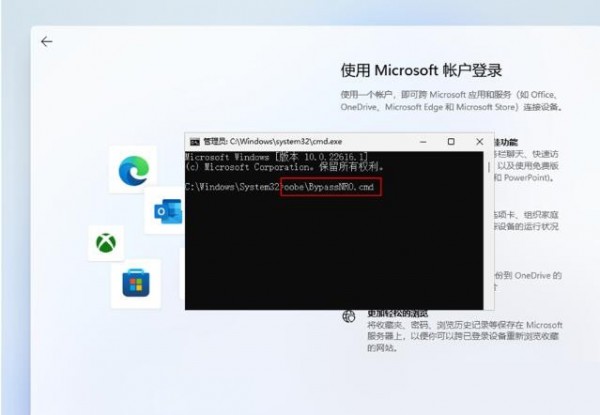
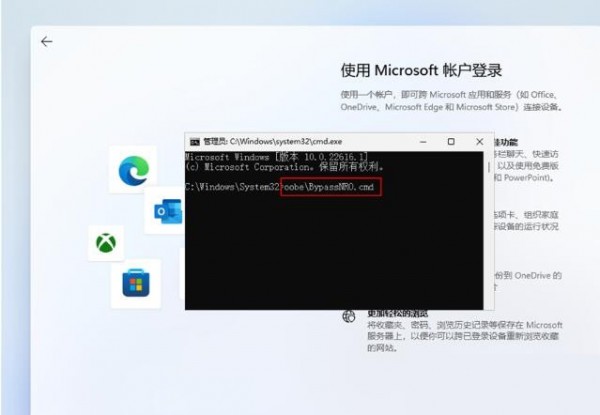
You need to disconnect from the network when you start it for the first time (remember to unplug the network cable for desktop computers), and then the network connection appears during the first startup During the interface, press Shift F10 to bring up the cmd input command:
oobeBypassNRO.cmd

and press Enter. At this time, the system will automatically restart, and it will There is a temporary skip option and can be configured offline as before.

ASUS win11 skips networking method two: solve it by modifying the registry
1. Press the [Shift F10] key combination on the keyboard to call up cmd command prompt window, and enter the following command:
regedit Press Enter to quickly open the Registry Editor.

2. Expand the Registry Editor window to the following path:
HKEY_LOCAL_MACHINESOFTWAREMicrosoftWindowsCurrentVersionOOBE
In the blank space on the right, click [right-click ], in the menu item that opens, select [New> DWORD (32-bit) value (D)], as shown in the figure below;

3, create a new Name the value [BypassNRO], double-click to open the BypassNRO value, then in the Edit DWORD (32-bit) value window, modify the numerical data to [1], and then click [OK];


4. Finally, enter the [logoff] command and press [Enter] to skip the online login account prompt, as shown in the figure below.

The above is the detailed content of Bypass network activation, try these two ASUS win11 tutorials. For more information, please follow other related articles on the PHP Chinese website!

Hot AI Tools

Undresser.AI Undress
AI-powered app for creating realistic nude photos

AI Clothes Remover
Online AI tool for removing clothes from photos.

Undress AI Tool
Undress images for free

Clothoff.io
AI clothes remover

AI Hentai Generator
Generate AI Hentai for free.

Hot Article

Hot Tools

Notepad++7.3.1
Easy-to-use and free code editor

SublimeText3 Chinese version
Chinese version, very easy to use

Zend Studio 13.0.1
Powerful PHP integrated development environment

Dreamweaver CS6
Visual web development tools

SublimeText3 Mac version
God-level code editing software (SublimeText3)

Hot Topics
 How to connect PS4 controller in Win11_Operation steps to match PS4 controller in Win11
May 08, 2024 pm 03:01 PM
1. First enter the win11 system, right-click the Bluetooth icon in the lower right corner and select [Add Bluetooth Device]. 2. Then enter the device interface and click [Add Bluetooth or other devices] to enter. 3. In the added device interface, click the Bluetooth option to enter. 4. Then use the controller, press and hold the SHARE button and PS4 button on the controller when it is turned off and not connected to the computer. It only takes about 5 seconds for the indicator light behind the controller to start flashing quickly to enter the pairing state. 5. Finally, you can search for the PS4 controller Bluetooth device on the computer's Add Device interface, and click WirelessController to pair it.
 How to install WinNTSetup into Win11 system_How to install WinNTSetup into Win11 system
May 08, 2024 am 11:19 AM
First download the latest Win11 system ISO image, and then in Win10 system, you can directly right-click on the downloaded ISO image file and select [Load]; if it is under WinPE, WinXP, or Win7 system, you need to use the virtual optical drive tool to load the ISO Image; or you can directly decompress the ISO image file without using a virtual optical drive. Then run WinNTSetup. The software interface is as shown in the figure: First locate the location of the install.wim file. You can find the install.wim file in the sources directory of the Win11 ISO image loaded or decompressed by the virtual optical drive. Then set the location of the boot disk and installation disk. Generally, you are going to put W
 Specific steps for expanding the C drive using the partition tool diskgenius
May 08, 2024 pm 08:04 PM
First, download and install the [DiskGenius] tool on your computer, then open the tool, then click [File Menu] at the top, and then click [Restart the system and run the DiskGenius software], as shown in the figure. Then click [OK] in the pop-up prompt box, as shown in the figure. After that, the computer will restart and then enter the Diskgen hard disk partition interface. At this time, if we want to expand the C drive, we only need to right-click the D drive next to the logical partition and click "Adjust Partition Size" in the pop-up menu, as shown in the figure shown. Then you need to adjust the size of the D drive partition. For example, the current capacity of the D drive is 14.99GB, as shown in the figure below. At this time, we can adjust the installment of the D drive. For example, if we want to allocate 1.03GB to the C drive, we only need to allocate 1.03GB to the C drive.
 How to change the win11 system interface to the classic version? Share how to change the win11 system interface to the classic version
May 09, 2024 pm 02:19 PM
Win11 has designed a new modern user interface, providing new interactions and appearances. However, many users still prefer the classic version of the desktop, so how should they be changed to the classic version? Let’s take a look below! 1. Adjust the taskbar: - Right-click the taskbar and select Taskbar Settings. -In the taskbar settings, you have the option to change the taskbar position to the bottom and adjust the size of the taskbar icons. - There is also the option to hide the task view button, task view and the new notification center. Also available: Xiaozhi Eye Protector. Quickly beautify the taskbar and experience a different desktop. 2. Adjust the start menu: - Right-click the start button on the taskbar and select Start button settings. -In the start button settings you can choose to set the start menu style to classic which will
 How to solve the problem that disk management cannot be opened in win11 system? Win11 disk management cannot be opened solution
May 07, 2024 pm 05:01 PM
We need to use disk management to perform formatting, partitioning, etc. Recently, many win11 users have reported that their computer disk management cannot be opened. This situation is usually because the corresponding function is turned off by group policy. , so access cannot be opened. As long as it is set to not configured, it can be started successfully. In order to facilitate the operation of the majority of users, today's win11 tutorial will bring you detailed operation steps. Let's take a look at the complete method. What to do if Disk Management cannot be opened in Win11 system 1. First press Win+R on the keyboard to open Run. 3. Then go to User Configuration - Administrative Templates - Windows Components on the left. 5. Then double-click to open the disk management option.
 What is the appropriate temperature for playing Apex computer?
May 06, 2024 am 09:31 AM
What is the appropriate temperature for playing Apex computer? 80 degrees is suitable. When running large-scale games or playing high-definition videos, the temperature can reach about 80°C. Generally, it is considered normal to not exceed 90°C under high load. Graphics cards are generally the hardware that generates the most heat among computer hardware. Generally, it is normal for the temperature of a graphics card to be around 30℃-80℃. Due to external temperature, it is normal for most graphics card temperatures to be between 50℃-85℃ in summer. range, if you are running large-scale 3D games or playing high-definition videos for a long time, the highest temperature may reach about 95°C. This temperature range will affect the life of the computer hardware. No matter how high the temperature is, you must consider strengthening heat dissipation and cleaning dust. How to play with the apex handle and the computer ? Method/step-by-step reading: 1. Use wired or wireless
 How to upgrade Win11 system on old computers_Tutorial on upgrading Win11 system on old computers
May 07, 2024 pm 08:07 PM
1. First we need to download the win11 image file. 2. Put the downloaded win11 image into another disk. 3. Then we find the win11 image file among the searched image files. 4. Then when we come to this interface, we select install.wim to proceed to the next step. 5. Then select the Windows 11 system and click OK to restore the image file. 6. Then we wait for pe to download and install. Wait patiently. After the download is completed, click restart according to the prompts. 7. Then come to this interface, we select the second xiaobaiPE. After selecting, the win11 system will be automatically installed for us. After the installation is completed, click to restart the computer immediately according to the prompts. 8. Finally, the system installation is completed, and we come to
 What you need to know when reinstalling the system from a USB flash drive: How to set up the BIOS correctly
May 06, 2024 pm 03:00 PM
Reinstalling the system is a problem that many computer users often encounter. Whether it is due to system crash, poisoning or wanting to upgrade the system, reinstalling the system is a good choice. However, many people encounter various problems when reinstalling the system, such as not knowing how to set up the BIOS, not knowing how to choose a suitable installation disk, etc. Today, we will talk about some things you must know when reinstalling the system from a USB flash drive, and teach you how to set up the BIOS correctly and successfully complete the system reinstallation. Tool materials: System version: Windows1020H2 Brand model: Lenovo Xiaoxin Air14 Software version: Pocket machine One-click reinstallation of system software v1.0 1. Preparation 1. Prepare a U disk with a capacity of no less than 8GB, preferably USB3. 0, so the speed will be faster


