

Steps to install Radish Home xp system

The installation procedure of Luobo Home XP system is to enter the BIOS and reinstall step by step according to the prompts. Do not change it casually after entering the BIOS, because the things inside are very important. If you want more details, take a look at the following introduction to the installation process of Luobo Home XP system.
Luobo Home xp system installation steps
First think about which disk you want to install the system on, and then organize the disk. The organization mentioned here is to save useful files on another disk to prevent them from being accidentally deleted during formatting. Also, if your machine's hardware driver disk cannot be found, it is recommended to use tool software to save the driver. Windows Optimizer can do this.
It should be noted that everything in "My Documents" is counted as the contents of the C drive. Don't forget to save the files in it. The paths to favorites, etc. vary from system to system. Generally, there is a folder named after your machine's login name under C:\Documents and Settings. When you open it, you will see the favorites, just copy it to another disk.
After doing the above, you can basically start installing the system. Restart your computer and press the DEL key to enter BIOS setup. Some people here don't know when to press the DEL key, so I'll tell you a stupid way. As long as you restart, just keep pressing it. Also, because the motherboard manufacturers are different, the shortcut keys to enter the BIOS are also different. Some are F2, and some are F10. Generally, there is a prompt at the lower end of the screen when booting.
After entering the BIOS, do not change it casually, because the things in it are very important. If you make mistakes, you may not even be able to enter the system. We only need to change the drive letter sequence when the computer starts.
It’s hard to say how to find this, because the BIOS settings will also vary depending on the motherboard. Generally, under the BOOT tab, you can set up the CD-ROM drive to start the computer. There will be relevant prompts on the right side of the BIOS settings, and novices can follow the prompts. After finishing, don’t rush to restart. Put the installation disk into the CD-ROM drive, then press F10 to save and restart.
At this time, you should pay attention to the observation. When starting up, the computer will first detect the optical drive, and a line of characters will appear below the screen (I forgot the specific English, sweat), which means that you can press any key to enter the optical disk boot. Press it once (if you really don’t know when to press it, just wait until the computer starts up and hit the space bar every once in a while. If you hit the keyboard a few more times, nothing will happen. Just be careful not to hit the Del key, haha~!), and you hear the CD-ROM drive It started to spin like crazy, and the process of installing the system officially began!
Installing the system:
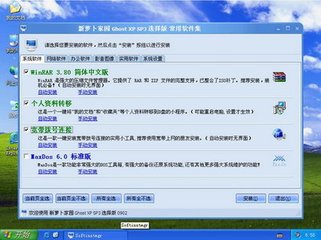
Look at the prompts on the screen. Since they are all in Chinese, there is almost no need to introduce them. First, the user needs to choose whether to install a new operating system or repair it, choose to install a new operating system, and then press F8 to agree to those agreements, and the drive letter selection interface will appear.
Use the up and down keys on the keyboard to move the cursor to the drive letter you want to install, press the "D" key, the system will prompt that deleting the drive will delete all data, ignore it, then press the "L" key again confirm delete. After completion, the screen returns to the previous interface. Then select "Install Windows Select "Quick NTFS mode" to format, and the formatting interface will appear. Wait until the progress bar reaches 100% and the computer will automatically start loading the installation files in the optical drive. It will take about 8 minutes (depending on the speed of the optical drive). Complete Then the system automatically restarts.
Note that you need to remove the installation disk from the CD-ROM drive at this time to avoid automatic reading after restarting. (It’s okay not to take it out, just don’t hit the keyboard at this time)
Enter the installation interface again after restarting. At this time, put the installation disk in again and the installation will continue. You hardly need to make any settings. Click Just "Next". However, there is a manual process of entering the serial number.
This process takes about 40 minutes, during which the screen will display some relevant function information about WindowsXP, you can pay attention to it. After completion, the system prompts to remove the installation disk. After you take it out, restart it, enter the BIOS and change the boot sequence back to hard disk boot, and the installation process is basically completed!
After installing the system:
Generally, after entering the system, the drivers for commonly used hardware have been installed, but not all. At this time, the user needs to install it himself. First check which drivers of the machine are not installed! Right-click "My Computer", select "Properties", and click "Device Manager" in the "Hardware" tab. Anything with a question mark icon in front of the device means there is a problem with the device. Double-click and follow the prompts above to install the driver. Until all the "question marks" in front disappear.
The drivers that need to be installed generally include graphics cards, sound cards, network cards, and modems. Some more advanced machines also have drivers for infrared, Bluetooth and other adapters.
The following are some optimization settings for the system. If your machine configuration is not high, it is recommended to do as I said.
1 Right-click the screen and select "Properties". Click the "Appearance" tab, select "Windows Classic Style" in the drop-down menu of "Appearance and Buttons", and then in the "Settings" tab, adjust the screen resolution according to personal preference, usually 1024*768. If you are using an ordinary CRT monitor, you need to click the "Monitor" tab again, adjust the "Screen Refresh Frequency" to "85 Hz", and click OK! Does the screen look more comfortable?
2 Right-click the taskbar, select "Properties", and select the check box in front of "Show Quick Start" in the "Taskbar" tab. Then click the "Start Menu" tab, change the menu type to "Classic Start Menu", click "OK" and see if the current look is more comfortable? (Hey, my personal feeling!)
3 Right-click My Computer and select the "Advanced" tab. Click the "Settings" button in the performance item. In the visual effects item, first click "Adjust for best performance", and then click on the Select "Use common tasks in folders" in the checkbox. If you do this, then click the "Advanced" tab next to "Visual Effects" and click the "Settings" button under "Virtual Memory". In the opened properties In the box, first position the cursor on the C drive, click "No paging file" below, then click on the D drive (click whichever drive has the most space on your machine), enter the corresponding value in the custom size, and click next to it. "Settings" button, and then click OK.
The settings of virtual memory should be determined according to the memory capacity! Generally, it is 1.5 times the memory capacity!
4 Right-click "My Computer" ", select the "System Restore" tab, and select "Turn off System Restore on all drives" if not needed. Most people don't need this!
5 At this time, you will find a system tray in the lower right corner of the screen. The "shield"-like icon is the Security Center of Windows XP. Double-click it to open it. When you do not install your own anti-virus software, turn on both "Firewall" and "Virus Protection". This will provide relatively higher security!
6 After doing this, click "Start" and select "Windows Update". At this time, IE will automatically open and connect to the windows upgrade website. Follow the prompts on it to upgrade. The steps are essential! After the upgrade is completed You may need to restart your computer.
7 Open any folder, click "Tools" from the menu bar, select "Folder Options". Click the "View" tab and change "Do not cache thumbnails" , "Remember the view position of each folder" and "Show prompt information when the mouse points to a folder or desktop item". Remove the check marks in front of these three categories. Then click "Apply to all folders" above and click OK!
8 Right-click IE, select "Properties", in the "General" tab, click "Use Blank Page", and then click OK!
Final words
To Here, we have basically finished introducing the novice system installation, but the author would like to remind everyone of a few points:
1 Anti-virus software must be installed, updated frequently, and anti-virus regularly. Don’t think that it will not work if you don’t visit the website randomly. Poisoned.
2 The system must be patched. Microsoft releases patches on the second week of every month. At that time, you must update according to the method I mentioned above.
3 Do not download and install randomly Software. The download links provided by many irregular websites may contain viruses or be bundled with a bunch of junk software. Please be sure to check the options when downloading and uncheck the checkboxes before unnecessary software.
4 Do not change computer settings or delete computer files at will.
The above is the detailed content of Steps to install Radish Home xp system. For more information, please follow other related articles on the PHP Chinese website!

Hot AI Tools

Undresser.AI Undress
AI-powered app for creating realistic nude photos

AI Clothes Remover
Online AI tool for removing clothes from photos.

Undress AI Tool
Undress images for free

Clothoff.io
AI clothes remover

AI Hentai Generator
Generate AI Hentai for free.

Hot Article
Hot Tools

Notepad++7.3.1
Easy-to-use and free code editor

SublimeText3 Chinese version
Chinese version, very easy to use

Zend Studio 13.0.1
Powerful PHP integrated development environment

Dreamweaver CS6
Visual web development tools

SublimeText3 Mac version
God-level code editing software (SublimeText3)
Hot Topics


 How to install WinNTSetup into Win11 system_How to install WinNTSetup into Win11 system
May 08, 2024 am 11:19 AM
How to install WinNTSetup into Win11 system_How to install WinNTSetup into Win11 system
May 08, 2024 am 11:19 AM
First download the latest Win11 system ISO image, and then in Win10 system, you can directly right-click on the downloaded ISO image file and select [Load]; if it is under WinPE, WinXP, or Win7 system, you need to use the virtual optical drive tool to load the ISO Image; or you can directly decompress the ISO image file without using a virtual optical drive. Then run WinNTSetup. The software interface is as shown in the figure: First locate the location of the install.wim file. You can find the install.wim file in the sources directory of the Win11 ISO image loaded or decompressed by the virtual optical drive. Then set the location of the boot disk and installation disk. Generally, you are going to put W
 Specific steps for expanding the C drive using the partition tool diskgenius
May 08, 2024 pm 08:04 PM
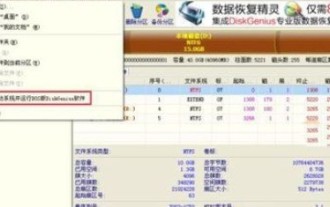
Specific steps for expanding the C drive using the partition tool diskgenius
May 08, 2024 pm 08:04 PM
First, download and install the [DiskGenius] tool on your computer, then open the tool, then click [File Menu] at the top, and then click [Restart the system and run the DiskGenius software], as shown in the figure. Then click [OK] in the pop-up prompt box, as shown in the figure. After that, the computer will restart and then enter the Diskgen hard disk partition interface. At this time, if we want to expand the C drive, we only need to right-click the D drive next to the logical partition and click "Adjust Partition Size" in the pop-up menu, as shown in the figure shown. Then you need to adjust the size of the D drive partition. For example, the current capacity of the D drive is 14.99GB, as shown in the figure below. At this time, we can adjust the installment of the D drive. For example, if we want to allocate 1.03GB to the C drive, we only need to allocate 1.03GB to the C drive.
 How to enter bios after assembling a computer? How to enter bios when assembling a computer?
May 07, 2024 am 09:13 AM
How to enter bios after assembling a computer? How to enter bios when assembling a computer?
May 07, 2024 am 09:13 AM
How to enter bios after assembling a computer? Before entering the BIOS, you need to make sure that the computer is completely shut down and powered off. Here are several common ways to enter the BIOS: 1. Use shortcut keys: Most computer manufacturers will display a prompt message at startup telling you which key to press to enter the BIOS settings. Usually the F2, F10, F12 or Delete key. After pressing the appropriate keys, you should be able to see a screen with information about your computer's hardware and BIOS settings. 2. Use the button on the motherboard: Some computer motherboards have a dedicated button for entering BIOS settings. This button is usually labeled "BIOS" or "UEFI". After pressing the button you should be able to see
 Huawei mobile phone USB sharing network to computer
May 08, 2024 am 08:25 AM
Huawei mobile phone USB sharing network to computer
May 08, 2024 am 08:25 AM
How to connect a Huawei phone to a computer via USB to access the Internet. First, we open the phone settings and search for "HDB". Then we click to open "Mobile Network Sharing" in More. Then we can click to open "USB Sharing Network" in the pop-up window. Summary First, connect the Huawei mobile phone to the computer through the data cable. Open "Settings" on your phone and enter the settings interface. Click "Personal Hotspot", select "USB tethering" and click the switch button at the back to turn it on. First click "Settings About Phone", then click "Version Number" 7 times in succession. You will be prompted to enter developer mode. Then return to the "Settings" list, "Developer Options" will appear, then click to enter "Developer Options", turn on the "USB Debugging" switch, and click
 MSI motherboard boot logo
May 08, 2024 pm 02:20 PM
MSI motherboard boot logo
May 08, 2024 pm 02:20 PM
How to cancel the MSI motherboard icon when booting 1. Press the DEL key when booting to enter the BIOS. Generally, in the "Advanced Features" item, you can find the words MSI motherboard LOGO screen. Select DISABLED, save and exit. There will no longer be this MSI motherboard LOGO screen when you turn on the computer in the future. MSI motherboard refers to the motherboard brand developed by MSI (MSI Technology Company). 2. The logo displayed when the computer is turned on is basically that of the motherboard manufacturer. You can set QUICKPOST to DISENABLE in the BIOS, so that the logo will generally no longer be displayed. It will display computer configuration-related information and give you more details. 3. First, teach you how to flash the BIOS in Windows environment. First: Go online
 How to enable tpm2.0 in win11_How to enable tpm2.0 in win11
May 08, 2024 pm 06:10 PM
How to enable tpm2.0 in win11_How to enable tpm2.0 in win11
May 08, 2024 pm 06:10 PM
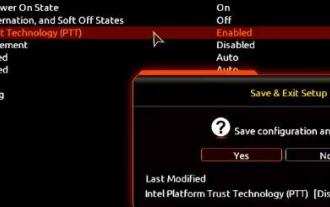
1. Gigabyte motherboard 1. First, we restart the computer and use the keyboard [DEL] to enter the BIOS settings when restarting. 2. Find and enter the [Settings] tab above. 3. Then find and enter [Miscellaneous] under settings. 4. Set [Intel Platform Trust Technology (PTT)] to [Enabled]. 5. After the settings are completed, use the keyboard [F10] to save, and then click [YES] to exit. 2. ASUS motherboard 1. First restart the computer and continuously tap [del] on the keyboard to enter the bios settings when booting. 2. Click [AdvancedMode] or press [F7] to find [A
 How to upgrade Gigabyte motherboard to Win11_How to upgrade Gigabyte motherboard to Win11
May 06, 2024 pm 12:04 PM
How to upgrade Gigabyte motherboard to Win11_How to upgrade Gigabyte motherboard to Win11
May 06, 2024 pm 12:04 PM
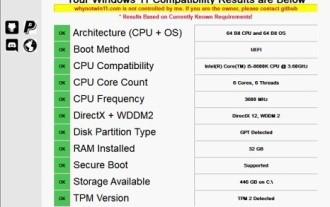
1. Win11 does not have very high requirements for the motherboard. You can first download healthcheck or whynotwin11 to check whether your other hardware devices support it (you can download it from this site). 2. If other conditions are met and only tpm does not meet the requirements, you can enable tpm in the bios settings. 3. Restart the system, and then press [DEL] on the keyboard to enter the BIOS settings when the logo pops up. 4. Enter the [Settings] option and [Miscellaneous] option in sequence. 5. Find [Intel Platform Trust Technology (PTT)] below and set it to [Start]. 6. If it is an AMD platform, then
 What is the appropriate temperature for playing Apex computer?
May 06, 2024 am 09:31 AM
What is the appropriate temperature for playing Apex computer?
May 06, 2024 am 09:31 AM
What is the appropriate temperature for playing Apex computer? 80 degrees is suitable. When running large-scale games or playing high-definition videos, the temperature can reach about 80°C. Generally, it is considered normal to not exceed 90°C under high load. Graphics cards are generally the hardware that generates the most heat among computer hardware. Generally, it is normal for the temperature of a graphics card to be around 30℃-80℃. Due to external temperature, it is normal for most graphics card temperatures to be between 50℃-85℃ in summer. range, if you are running large-scale 3D games or playing high-definition videos for a long time, the highest temperature may reach about 95°C. This temperature range will affect the life of the computer hardware. No matter how high the temperature is, you must consider strengthening heat dissipation and cleaning dust. How to play with the apex handle and the computer ? Method/step-by-step reading: 1. Use wired or wireless
