
 Computer Tutorials
Computer Knowledge
How to solve the problem that win11 fails to start correctly when booting
Computer Tutorials
Computer Knowledge
How to solve the problem that win11 fails to start correctly when booting
How to solve the problem that win11 fails to start correctly when booting

php editor Xinyi provides you with a solution to the problem that Win11 fails to start correctly. Win11 system is the latest operating system launched by Microsoft. Many users may encounter the problem of failing to start correctly after upgrading. This situation may be caused by hardware compatibility, driver issues, or system settings. Don’t worry, we will introduce you to several common solutions in detail in this article to help you solve the problem of Win11 failing to start correctly and get your computer back to normal operation. Whether it's a black screen, blue screen or other boot problems, you can find corresponding solutions to make your Win11 system run stably.
Win11 fails to start correctly when booting up Solution
Method 1: Uninstall new applications
If the computer does not start correctly after installing a new application, you can enter Uninstall them in safe mode to fix the problem.
1. Click Startup Settings in the Advanced Options window.
2. Press F4 in the startup settings window to enable safe mode.
3. After successfully entering the safe mode system, follow the normal process to uninstall the newly installed application.
Method Two: Perform a System Restore
Previously we mentioned that problems that may cause Windows to fail to start correctly are caused by third-party programs or recent hardware changes. Therefore, performing a system restore is one way to resolve computer startup issues.
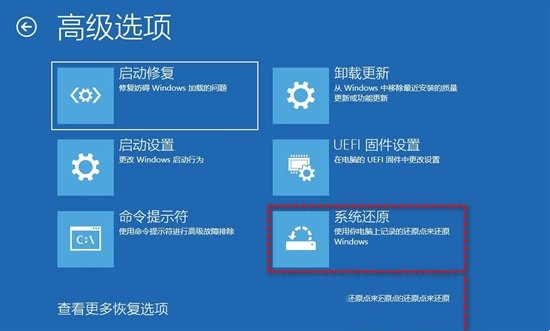
In the lower right corner of the blue screen interface, click the Advanced Options button or use the system installation CD to boot into the troubleshooting advanced options of Repair Computer Options.
2. Select System Restore in the Advanced Options window.
3. Follow the prompts to restore the system and check whether the problem has been solved.
Method Three: Perform Startup Repair
If the first two methods cannot solve the blue screen problem, you can also click Startup Repair in the Advanced Options window, It will scan your Windows computer and try to fix Windows11/10/8/7 not booting properly issue.
If you encounter a problem that Startup Repair cannot automatically repair this computer during the task, you can continue to try the next method.
Method 4: Run the SFC command
If your computer does not start correctly due to damaged system files, you can use the SFC command to scan and repair the damaged file system.
1. Click Command Prompt in the Advanced Options window.
2. Enter sfc/scannow in the command prompt window and press Enter to automatically scan and repair damaged system files.
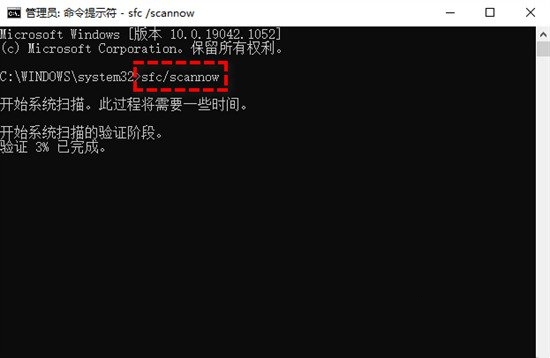
#3. After waiting for the progress to be completed, close the command prompt and restart the computer to check whether the blue screen problem has been resolved.
Method 5: Repair damaged boot configuration data (recommended)
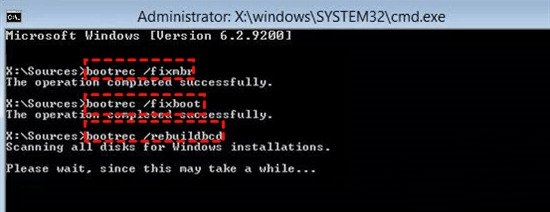
Many times, computer startup failure is caused by damage to the boot configuration data BCD file, so you can try to use bootrec. exe tool to repair BCD.
1. Click Command Prompt in the Advanced Options window.
2. Enter the following commands in sequence and press the Enter key after each line of commands to execute.
bootrec /fixmbr
bootrec /fixboot
bootrec /rebuildbcd
The above is the detailed content of How to solve the problem that win11 fails to start correctly when booting. For more information, please follow other related articles on the PHP Chinese website!

Hot AI Tools

Undresser.AI Undress
AI-powered app for creating realistic nude photos

AI Clothes Remover
Online AI tool for removing clothes from photos.

Undress AI Tool
Undress images for free

Clothoff.io
AI clothes remover

AI Hentai Generator
Generate AI Hentai for free.

Hot Article
Hot Tools

Notepad++7.3.1
Easy-to-use and free code editor

SublimeText3 Chinese version
Chinese version, very easy to use

Zend Studio 13.0.1
Powerful PHP integrated development environment

Dreamweaver CS6
Visual web development tools

SublimeText3 Mac version
God-level code editing software (SublimeText3)
Hot Topics


 How to install WinNTSetup into Win11 system_How to install WinNTSetup into Win11 system
May 08, 2024 am 11:19 AM
How to install WinNTSetup into Win11 system_How to install WinNTSetup into Win11 system
May 08, 2024 am 11:19 AM
First download the latest Win11 system ISO image, and then in Win10 system, you can directly right-click on the downloaded ISO image file and select [Load]; if it is under WinPE, WinXP, or Win7 system, you need to use the virtual optical drive tool to load the ISO Image; or you can directly decompress the ISO image file without using a virtual optical drive. Then run WinNTSetup. The software interface is as shown in the figure: First locate the location of the install.wim file. You can find the install.wim file in the sources directory of the Win11 ISO image loaded or decompressed by the virtual optical drive. Then set the location of the boot disk and installation disk. Generally, you are going to put W
 Tutorial on assembling a computer and installing a system? How to install win11 system when assembling a computer?
Apr 27, 2024 pm 03:38 PM
Tutorial on assembling a computer and installing a system? How to install win11 system when assembling a computer?
Apr 27, 2024 pm 03:38 PM
Tutorial on assembling a computer and installing a system? Nowadays, the system installation for assembling computers is very simple and convenient, and only requires a CD. First enter the bios settings, set the computer to boot first with the CD-ROM drive, then restart the computer and load the system CD into the CD-ROM drive. The CD will automatically enter the installation state. At this time, you only need to manually repartition the partitions, and the rest will be completed automatically. How to install win11 system when assembling a computer? 1. First, we need to download a win11 image file from this site before installing it. 2. The win11 image file has undergone a large number of professional tests to ensure stable installation and smooth operation. 3. After the download is completed, load the folder in the download path and run the "windowssetup" process in it.
 How to enter bios after assembling a computer? How to enter bios when assembling a computer?
May 07, 2024 am 09:13 AM
How to enter bios after assembling a computer? How to enter bios when assembling a computer?
May 07, 2024 am 09:13 AM
How to enter bios after assembling a computer? Before entering the BIOS, you need to make sure that the computer is completely shut down and powered off. Here are several common ways to enter the BIOS: 1. Use shortcut keys: Most computer manufacturers will display a prompt message at startup telling you which key to press to enter the BIOS settings. Usually the F2, F10, F12 or Delete key. After pressing the appropriate keys, you should be able to see a screen with information about your computer's hardware and BIOS settings. 2. Use the button on the motherboard: Some computer motherboards have a dedicated button for entering BIOS settings. This button is usually labeled "BIOS" or "UEFI". After pressing the button you should be able to see
 Reasons why Baidu Netdisk download failed 125201
Apr 30, 2024 pm 10:42 PM
Reasons why Baidu Netdisk download failed 125201
Apr 30, 2024 pm 10:42 PM
Baidu Netdisk download failed 125201 Error reason: Network problems: unstable/slow connection, router failure, busy server File problems: damaged/incomplete files, invalid links Baidu Netdisk restrictions: download limit exceeded, membership expiration/account restricted Browser/application issues: out-of-date version/poor compatibility, download manager failure System issues: viruses/malware, missing components/drivers
 How to install Windows system on tablet computer
May 03, 2024 pm 01:04 PM
How to install Windows system on tablet computer
May 03, 2024 pm 01:04 PM
How to flash the Windows system on BBK tablet? The first way is to install the system on the hard disk. As long as the computer system does not crash, you can enter the system and download things, you can use the computer hard drive to install the system. The method is as follows: Depending on your computer configuration, you can install the WIN7 operating system. We choose to download Xiaobai's one-click reinstallation system in vivopad to install it. First, select the system version suitable for your computer, and click "Install this system" to next step. Then we wait patiently for the installation resources to be downloaded, and then wait for the environment to be deployed and restarted. The steps to install win11 on vivopad are: first use the software to check whether win11 can be installed. After passing the system detection, enter the system settings. Select the Update & Security option there. Click
 3D drawing computer configuration and assembly recommendations?
May 04, 2024 am 09:34 AM
3D drawing computer configuration and assembly recommendations?
May 04, 2024 am 09:34 AM
3D drawing computer configuration and assembly recommendations? If used for 3D renderings, the laptop configuration requirements are as follows: 1. Operating system: Windows 7 (64-bit is recommended) 2. Memory: at least 2GB (4GB and above are recommended) 3. Graphics card: 1G of video memory and above, bit width 256bit or above, the video memory type is DDR3 or above, it is recommended to use NVIDIA brand graphics card (it is recommended to use professional graphics cards certified by solidworks: such as: NVIDIA Quadro series, ATI FireGL series or Firepro series) 4. CPU: Intel dual-core high frequency 64bit, it is recommended to use i5 series or i7 series, it is recommended that the CPU frequency is higher than 2.8GHz, in the center
 How to upgrade Win11 system on old computers_Tutorial on upgrading Win11 system on old computers
May 07, 2024 pm 08:07 PM
How to upgrade Win11 system on old computers_Tutorial on upgrading Win11 system on old computers
May 07, 2024 pm 08:07 PM
1. First we need to download the win11 image file. 2. Put the downloaded win11 image into another disk. 3. Then we find the win11 image file among the searched image files. 4. Then when we come to this interface, we select install.wim to proceed to the next step. 5. Then select the Windows 11 system and click OK to restore the image file. 6. Then we wait for pe to download and install. Wait patiently. After the download is completed, click restart according to the prompts. 7. Then come to this interface, we select the second xiaobaiPE. After selecting, the win11 system will be automatically installed for us. After the installation is completed, click to restart the computer immediately according to the prompts. 8. Finally, the system installation is completed, and we come to
 What you need to know when reinstalling the system from a USB flash drive: How to set up the BIOS correctly
May 06, 2024 pm 03:00 PM
What you need to know when reinstalling the system from a USB flash drive: How to set up the BIOS correctly
May 06, 2024 pm 03:00 PM
Reinstalling the system is a problem that many computer users often encounter. Whether it is due to system crash, poisoning or wanting to upgrade the system, reinstalling the system is a good choice. However, many people encounter various problems when reinstalling the system, such as not knowing how to set up the BIOS, not knowing how to choose a suitable installation disk, etc. Today, we will talk about some things you must know when reinstalling the system from a USB flash drive, and teach you how to set up the BIOS correctly and successfully complete the system reinstallation. Tool materials: System version: Windows1020H2 Brand model: Lenovo Xiaoxin Air14 Software version: Pocket machine One-click reinstallation of system software v1.0 1. Preparation 1. Prepare a U disk with a capacity of no less than 8GB, preferably USB3. 0, so the speed will be faster
