
 Computer Tutorials
Computer Knowledge
Tutorial to solve the problem of installing win11 system on Lenovo Tianyi laptop
Computer Tutorials
Computer Knowledge
Tutorial to solve the problem of installing win11 system on Lenovo Tianyi laptop
Tutorial to solve the problem of installing win11 system on Lenovo Tianyi laptop

php editor Xigua brings you a tutorial on how to solve the problem of unable to install win11 on Lenovo Tianyi laptop. As the latest operating system launched by Microsoft, win11 brings many new features and improvements, but it also faces some compatibility issues. If you encounter the problem of being unable to install win11 on your Lenovo Tianyi laptop, don't worry, this tutorial will teach you how to solve this problem, so that you can smoothly experience the full charm of win11!

#1. Check the CD-ROM drive and CD-ROM
First of all, you need to check whether the CD-ROM drive and CD-ROM of the Lenovo notebook are normal. Make sure the optical drive can read the disc properly and check whether the disc is damaged or stained. You can try inserting the CD into another computer to test and confirm whether the system can be installed normally.
2. Check the BIOS settings
If there is no problem with the optical drive and CD, check the BIOS settings of the Lenovo notebook. Make sure the CD-ROM drive is set as the first startup item to ensure that the system installation program can start normally.
In addition to checking the boot mode, it is also recommended that you ensure that the Secure Boot option is disabled in the BIOS. Sometimes, enabling Secure Boot may prevent certain operating systems or software from installing correctly. After disabling Secure Boot, restart Setup to try to resolve the issue.
3. Computer hardware problems
If the computer has too much dust, the hardware contact will be poor, or the internal components of the machine may be loose, which may cause reinstallation failure.
Solution: Pay attention to the need to detect and troubleshoot the status of each hardware one by one, etc.
4. Contact after-sales service
If the above operations do not solve the problem, you can contact Lenovo notebook after-sales service. There may be hardware problems or other problems that require professional technicians to check and repair.
5. Try U disk installation
If there is no problem with the optical drive and CD, you can try to use U disk to install the system. This requires making a bootable USB flash drive from another computer and inserting the USB flash drive into the Lenovo laptop to start the installation program. If the installation can be performed normally, there may be a problem with the optical drive and needs to be replaced or repaired.
Recommended system 1: Lenovo savior Win11 permanently activates the pure version x64 V2023
Lenovo savior Win11 permanently activates the pure version x64 V2023 uses the latest intelligent technology to optimize and streamline, ensuring The system is safe and non-toxic, with optimized startup items and self-starting services to speed up power on and off. Integrate a universal driver version and use driver intelligent identification technology to greatly reduce the chance of a blue screen caused by misinstallation of the driver. The system interface is very refreshing and is automatically activated after installation.
Recommended system 2: Win11 64-bit Lenovo ome Professional Edition ISO V2023
Win11 64-bit Lenovo oem Professional Edition ISO system this This system has been greatly optimized and upgraded visually or in terms of performance. It has strong compatibility and is very fast and smooth to operate. It can make decisions for all diseases. In addition, the system settings are very detailed and bring about a unique experience. It is worthy of trust. Provides different computer operating system experiences.

Recommended system 3: System Home Win11 newly upgraded pure version x64 V2023
System Home Win11 newly upgraded pure version x64 V2023 is a newly launched and upgraded windows operating system. Carefully optimized system, moderately lightweight and streamlined, with a new UI interface, optimized start menu, taskbar, icons and program interface, the system runs faster and more stable, and supports 99% of the models on the market.
The above is the detailed content of Tutorial to solve the problem of installing win11 system on Lenovo Tianyi laptop. For more information, please follow other related articles on the PHP Chinese website!

Hot AI Tools

Undresser.AI Undress
AI-powered app for creating realistic nude photos

AI Clothes Remover
Online AI tool for removing clothes from photos.

Undress AI Tool
Undress images for free

Clothoff.io
AI clothes remover

Video Face Swap
Swap faces in any video effortlessly with our completely free AI face swap tool!

Hot Article
Hot Tools

Notepad++7.3.1
Easy-to-use and free code editor

SublimeText3 Chinese version
Chinese version, very easy to use

Zend Studio 13.0.1
Powerful PHP integrated development environment

Dreamweaver CS6
Visual web development tools

SublimeText3 Mac version
God-level code editing software (SublimeText3)
Hot Topics
 1386
1386
 52
52

 How to connect PS4 controller in Win11_Operation steps to match PS4 controller in Win11
May 08, 2024 pm 03:01 PM
How to connect PS4 controller in Win11_Operation steps to match PS4 controller in Win11
May 08, 2024 pm 03:01 PM
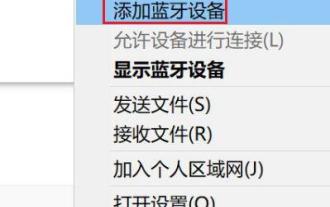
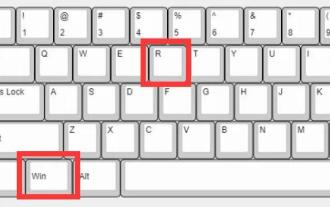
1. First enter the win11 system, right-click the Bluetooth icon in the lower right corner and select [Add Bluetooth Device]. 2. Then enter the device interface and click [Add Bluetooth or other devices] to enter. 3. In the added device interface, click the Bluetooth option to enter. 4. Then use the controller, press and hold the SHARE button and PS4 button on the controller when it is turned off and not connected to the computer. It only takes about 5 seconds for the indicator light behind the controller to start flashing quickly to enter the pairing state. 5. Finally, you can search for the PS4 controller Bluetooth device on the computer's Add Device interface, and click WirelessController to pair it.
 How to install WinNTSetup into Win11 system_How to install WinNTSetup into Win11 system
May 08, 2024 am 11:19 AM
How to install WinNTSetup into Win11 system_How to install WinNTSetup into Win11 system
May 08, 2024 am 11:19 AM
First download the latest Win11 system ISO image, and then in Win10 system, you can directly right-click on the downloaded ISO image file and select [Load]; if it is under WinPE, WinXP, or Win7 system, you need to use the virtual optical drive tool to load the ISO Image; or you can directly decompress the ISO image file without using a virtual optical drive. Then run WinNTSetup. The software interface is as shown in the figure: First locate the location of the install.wim file. You can find the install.wim file in the sources directory of the Win11 ISO image loaded or decompressed by the virtual optical drive. Then set the location of the boot disk and installation disk. Generally, you are going to put W
 How to change the win11 system interface to the classic version? Share how to change the win11 system interface to the classic version
May 09, 2024 pm 02:19 PM
How to change the win11 system interface to the classic version? Share how to change the win11 system interface to the classic version
May 09, 2024 pm 02:19 PM
Win11 has designed a new modern user interface, providing new interactions and appearances. However, many users still prefer the classic version of the desktop, so how should they be changed to the classic version? Let’s take a look below! 1. Adjust the taskbar: - Right-click the taskbar and select Taskbar Settings. -In the taskbar settings, you have the option to change the taskbar position to the bottom and adjust the size of the taskbar icons. - There is also the option to hide the task view button, task view and the new notification center. Also available: Xiaozhi Eye Protector. Quickly beautify the taskbar and experience a different desktop. 2. Adjust the start menu: - Right-click the start button on the taskbar and select Start button settings. -In the start button settings you can choose to set the start menu style to classic which will
 MSI motherboard boot logo
May 08, 2024 pm 02:20 PM
MSI motherboard boot logo
May 08, 2024 pm 02:20 PM
How to cancel the MSI motherboard icon when booting 1. Press the DEL key when booting to enter the BIOS. Generally, in the "Advanced Features" item, you can find the words MSI motherboard LOGO screen. Select DISABLED, save and exit. There will no longer be this MSI motherboard LOGO screen when you turn on the computer in the future. MSI motherboard refers to the motherboard brand developed by MSI (MSI Technology Company). 2. The logo displayed when the computer is turned on is basically that of the motherboard manufacturer. You can set QUICKPOST to DISENABLE in the BIOS, so that the logo will generally no longer be displayed. It will display computer configuration-related information and give you more details. 3. First, teach you how to flash the BIOS in Windows environment. First: Go online
 How to solve the problem that disk management cannot be opened in win11 system? Win11 disk management cannot be opened solution
May 07, 2024 pm 05:01 PM
How to solve the problem that disk management cannot be opened in win11 system? Win11 disk management cannot be opened solution
May 07, 2024 pm 05:01 PM
We need to use disk management to perform formatting, partitioning, etc. Recently, many win11 users have reported that their computer disk management cannot be opened. This situation is usually because the corresponding function is turned off by group policy. , so access cannot be opened. As long as it is set to not configured, it can be started successfully. In order to facilitate the operation of the majority of users, today's win11 tutorial will bring you detailed operation steps. Let's take a look at the complete method. What to do if Disk Management cannot be opened in Win11 system 1. First press Win+R on the keyboard to open Run. 3. Then go to User Configuration - Administrative Templates - Windows Components on the left. 5. Then double-click to open the disk management option.
 How to upgrade Win11 system on old computers_Tutorial on upgrading Win11 system on old computers
May 07, 2024 pm 08:07 PM
How to upgrade Win11 system on old computers_Tutorial on upgrading Win11 system on old computers
May 07, 2024 pm 08:07 PM
1. First we need to download the win11 image file. 2. Put the downloaded win11 image into another disk. 3. Then we find the win11 image file among the searched image files. 4. Then when we come to this interface, we select install.wim to proceed to the next step. 5. Then select the Windows 11 system and click OK to restore the image file. 6. Then we wait for pe to download and install. Wait patiently. After the download is completed, click restart according to the prompts. 7. Then come to this interface, we select the second xiaobaiPE. After selecting, the win11 system will be automatically installed for us. After the installation is completed, click to restart the computer immediately according to the prompts. 8. Finally, the system installation is completed, and we come to
 How to enable tpm2.0 in win11_How to enable tpm2.0 in win11
May 08, 2024 pm 06:10 PM
How to enable tpm2.0 in win11_How to enable tpm2.0 in win11
May 08, 2024 pm 06:10 PM
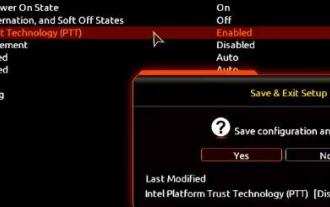
1. Gigabyte motherboard 1. First, we restart the computer and use the keyboard [DEL] to enter the BIOS settings when restarting. 2. Find and enter the [Settings] tab above. 3. Then find and enter [Miscellaneous] under settings. 4. Set [Intel Platform Trust Technology (PTT)] to [Enabled]. 5. After the settings are completed, use the keyboard [F10] to save, and then click [YES] to exit. 2. ASUS motherboard 1. First restart the computer and continuously tap [del] on the keyboard to enter the bios settings when booting. 2. Click [AdvancedMode] or press [F7] to find [A
 How to assemble an acer desktop computer?
May 08, 2024 pm 08:25 PM
How to assemble an acer desktop computer?
May 08, 2024 pm 08:25 PM
How to assemble an acer desktop computer? The assembly method of Acer desktop computer is as follows: open the case, install the power supply into the case, and tighten the screws. Install the CPU onto the motherboard, making sure the pins on the CPU are aligned with the slots on the motherboard, and tighten the screws on the CPU heat sink. Install the memory module onto the motherboard, making sure that the bumps on the memory module are aligned with the slots on the motherboard. Press down hard until you hear a "pop" sound to complete the installation. Install graphics cards, sound cards, network cards and other boards onto the motherboard, making sure the screws on the boards are tightened. Install storage devices such as hard drives and optical drives into the chassis, making sure the screws are tightened. Connect the motherboard to the chassis, including power cables, hard drive cables, optical drive cables, etc. Finally, close the chassis cover and tighten the screws to complete the assembly. exist
