

Microsoft launches 24 exquisite themes for its edge browser

What are the 24 exquisite themes Microsoft has launched for its edge browser? Recently, Microsoft launched 24 exquisite themes for its browser Edge. Microsoft says these themes can "create beautiful and immersive visual experiences," and more will be added to the Edge add-on store soon.
Users can apply different themes to each profile according to their own preferences for use in different scenarios. In addition to the "Wonder Woman 1984" theme, the Microsoft Store also provides a variety of other themes for Edge browsers, including "Halo", "Microsoft Flight Simulator", "Forza Horizon 4", "Gears 5", "Sea of Thieves" ”, “Ori” and “WilloftheWisps” etc. These themes provide users with a diverse browser interface, making their experience more personalized and rich.
The following is the theme list:
●Halo
●WanderingFields
●TheMist-SeaofThievestheme
●SatinStacks
●WonderWoman1984Theme
●MicrosoftFlightSimulator–OceanFlight
●Halo–AlphaHalo
●FortuneIsland–ForzaHorizon4theme
●TheForest-OriandWilloftheWispstheme
● Grounded-GroundWar
●Halo-GhostsofReach
●TheMegalodon
●GearsxLukePreece-Gears5theme
●MicrosoftFlightSimulator–Mt.Fuji
Swallow 'sNest-OriandWilloftheWispstheme
VerdantViews
MicrosoftFlightSimulator–TwilightVista
SteampunkOmen–GearsTacticstheme
SpiritWillow-OriandWilloftheWispstheme
Howl–
WinterHorizon
ShipsofFortune
Halo–Arrival
GoldHoarder
Edge Add-on Store Installation Theme Method:
1. Start Edge Browser
2. Add-ons-Themes
3. Browse all themes and click the "Get" button when you find one you are satisfied with.
4. Further, click the "Add Theme" button to install the theme in the Edge browser.
5. Then the appearance of the tab bar and toolbar will be switched to the theme-defined design, and the new tab wallpaper will be replaced with the custom theme just installed.
Uninstall the Edge theme:
Visit Settings > Appearance and click the delete button under the "Custom Theme" you want to delete.
The above is the detailed content of Microsoft launches 24 exquisite themes for its edge browser. For more information, please follow other related articles on the PHP Chinese website!

Hot AI Tools

Undresser.AI Undress
AI-powered app for creating realistic nude photos

AI Clothes Remover
Online AI tool for removing clothes from photos.

Undress AI Tool
Undress images for free

Clothoff.io
AI clothes remover

Video Face Swap
Swap faces in any video effortlessly with our completely free AI face swap tool!

Hot Article
Hot Tools

Notepad++7.3.1
Easy-to-use and free code editor

SublimeText3 Chinese version
Chinese version, very easy to use

Zend Studio 13.0.1
Powerful PHP integrated development environment

Dreamweaver CS6
Visual web development tools

SublimeText3 Mac version
God-level code editing software (SublimeText3)
Hot Topics
 1386
1386
 52
52

 How to set up microsoft edge autofill_microsoft edge autofill setting tutorial
May 09, 2024 pm 01:22 PM
How to set up microsoft edge autofill_microsoft edge autofill setting tutorial
May 09, 2024 pm 01:22 PM
1. First open Microsoft Edge, click the [...] button, and then click the [Settings] option button. 2. Then click the [Password and Autofill] button. 3. The last step is the Microsoft Edge auto-fill setting area.
 How to enable microphone permission in Edge browser How to enable microphone permission
May 09, 2024 pm 04:40 PM
How to enable microphone permission in Edge browser How to enable microphone permission
May 09, 2024 pm 04:40 PM
1. First, click Start, right-click and select [Microsoft Edge]. 2. Then, click [More] to open [App Settings]. 3. Next, find and enter [Application Permissions]. 4. Then, find [Microphone] in the permissions below. 5. Finally, turn on the switch behind the microphone.
 What to do if there is no sound in Edge browser What to do if there is no sound in Edge browser
May 09, 2024 pm 12:30 PM
What to do if there is no sound in Edge browser What to do if there is no sound in Edge browser
May 09, 2024 pm 12:30 PM
1. First, right-click the volume in the lower right corner and click [Open Volume Mix]. 2. Then, click the small speaker under the speaker to turn it off. 3. Again, click on the small speaker to open it, and then restart the computer. Solution 2: 1. First, right-click the volume in the lower right corner and click [Playback Device]. 2. Then, right-click the device in the list in the interface and [Disable] all devices. 3. After that, enable the applications one by one, click [OK] to restart the computer.
 What should I do if the Edge browser shows that the site is unsafe?
May 09, 2024 am 11:07 AM
What should I do if the Edge browser shows that the site is unsafe?
May 09, 2024 am 11:07 AM
1. First, open the Edge browser and click on the three dots in the upper right corner. 2. Then, click [Settings] in the taskbar. 3. Next, click [Privacy and Security] on the left taskbar. 4. Finally, pull down to the bottom and turn off [Windows Defender Smart Screen].
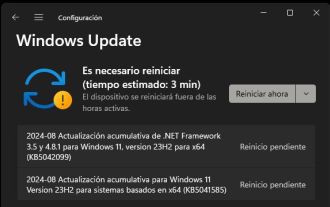 Microsoft releases Win11 August cumulative update: improving security, optimizing lock screen, etc.
Aug 14, 2024 am 10:39 AM
Microsoft releases Win11 August cumulative update: improving security, optimizing lock screen, etc.
Aug 14, 2024 am 10:39 AM
According to news from this site on August 14, during today’s August Patch Tuesday event day, Microsoft released cumulative updates for Windows 11 systems, including the KB5041585 update for 22H2 and 23H2, and the KB5041592 update for 21H2. After the above-mentioned equipment is installed with the August cumulative update, the version number changes attached to this site are as follows: After the installation of the 21H2 equipment, the version number increased to Build22000.314722H2. After the installation of the equipment, the version number increased to Build22621.403723H2. After the installation of the equipment, the version number increased to Build22631.4037. The main contents of the KB5041585 update for Windows 1121H2 are as follows: Improvement: Improved
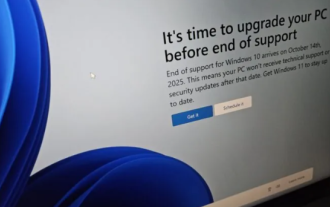 Microsoft's full-screen pop-up urges Windows 10 users to hurry up and upgrade to Windows 11
Jun 06, 2024 am 11:35 AM
Microsoft's full-screen pop-up urges Windows 10 users to hurry up and upgrade to Windows 11
Jun 06, 2024 am 11:35 AM
According to news on June 3, Microsoft is actively sending full-screen notifications to all Windows 10 users to encourage them to upgrade to the Windows 11 operating system. This move involves devices whose hardware configurations do not support the new system. Since 2015, Windows 10 has occupied nearly 70% of the market share, firmly establishing its dominance as the Windows operating system. However, the market share far exceeds the 82% market share, and the market share far exceeds that of Windows 11, which will be released in 2021. Although Windows 11 has been launched for nearly three years, its market penetration is still slow. Microsoft has announced that it will terminate technical support for Windows 10 after October 14, 2025 in order to focus more on
 What to do if the Edge browser takes up too much memory What to do if the Edge browser takes up too much memory
May 09, 2024 am 11:10 AM
What to do if the Edge browser takes up too much memory What to do if the Edge browser takes up too much memory
May 09, 2024 am 11:10 AM
1. First, enter the Edge browser and click the three dots in the upper right corner. 2. Then, select [Extensions] in the taskbar. 3. Next, close or uninstall the plug-ins you do not need.
 How to reset Microsoft Edge browser_Microsoft Edge browser reset tutorial
May 09, 2024 pm 02:19 PM
How to reset Microsoft Edge browser_Microsoft Edge browser reset tutorial
May 09, 2024 pm 02:19 PM
Step 1: Open the Microsoft Edge browser (as shown in the picture). Step 2: Click the three-dot icon in the upper right corner of the browser window (as shown in the picture). Step 3: In the drop-down menu that appears, select Settings (as shown in the picture). Step 4: Then click Reset Settings (as shown in the picture). Step 5: Under [Reset Settings], click to restore the settings to their default values (as shown in the picture). Step 6: When prompted, click the [Reset] button (as shown in the picture).
