

macqq shortcut key settings?

php editor Yuzai introduces macqq shortcut key settings to everyone. When using QQ on a Mac system, understanding and setting shortcut keys can improve work efficiency. By setting shortcut keys, we can quickly send messages, switch conversation windows, search chat records, etc., eliminating the tedious steps of mouse clicks. When using MacQQ, we can customize shortcut keys according to our own usage habits and needs to make operations more convenient and faster. Next, let’s take a closer look at the methods and steps for setting macqq shortcut keys.
How to take a screenshot of Apple computer QQ? Where to set the shortcut key for Mac computer QQ screenshot
First we open a QQ chat window at will, then we display QQ in the navigation bar in the upper left corner of the Mac OS system various functional interfaces.
The first step is to open a chat window and let the navigation bar in the upper left corner of the Mac OS system display the QQ functional interface.
The shortcut key to capture full screen is Shift Command 3. Press this key combination to directly save the computer screenshot on the desktop. And if you want to take a screenshot of a specific window, you can use Shift Command 4 and then press the space bar to take a screenshot.
After opening Snip, you can set the Snip properties in the icon in the upper right corner of the computer screen. After clicking the scissors icon, select "Preferences" to set the shortcut key for taking screenshots. The default screenshot shortcut key is Control Command A key.
First of all, opening the QQ software and logging in to your QQ account is a critical step.
How to take screenshots of the mac version of QQ?
The first step is to open a chat window and let the navigation bar in the upper left corner of the Mac OS system display the QQ functional interface.
The system’s built-in screenshot function is very convenient. Just press shift command 3 at the same time and you will hear a "click", indicating that the screenshot is successful. The captured pictures will be saved directly on the macbook's desktop.
In the Apple computer desktop, click the qq icon. Select Preferences and set a screenshot shortcut.

How to set the shortcut key for QQ "Open Contacts" on Apple MAC computer
1. First turn on the computer, find the QQ icon, and open it. After logging in to the main page, click the QQ icon above. In the menu that opens, select the Preferences option. In the preferences page that opens, switch to the chat option at the top.
2. First open the computer and enter the desktop, then find the QQ icon and click to open it. After entering the QQ software interface, we click on the application option at the top of the interface. Then we click on the application settings option at the bottom of the pop-up menu. After entering the application settings window, we click on the chat option at the top of the window.
3. First open QQ on your computer. After entering the QQ page, click the QQ icon above. In the menu that opens, select the Preferences option. In the preferences page that opens, click General Options at the top.
4. The first step is to turn on the computer and find the QQ icon on the desktop, click to open it. In the second step, after opening QQ, click the QQ option in the upper left corner. The third step is to click the Preferences option in the pop-up menu. Step 4: After opening the preference window, click the function option above.
Conclusion: The above is a summary of the answers related to macqq shortcut key settings compiled by this site for you. I hope it will be helpful to you! If your problem is solved, please share it with more friends who care about this problem~
The above is the detailed content of macqq shortcut key settings?. For more information, please follow other related articles on the PHP Chinese website!

Hot AI Tools

Undresser.AI Undress
AI-powered app for creating realistic nude photos

AI Clothes Remover
Online AI tool for removing clothes from photos.

Undress AI Tool
Undress images for free

Clothoff.io
AI clothes remover

AI Hentai Generator
Generate AI Hentai for free.

Hot Article
Hot Tools

Notepad++7.3.1
Easy-to-use and free code editor

SublimeText3 Chinese version
Chinese version, very easy to use

Zend Studio 13.0.1
Powerful PHP integrated development environment

Dreamweaver CS6
Visual web development tools

SublimeText3 Mac version
God-level code editing software (SublimeText3)
Hot Topics
 1378
1378
 52
52

 How to correct the yellowing of the computer screen
Apr 30, 2024 am 08:58 AM
How to correct the yellowing of the computer screen
Apr 30, 2024 am 08:58 AM
How to adjust the computer screen when it turns yellow? 1. Move the slider in the window to adjust the screen color, and the problem is solved. The method may be caused by a problem with the monitor data cable or poor contact. You can check whether the interface is loose and then replace the connection cable with a new one. 2. Click the Windows icon in the lower left corner of the computer, and then click Settings. In the settings interface, click System. Select Display, click Advanced display settings, and that's it. First open the control panel. 3. Move the slider in the window to adjust the gamma value. Finally, move the slider in the window to adjust the screen color and the problem is solved. Why does the computer screen turn yellow? It is relatively rare that the computer screen turns yellow due to a malfunction of the graphics card itself. It is recommended to have it checked for maintenance. Monitor display mode problem some display
 A simple way to set up automatic line wrapping with Beyond Compare
Apr 22, 2024 pm 01:04 PM
A simple way to set up automatic line wrapping with Beyond Compare
Apr 22, 2024 pm 01:04 PM
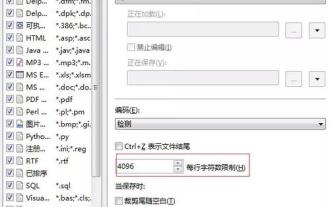
In fact, BeyondCompare does not support automatic line wrapping. In the new version BeyondCompare4, you can limit the characters of each line of the file to achieve the purpose of automatic line wrapping for easy modification. You can follow the steps below: Click: Tools (T) in the menu bar, then select: File Format (F) in the pop-up list; find 'Characters per line' in the [Convert] tab on the right side of the pop-up box For the word "limit", modify the previous value (the default is 4096) and save it. Generally, it can be set to 80 to 90 or more. Of course, in BeyondCompare, you can also consider other ways to slightly improve it. The solution is as follows: Solution 1: Temporarily switch to the upper and lower layout. Select under the [View] menu
 How many centimeters is an 8-inch tablet?
Apr 22, 2024 pm 04:25 PM
How many centimeters is an 8-inch tablet?
Apr 22, 2024 pm 04:25 PM
How big is an eight-inch tablet? 1. The size of an 8-inch tablet is 32 cm; the size of a 9-inch tablet is 286 cm; the size of a 7-inch tablet is 2638 cm; and the size of a 10-inch tablet is 24 cm. 2. The aspect ratio of a 2-inch tablet computer is 16:9, so the screen length and width are 32 cm and 11 cm respectively. The so-called 8-inch tablet computer refers to the size of the screen, not the size of the overall machine. The 8-inch screen size refers to the diagonal length of the screen. 1 inch is equal to 54 centimeters, so 8 inches is equal to 32 centimeters. 3. The eight-inch tablet is 128 cm long and 80 cm wide. An eight-inch tablet refers to a tablet with a screen diagonal length of 8 inches. Based on the common screen aspect ratio of 16:10, it can be calculated that its length is approximately 128 cm.
 How to disable automatic backup in Windows 10
Apr 18, 2024 pm 07:49 PM
How to disable automatic backup in Windows 10
Apr 18, 2024 pm 07:49 PM
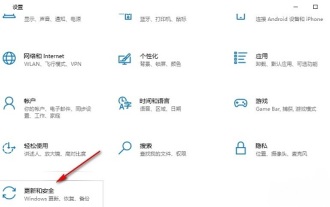
Some Windows 10 users have found that the system's built-in automatic backup function is activated during use. Although this function helps ensure data security, some users may not feel the need to continue enabling it due to storage space considerations or other reasons. This function. Therefore, if you want to turn off the automatic backup function in Windows 10 system, the correct operation steps are particularly important. Next, this article will introduce in detail how to turn off the automatic backup function of the Win10 system for the reference implementation of users who have this need. Close method 1. Use the "win+i" shortcut key to quickly open the "Settings" page. After entering the new page, you need to click the "Update and Security" option. 2. In the new interface that opens, click in the left column
 Laptop has mouse arrows but black screen
Apr 10, 2024 pm 01:20 PM
Laptop has mouse arrows but black screen
Apr 10, 2024 pm 01:20 PM
After turning on the laptop, the screen goes black and there is nothing on the desktop. There is no icon, only a mouse arrow... Damage to the picture tube or line output circuit. Failure of the picture tube or line output circuit will also cause a black screen without raster when the monitor is powered on. It is also the main cause of a black screen after the notebook is turned on. Sometimes the inability to boot is caused by a short circuit in some components, such as external USB devices, keyboards, mice, or power adapters. Try unplugging these devices and booting with only the battery installed to see if you can enter the BIOS. some type of. A black screen may occur when the computer starts up because the motherboard, monitor and graphics card in the computer are damaged, or the computer configuration is too old. This phenomenon may also occur. Most of the reasons are caused by process errors.
 How to hide or turn off the taskbar volume icon in Windows 10
Apr 15, 2024 pm 05:19 PM
How to hide or turn off the taskbar volume icon in Windows 10
Apr 15, 2024 pm 05:19 PM
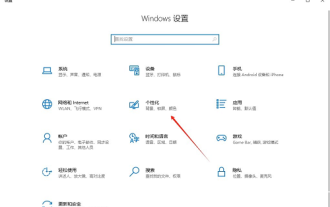
In the Windows 10 operating system, the taskbar usually displays an intuitive volume icon under default settings, allowing users to adjust the system volume at any time. Some friends hope to turn off or hide this volume control icon due to personal preference or interface simplicity. The following is a detailed operation plan for everyone, let’s take a look. Close method 1. Use the "win+i" shortcut key to open the "Settings" interface. After entering the "Settings" interface, you need to click the "Personalization" option. 2. In the new interface that opens, you need to click the "Taskbar" option in the left column. 3. Then click "Select which icons appear on the taskbar" in the "Notification Area" on the right. 4. Then find the "Volume", and finally click the switch button on the right.
 How to adjust the computer screen if it is a bit yellow?
Apr 11, 2024 pm 01:46 PM
How to adjust the computer screen if it is a bit yellow?
Apr 11, 2024 pm 01:46 PM
The computer screen is a little yellowish. What's going on? The computer screen may be a little yellowish due to a variety of reasons. The following are some common solutions: Adjust the screen color mode: You can select it through the display menu of the monitor or the display settings of the computer operating system. Suitable color mode, such as RGB mode or sRGB mode. Monitor color temperature setting problem: If the monitor color temperature is set too high, the screen will appear yellowish, so the color temperature setting needs to be adjusted. At this time, you need to enter the display settings of the computer, find the color temperature option, and adjust it to the appropriate value. Graphics card driver problem: There may be a problem with the graphics card driver, causing the screen to display abnormally. If the score is very low, it means there is a problem with the graphics card, and you need to find a professional to identify and replace the graphics card. How yellow is the computer screen?
 Laptop external monitor cannot go full screen
Apr 19, 2024 pm 04:16 PM
Laptop external monitor cannot go full screen
Apr 19, 2024 pm 04:16 PM
What to do if the laptop screen is not full screen? Steps: 1. Turn on the computer, right-click on the desktop and click the "Display Settings" option. Adjust the resolution so that the monitor fills the entire screen. If you don't want to change the current resolution, click "Advanced display settings". In the interface, find and click the "Display Adapter Properties for Monitor 1" option. If the computer monitor cannot display in full screen, it may be because the screen resolution setting is incorrect, or the monitor OSD setting is wrong. You can correct the settings to restore full screen display. The specific operation method is as follows: Set the screen resolution correctly (taking WIN7 as an example): right-click a blank space on the desktop and select "Screen Resolution". Adjust the resolution so that the monitor fills the entire screen. If you don't want to change the current resolution, click "Advanced display settings". In the interface, find and click "
