

Asus case fan speed setting?

php Xiaobian Youzi teaches you how to set the speed of the ASUS case fan. The speed setting of the chassis fan is very important for the cooling effect and noise control of the computer. Most ASUS chassis fans support software control. Through ASUS AI Suite or BIOS settings, you can easily adjust the fan speed to achieve the best cooling effect and noise control. Let’s take a closer look at the specific settings.

Asus case fan setting speed?
The method to adjust the fan speed is as follows:
Turn on the computer, and then press the Del key on the right small keyboard continuously. The system will enter the BIOS settings.
Then press the up and down keys. Use the arrow keys to select PC Health Status,
where CPU Smart Fan Control is the fan speed adjustment, and selecting enabled is to turn on the speed adjustment function.
Set CPU Target Temp=50 degrees, CPU Tolerance Temp=5 degrees, CPU Fan Stop PWM(%)=30%; save the settings, restart the computer and enter the BIOS again, check "PC Health Status" .
Looking carefully at the fan value, it is obvious that the Observer CPU smart fan function has taken effect.
Change the setting again: CPU Fan Stop PWM(%)=10%, save it and then enter the BIOS.
The CPU fan speed has dropped to more than 1300 rpm.
Continue to change the settings: CPU Fan Stop PWM(%)=60%, save and then enter the BIOS,
The CPU fan speed drops to about 2200 rpm.
After the temperature drops to 45 degrees, the lower limit of the 45~55 degree range, the CPU speed begins to automatically decrease.
How to adjust the fan speed of ASUS Heavy Gunner?
ASUS Heavy Gunner fan speed can be adjusted through the following steps: 1. Enter the BIOS setup interface.
After starting the computer, press the F2 key or DEL key to enter the BIOS setting interface.
2. Find the fan setting options.
In the BIOS setup interface, find the Advanced option -> Monitor -> Fan Speed Control or similar options.
3. Adjust the fan speed.
In the fan setting options, you can choose to manually control the fan speed. Just adjust the fan speed value as needed.
4. Save settings and exit BIOS.
After the settings are completed, press the F10 key to save the settings and exit the BIOS. Note: When adjusting the fan speed, please be careful not to set it too high, otherwise it will cause damage to the fan and computer hardware. At the same time, when using a computer, you should also pay more attention to heat dissipation issues to prevent the computer from overheating.
How to adjust the fan speed on Asus Fubuki motherboard?
1 You can adjust the fan speed by adjusting BIOS settings or using the official optimization tool provided by ASUS. 2 The reason for adjusting the fan speed is to better control the temperature of the CPU and GPU and improve the stability and performance of the computer. 3 In the BIOS settings, you can enter the fan control option, choose to manually adjust the fan speed, and set the corresponding speed as needed. When using the ASUS official optimization tool, you can also adjust the fan speed by setting the fan mode to achieve the best cooling effect. At the same time, it should be noted that the fan speed should be adjusted appropriately according to different usage scenarios to avoid problems such as overheating or overcooling.
How to adjust the ASUS motherboard fan speed automatically?
First of all, make sure your fan is a 4-pin fan, and then you need to enable the Q-fan function in the BIOS. There are two Q-fan options: automatic and manual. Automatic adjustment can generally meet ordinary mute requirements. You can Choose manual adjustment. Summer is coming and the temperature will be relatively high. You can set the starting temperature to 40°C and the starting speed to 20% (this value is only a relative value. You have to try it based on the fan. Some fans may be 20% It only has a few hundred revolutions, some may have 2 to 3000 revolutions, try to find a satisfactory speed), and the maximum temperature is 60 degrees Celsius. Asus' bios generally requires pressing the F2 or delete key when starting up, and pay attention to the boot prompts. In addition, I would like to recommend you a fan adjustment software for Windows, speedfan. It is a very powerful software that takes up little memory and can adjust CPU fans, graphics card fans, host fans, etc., with free settings. Much more powerful than Q-fan.
Hope my answer is useful to you.
In addition, you can refer to the following points: 1. Install a speed regulating cable, which is an extension cable with a resistor in the middle. It is used to slow down the fan speed and cannot increase the speed.
2. Install a speed control switch. Some have a speed control knob on the speed control line, and some knobs can be installed on the back panel or optical drive panel.
3. If your motherboard supports PWM For 4Pin smart temperature control and speed-adjustable plugs, you only need to use the corresponding 4-pin plug smart temperature-control and speed-adjustable fan, and its speed is determined by the actual temperature of the CPU. Provides speed adjustment in real time.
4. Set the fan speed in the BIOS. This setting option is not provided by all motherboard BIOSes. You need to check whether your motherboard manual supports it.
ASUS motherboard: Fan speed adjustment?
Asus motherboard can set the CPU fan speed in the Monitor option in the BIOS. The specific setting steps are as follows:
1. After booting, press "DEL" or "F2" to enter the BIOS;
2. Use the right arrow key on the keyboard to select Monitor;
3. The CPU FAN Speed option under the Monitor tab is the setting of the CPU fan speed. After the settings are completed, click the F10 key to save the settings in the BIOS, and the machine will automatically restart.
The above is the detailed content of Asus case fan speed setting?. For more information, please follow other related articles on the PHP Chinese website!

Hot AI Tools

Undresser.AI Undress
AI-powered app for creating realistic nude photos

AI Clothes Remover
Online AI tool for removing clothes from photos.

Undress AI Tool
Undress images for free

Clothoff.io
AI clothes remover

AI Hentai Generator
Generate AI Hentai for free.

Hot Article
Hot Tools

Notepad++7.3.1
Easy-to-use and free code editor

SublimeText3 Chinese version
Chinese version, very easy to use

Zend Studio 13.0.1
Powerful PHP integrated development environment

Dreamweaver CS6
Visual web development tools

SublimeText3 Mac version
God-level code editing software (SublimeText3)
Hot Topics


 Specific steps for expanding the C drive using the partition tool diskgenius
May 08, 2024 pm 08:04 PM
Specific steps for expanding the C drive using the partition tool diskgenius
May 08, 2024 pm 08:04 PM
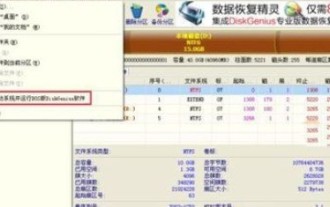
First, download and install the [DiskGenius] tool on your computer, then open the tool, then click [File Menu] at the top, and then click [Restart the system and run the DiskGenius software], as shown in the figure. Then click [OK] in the pop-up prompt box, as shown in the figure. After that, the computer will restart and then enter the Diskgen hard disk partition interface. At this time, if we want to expand the C drive, we only need to right-click the D drive next to the logical partition and click "Adjust Partition Size" in the pop-up menu, as shown in the figure shown. Then you need to adjust the size of the D drive partition. For example, the current capacity of the D drive is 14.99GB, as shown in the figure below. At this time, we can adjust the installment of the D drive. For example, if we want to allocate 1.03GB to the C drive, we only need to allocate 1.03GB to the C drive.
 How to enter bios on hp motherboard
May 04, 2024 pm 09:01 PM
How to enter bios on hp motherboard
May 04, 2024 pm 09:01 PM
How to set up the U disk boot in the HP notebook bios (how to enter the HP computer bios) and then insert the U disk to be booted first into the USB port of the notebook. If you want to install the system, the system program must have been prepared in the U disk. First, open the laptop. Make sure the laptop is turned off. Setting the bios must be done with the computer turned off. Then insert the U disk that you want to boot first into the USB port of the notebook. If you want to install the system, the prerequisite is that the system program has been prepared in the U disk. Take the HP ProDesk400G5SFF desktop computer as an example. Set the BIOS disk startup method: First, restart the computer and wait for the startup screen to appear. There are two ways to set up USB disk startup on HP notebooks. One is to directly press the shortcut key to select
 Tutorial on assembling a computer and installing a system? How to install win11 system when assembling a computer?
Apr 27, 2024 pm 03:38 PM
Tutorial on assembling a computer and installing a system? How to install win11 system when assembling a computer?
Apr 27, 2024 pm 03:38 PM
Tutorial on assembling a computer and installing a system? Nowadays, the system installation for assembling computers is very simple and convenient, and only requires a CD. First enter the bios settings, set the computer to boot first with the CD-ROM drive, then restart the computer and load the system CD into the CD-ROM drive. The CD will automatically enter the installation state. At this time, you only need to manually repartition the partitions, and the rest will be completed automatically. How to install win11 system when assembling a computer? 1. First, we need to download a win11 image file from this site before installing it. 2. The win11 image file has undergone a large number of professional tests to ensure stable installation and smooth operation. 3. After the download is completed, load the folder in the download path and run the "windowssetup" process in it.
 How to enter bios after assembling a computer? How to enter bios when assembling a computer?
May 07, 2024 am 09:13 AM
How to enter bios after assembling a computer? How to enter bios when assembling a computer?
May 07, 2024 am 09:13 AM
How to enter bios after assembling a computer? Before entering the BIOS, you need to make sure that the computer is completely shut down and powered off. Here are several common ways to enter the BIOS: 1. Use shortcut keys: Most computer manufacturers will display a prompt message at startup telling you which key to press to enter the BIOS settings. Usually the F2, F10, F12 or Delete key. After pressing the appropriate keys, you should be able to see a screen with information about your computer's hardware and BIOS settings. 2. Use the button on the motherboard: Some computer motherboards have a dedicated button for entering BIOS settings. This button is usually labeled "BIOS" or "UEFI". After pressing the button you should be able to see
 How to skip the network installation system in win11 24h2? The latest version of win11 24h2 skips the online installation tutorial
May 03, 2024 pm 09:13 PM
How to skip the network installation system in win11 24h2? The latest version of win11 24h2 skips the online installation tutorial
May 03, 2024 pm 09:13 PM
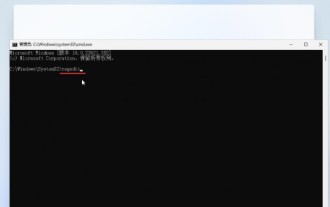
The 24h2 version is the latest operating system released by Microsoft. I believe many users have seen some download packages on the Internet. So how can win1124h2 skip the Internet installation system? Let this site carefully introduce the latest version of win1124h2 to users. Skip the Internet installation tutorial. The latest version of win1124h2 skips the online installation tutorial. Method 1: Skip by modifying the registry. 1. Press the Shift+F10 keys to bring up the cmd command prompt window and enter the following command: regedit and press Enter to quickly open the registry editor. If users feel that the 24h2 version is not used to the operation, they can click on the 23h2 version below to reinstall it. Win1123H22263
 MSI motherboard boot logo
May 08, 2024 pm 02:20 PM
MSI motherboard boot logo
May 08, 2024 pm 02:20 PM
How to cancel the MSI motherboard icon when booting 1. Press the DEL key when booting to enter the BIOS. Generally, in the "Advanced Features" item, you can find the words MSI motherboard LOGO screen. Select DISABLED, save and exit. There will no longer be this MSI motherboard LOGO screen when you turn on the computer in the future. MSI motherboard refers to the motherboard brand developed by MSI (MSI Technology Company). 2. The logo displayed when the computer is turned on is basically that of the motherboard manufacturer. You can set QUICKPOST to DISENABLE in the BIOS, so that the logo will generally no longer be displayed. It will display computer configuration-related information and give you more details. 3. First, teach you how to flash the BIOS in Windows environment. First: Go online
 How to enable tpm2.0 in win11_How to enable tpm2.0 in win11
May 08, 2024 pm 06:10 PM
How to enable tpm2.0 in win11_How to enable tpm2.0 in win11
May 08, 2024 pm 06:10 PM
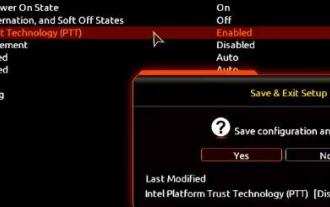
1. Gigabyte motherboard 1. First, we restart the computer and use the keyboard [DEL] to enter the BIOS settings when restarting. 2. Find and enter the [Settings] tab above. 3. Then find and enter [Miscellaneous] under settings. 4. Set [Intel Platform Trust Technology (PTT)] to [Enabled]. 5. After the settings are completed, use the keyboard [F10] to save, and then click [YES] to exit. 2. ASUS motherboard 1. First restart the computer and continuously tap [del] on the keyboard to enter the bios settings when booting. 2. Click [AdvancedMode] or press [F7] to find [A
 What is the appropriate temperature for playing Apex computer?
May 06, 2024 am 09:31 AM
What is the appropriate temperature for playing Apex computer?
May 06, 2024 am 09:31 AM
What is the appropriate temperature for playing Apex computer? 80 degrees is suitable. When running large-scale games or playing high-definition videos, the temperature can reach about 80°C. Generally, it is considered normal to not exceed 90°C under high load. Graphics cards are generally the hardware that generates the most heat among computer hardware. Generally, it is normal for the temperature of a graphics card to be around 30℃-80℃. Due to external temperature, it is normal for most graphics card temperatures to be between 50℃-85℃ in summer. range, if you are running large-scale 3D games or playing high-definition videos for a long time, the highest temperature may reach about 95°C. This temperature range will affect the life of the computer hardware. No matter how high the temperature is, you must consider strengthening heat dissipation and cleaning dust. How to play with the apex handle and the computer ? Method/step-by-step reading: 1. Use wired or wireless
