 Computer Tutorials
 Computer Knowledge
 What is Windows Protected Printing Mode and how to enable it?
What is Windows Protected Printing Mode and how to enable it?
php editor Xigua introduces you to Windows Protected Printing Mode, which is a feature that can help you protect computer security. When protected printing mode is enabled, the system restricts the access rights of the print driver to prevent malware from exploiting printer vulnerabilities. To enable Protected Printing Mode, you can go to the Devices and Printers option in Control Panel, find the desired printer, right-click on Properties, and then enable Protected Printing Mode in the Security Options. This way, your computer will be more secure and reliable.
What is Windows Protected Printing Mode?
Windows Protected Printing Mode (WPP) allows your PC to print using the Windows modern printing stack, i.e. no drivers required. Currently only Mopria certified printers are supported, which means you don’t need a third-party software installer to get the added security benefit. This feature ensures secure printing from the printing device and simplifies the entire installation and printing process.
Most printer brands, such as HP, Canon, Epson, etc., support WPP. However, some older models may not be supported. In order to check if your device is Mopria certified, you can visit the official Mopria page.
WPP is co-designed by the MORSE security and Windows printing teams as a modern solution for Windows printing systems. This feature provides a more modern, more secure and more widely compatible printing system, bringing many advantages to users. By ending support for third-party drivers, Windows improves its printing stack and places more emphasis on system security. This improvement allows users to better use the printing function without worrying about security issues.
How to enable protected printing mode in Windows 11?
To enable the Windows Protected Printing Mode feature, Windows 11 Insider Preview Build 26016 or later needs to be installed. Currently, this feature is only available to Windows 11 Pro users. If you don't join Insider Build, you won't be able to use this feature.
To check the current build and build number, open the Run Console ( Win R ), type Winver, and press Enter.
You can enable Protected Printing Mode or WPP in Windows 11 in two ways:
Enable WPP through Group Policy Editor Enable WPP using Registry Editor1] Via Group Policy Editor Enable WPP

#To enable Windows Protected Printing Mode through the Group Policy Editor, press the Win R shortcut key to open the Run Console. In the search bar, type gpedit.msc and press Enter.
In the Local Group Policy Editor, navigate to the following path:
计算机配置 > 管理模板 > 打印机
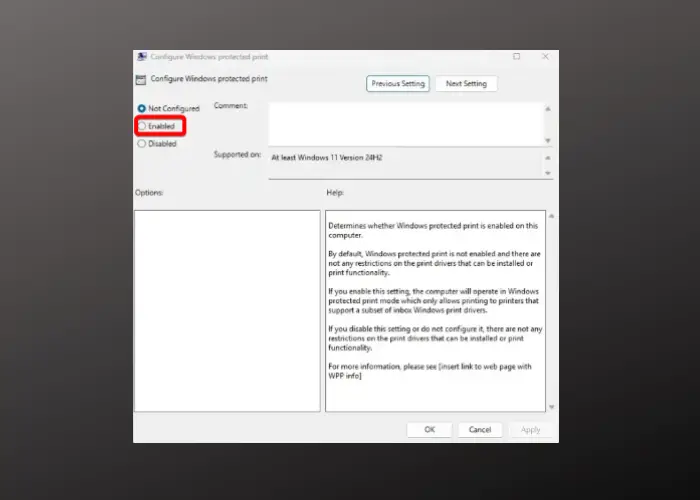
Next, go to the right and double-click Configure Windows Protected Printing to open the configuration window.
Now, set it to "Enable" to enable "Windows Protected Printing Mode".
*Note – Select Disable to turn off the Windows Protected Printing Mode feature.
2] Use Registry Editor to enable WPP

Before making any changes to the registry, be sure to back up the registry settings to restore any lost data.
Press the Win R key at the same time to start the running console, enter regedit, and then press Enter.
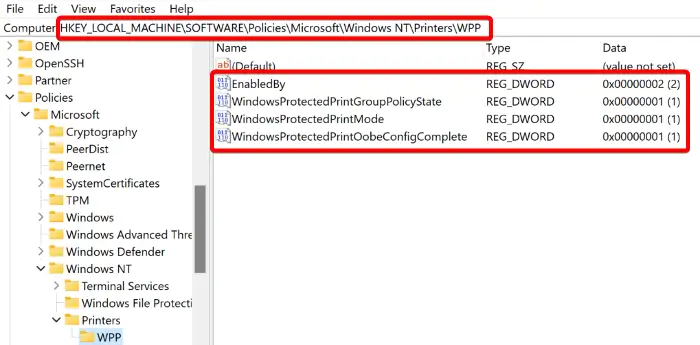
Now, in the Registry Editor, navigate to the following path:
HKEY_LOCAL_MACHINESOFTWAREPoliciesMicrosoftWindows NTPrintersWPP
Now, check if the following DWORD keys appear on the right side of the pane. Double click on each of them and check that the value data is set to the following values to make sure WPP is enabled.
EnabledBy与值数据2
具有值数据1的WindowsProtectedPrintGroupPolicyState
具有值数据1的WindowsProtectedPrintMode
WindowsProtectedPrintOobeConfigComplete包含值数据1
If you want to disable Windows Protected Mode at any time, make sure to change the value data of each key to 0.
How to set up a locked printer in Windows?
To set up a locked print job in Windows, open the Run Console ( Win R ), type Control Printers, and press Enter. This will open the Devices and Printers window. Here, right-click on the printer and select Printing Preferences. Next, click on Job Type and select Locked Printing. Now enter your user ID and create a secure numeric password. This will ensure that only you can publish and print documents on the machine.
How to enable secure printing in Windows?
To enable secure printing in Windows, open the desired document, select Print, right-click your printer, and select Printer Properties. Now, look for the Security or Job Storage tab. Here, go to "Secure Printing" or "PIN Printing", set the PIN and press "OK". Once you enter your PIN on the printer, your document will print immediately.
The above is the detailed content of What is Windows Protected Printing Mode and how to enable it?. For more information, please follow other related articles on the PHP Chinese website!

Hot AI Tools

Undresser.AI Undress
AI-powered app for creating realistic nude photos

AI Clothes Remover
Online AI tool for removing clothes from photos.

Undress AI Tool
Undress images for free

Clothoff.io
AI clothes remover

AI Hentai Generator
Generate AI Hentai for free.

Hot Article

Hot Tools

Notepad++7.3.1
Easy-to-use and free code editor

SublimeText3 Chinese version
Chinese version, very easy to use

Zend Studio 13.0.1
Powerful PHP integrated development environment

Dreamweaver CS6
Visual web development tools

SublimeText3 Mac version
God-level code editing software (SublimeText3)

Hot Topics
 How to update the latest version of Bybit Exchange? Will there be any impact if it is not updated?
Feb 21, 2025 pm 10:54 PM
The way to update ByBit exchanges varies by platform and device: Mobile: Check for updates and install in the app store. Desktop Client: Check for updates in the Help menu and install automatically. Web page: You need to manually access the official website for updates. Failure to update the exchange can lead to security vulnerabilities, functional limitations, compatibility issues and reduced transaction execution efficiency.
 deepseek web version entrance deepseek official website entrance
Feb 19, 2025 pm 04:54 PM
DeepSeek is a powerful intelligent search and analysis tool that provides two access methods: web version and official website. The web version is convenient and efficient, and can be used without installation; the official website provides comprehensive product information, download resources and support services. Whether individuals or corporate users, they can easily obtain and analyze massive data through DeepSeek to improve work efficiency, assist decision-making and promote innovation.
 Pi Node Teaching: What is a Pi Node? How to install and set up Pi Node?
Mar 05, 2025 pm 05:57 PM
Detailed explanation and installation guide for PiNetwork nodes This article will introduce the PiNetwork ecosystem in detail - Pi nodes, a key role in the PiNetwork ecosystem, and provide complete steps for installation and configuration. After the launch of the PiNetwork blockchain test network, Pi nodes have become an important part of many pioneers actively participating in the testing, preparing for the upcoming main network release. If you don’t know PiNetwork yet, please refer to what is Picoin? What is the price for listing? Pi usage, mining and security analysis. What is PiNetwork? The PiNetwork project started in 2019 and owns its exclusive cryptocurrency Pi Coin. The project aims to create a one that everyone can participate
 How to install deepseek
Feb 19, 2025 pm 05:48 PM
There are many ways to install DeepSeek, including: compile from source (for experienced developers) using precompiled packages (for Windows users) using Docker containers (for most convenient, no need to worry about compatibility) No matter which method you choose, Please read the official documents carefully and prepare them fully to avoid unnecessary trouble.
 Coinsuper exchange software channel official website entrance
Feb 21, 2025 pm 10:39 PM
The official website entrance of the Coinsuper Exchange: https://www.coinsuper.com. The client download channels are: Windows client, macOS client, and mobile (iOS/Android). Registration requires an email, mobile phone number and password, and you need to complete real-name authentication before you can trade. The platform provides a variety of digital asset transactions, including Bitcoin, Ethereum, etc., with the transaction fee rate of 0.1% for both orders and acceptors. Security safeguards include cold wallet storage, dual-factor verification, anti-money laundering and anti-terrorism financing measures, and with security public
 Ouyi okx installation package is directly included
Feb 21, 2025 pm 08:00 PM
Ouyi OKX, the world's leading digital asset exchange, has now launched an official installation package to provide a safe and convenient trading experience. The OKX installation package of Ouyi does not need to be accessed through a browser. It can directly install independent applications on the device, creating a stable and efficient trading platform for users. The installation process is simple and easy to understand. Users only need to download the latest version of the installation package and follow the prompts to complete the installation step by step.
 BITGet official website installation (2025 beginner's guide)
Feb 21, 2025 pm 08:42 PM
BITGet is a cryptocurrency exchange that provides a variety of trading services including spot trading, contract trading and derivatives. Founded in 2018, the exchange is headquartered in Singapore and is committed to providing users with a safe and reliable trading platform. BITGet offers a variety of trading pairs, including BTC/USDT, ETH/USDT and XRP/USDT. Additionally, the exchange has a reputation for security and liquidity and offers a variety of features such as premium order types, leveraged trading and 24/7 customer support.
 Get the gate.io installation package for free
Feb 21, 2025 pm 08:21 PM
Gate.io is a popular cryptocurrency exchange that users can use by downloading its installation package and installing it on their devices. The steps to obtain the installation package are as follows: Visit the official website of Gate.io, click "Download", select the corresponding operating system (Windows, Mac or Linux), and download the installation package to your computer. It is recommended to temporarily disable antivirus software or firewall during installation to ensure smooth installation. After completion, the user needs to create a Gate.io account to start using it.


