How to use Follow Up in the Mail app on iPhone, iPad, and Mac
Given the large volume of emails we send, it is difficult to confirm whether all responses have been received. Remember, if you don't receive a reply to an email you send, you can use the Follow Up feature in Apple Mail.
What is "Follow Up" in Apple Mail? How to use Follow Up in Apple Mail How to turn off Follow Up in Apple MailWhat is Follow Up in Apple Mail?
Email follow-up in Apple Mail was introduced in iOS 16, iPadOS 16, and macOS Ventura. This feature is turned on by default, making it easy for you to try it out.
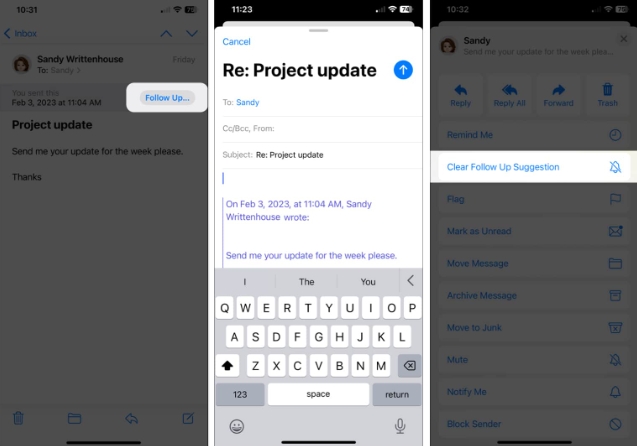
If you don't receive a reply three days after sending an email, the email will automatically return to the top of your inbox. Additionally, you can select the "Follow Up" option to send a follow-up message.
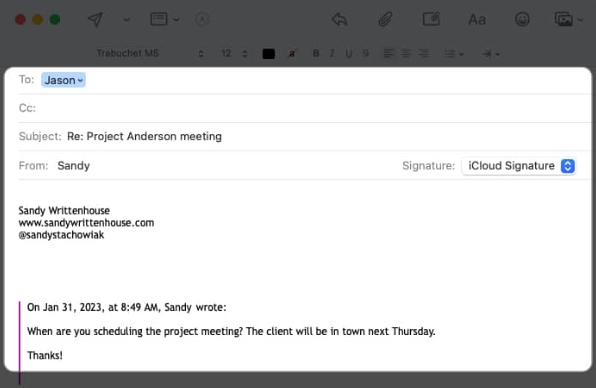
A new email will then open with the content of the previous email in the body, including the date and time it was originally sent. Recipients are automatically added to the "To" field, with the subject line beginning with "Reply to:". Then you just add a new message and send the email instantly.
This feature will give you a simple reminder that you have not received a reply so you can follow up.
How to Use Follow Up in Apple Mail
If you want to take advantage of the Follow Up feature in Apple Mail, you can easily do it on iPhone, iPad, and Mac.
Use Follow Up in Mail on iPhone and iPad
Remember, you won’t see an email in your inbox until three days after it’s sent or Follow-up suggestions.
When you discover an email, you'll see "Follow Up" to the right of the email in the list and below the email title. Click "Follow" and a new email will open containing the original message and recipients (as mentioned previously). Add another message and send the email like any other email. If you don't take any action on an email, it will disappear from your inbox within a day. But you can ignore the "Follow Up" suggestions if you prefer. Swipe from right to left on a message in the list and tap the three dots. Then, select Clear follow-up suggestions.
Use Follow Up in Mail on Mac
The Follow Up feature in Mail on Mac works the same as it does on iPhone and iPad .
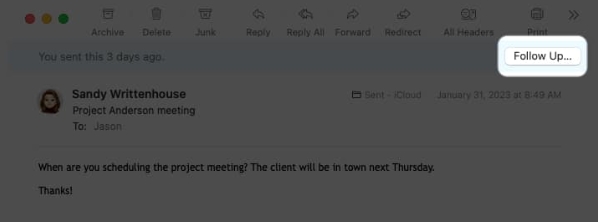
After three days of no reply, you'll see your sent email at the top of your inbox and a Follow button in the shaded area above the title. Click "Follow" to add your message to the email and send it. Again, you'll see the original message in the body and the recipients in the "To" field. You can ignore the "Follow Up" suggestion and the email will be deleted from your inbox within a day. Alternatively, swipe the message right on the list to officially ignore it.
How to turn off Follow Up in Apple Mail
If you find that the Apple Mail Follow Up feature isn't helpful, you can disable it on one or all of your devices.
Turn off Follow Up on iPhone and iPad
You can turn off Follow Up suggestions on iPhone and iPad in just a few steps.
Open the “Settings” application. Select "Mail". Turn off the "Follow up suggestions" switch in the "Messages" section.Turn off Follow Up on Mac
Disabling Follow Up in Mail on Mac is just as easy.
Open the Mail application. Select "Mail" in the menu bar → select "Settings". Go to the General tab. Uncheck the Enable message follow-up suggestions checkbox.Follow up with a handy reminder!
If you often need to follow up on the emails you send, the Apple Mail Follow Up feature can give you a convenient way to remember when you need to.
What do you think of the Follow Up feature in Apple Mail? Would you leave it enabled and give it a try, or turn it off and follow up on your own? let us know!
For other Mail app features, check out our tips for using Apple Mail like a pro.
The above is the detailed content of How to use Follow Up in the Mail app on iPhone, iPad, and Mac. For more information, please follow other related articles on the PHP Chinese website!

Hot AI Tools

Undresser.AI Undress
AI-powered app for creating realistic nude photos

AI Clothes Remover
Online AI tool for removing clothes from photos.

Undress AI Tool
Undress images for free

Clothoff.io
AI clothes remover

AI Hentai Generator
Generate AI Hentai for free.

Hot Article

Hot Tools

Notepad++7.3.1
Easy-to-use and free code editor

SublimeText3 Chinese version
Chinese version, very easy to use

Zend Studio 13.0.1
Powerful PHP integrated development environment

Dreamweaver CS6
Visual web development tools

SublimeText3 Mac version
God-level code editing software (SublimeText3)

Hot Topics
 1376
1376
 52
52
 iPhone 16 Pro and iPhone 16 Pro Max official with new cameras, A18 Pro SoC and larger screens
Sep 10, 2024 am 06:50 AM
Apple has finally lifted the covers off its new high-end iPhone models. The iPhone 16 Pro and iPhone 16 Pro Max now come with larger screens compared to their last-gen counterparts (6.3-in on the Pro, 6.9-in on Pro Max). They get an enhanced Apple A1
 iPhone parts Activation Lock spotted in iOS 18 RC — may be Apple\'s latest blow to right to repair sold under the guise of user protection
Sep 14, 2024 am 06:29 AM
Earlier this year, Apple announced that it would be expanding its Activation Lock feature to iPhone components. This effectively links individual iPhone components, like the battery, display, FaceID assembly, and camera hardware to an iCloud account,
 iPhone parts Activation Lock may be Apple\'s latest blow to right to repair sold under the guise of user protection
Sep 13, 2024 pm 06:17 PM
Earlier this year, Apple announced that it would be expanding its Activation Lock feature to iPhone components. This effectively links individual iPhone components, like the battery, display, FaceID assembly, and camera hardware to an iCloud account,
 Gate.io trading platform official app download and installation address
Feb 13, 2025 pm 07:33 PM
This article details the steps to register and download the latest app on the official website of Gate.io. First, the registration process is introduced, including filling in the registration information, verifying the email/mobile phone number, and completing the registration. Secondly, it explains how to download the Gate.io App on iOS devices and Android devices. Finally, security tips are emphasized, such as verifying the authenticity of the official website, enabling two-step verification, and being alert to phishing risks to ensure the safety of user accounts and assets.
 Anbi app official download v2.96.2 latest version installation Anbi official Android version
Mar 04, 2025 pm 01:06 PM
Binance App official installation steps: Android needs to visit the official website to find the download link, choose the Android version to download and install; iOS search for "Binance" on the App Store. All should pay attention to the agreement through official channels.
 Multiple iPhone 16 Pro users report touchscreen freezing issues, possibly linked to palm rejection sensitivity
Sep 23, 2024 pm 06:18 PM
If you've already gotten your hands on a device from the Apple's iPhone 16 lineup — more specifically, the 16 Pro/Pro Max — chances are you've recently faced some kind of issue with the touchscreen. The silver lining is that you're not alone—reports
 Download link of Ouyi iOS version installation package
Feb 21, 2025 pm 07:42 PM
Ouyi is a world-leading cryptocurrency exchange with its official iOS app that provides users with a convenient and secure digital asset management experience. Users can download the Ouyi iOS version installation package for free through the download link provided in this article, and enjoy the following main functions: Convenient trading platform: Users can easily buy and sell hundreds of cryptocurrencies on the Ouyi iOS app, including Bitcoin and Ethereum. and Dogecoin. Safe and reliable storage: Ouyi adopts advanced security technology to provide users with safe and reliable digital asset storage. 2FA, biometric authentication and other security measures ensure that user assets are not infringed. Real-time market data: Ouyi iOS app provides real-time market data and charts, allowing users to grasp encryption at any time
 How to solve the problem of 'Undefined array key 'sign'' error when calling Alipay EasySDK using PHP?
Mar 31, 2025 pm 11:51 PM
Problem Description When calling Alipay EasySDK using PHP, after filling in the parameters according to the official code, an error message was reported during operation: "Undefined...


