Can Linux run on 8-bit MCU?
We often see beginners asking on microcontroller forums whether their puny 8-bit microcontrollers can run Linux. These questions often elicit a burst of laughter. We often see people on Linux forums asking what are the minimum requirements to run Linux. The common answer is that Linux requires a 32-bit architecture and an MMU (Memory Management Unit), and at least 1MB of RAM to satisfy the kernel.
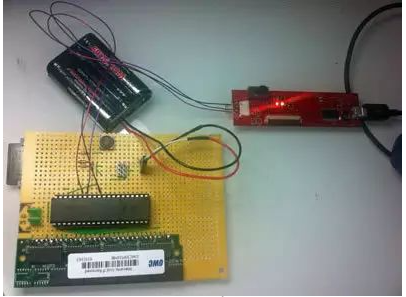
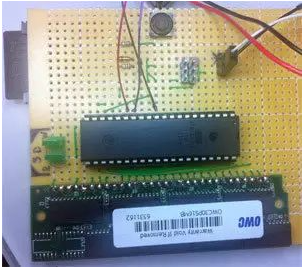
However, this project aims to (and has succeeded in) shattering these perceptions. The development board shown in the picture below is based on ATmega1284P. I (a foreigner) also made a development board based on ATmega644a, which was also successful. This development board does not use another processor and can boot the Linux 2.6.34 kernel. In fact, it can even run a full Ubuntu stack, including X (if you're willing to wait for it to boot) and the gnome desktop environment.

▍RAM (random access memory)
Yes, that's right, a full Linux installation requires several megabytes of RAM and a 32-bit CPU with an MMU. This project has it all. First, let's access the RAM. As you can see, there is an antique 30-pin SIMM memory module in the circuit. These are what 80286 based PCs once used. It interfaces with the ATmega and I write code to access it and refresh it as per specs (SDRAM needs constant rate refresh to avoid losing data).
How fast is it? The refresh interrupt occurs every 62ms and takes up 1.5ms, so it takes up less than 3% of the CPU. Access RAM, for ease of programming, one byte at a time. The maximum bandwidth this produces is about 300KBps.

***▍*Storage
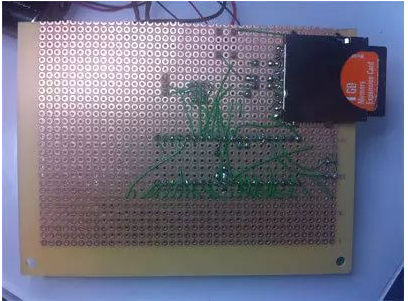
For RAM to work in sleep state, we have two things to deal with. Storage is not a problem that is too difficult to solve. It is very easy to interact with the SD card using SPI, which I did in my project. A 1GB SD card will work just fine, although 512MB is sufficient for this particular file system (Ubuntu Jaunty).
ATmega has a hardware SPI module, but for whatever reason, it didn't work very smoothly, so I bit-stripped the interface. It's still chunky enough - about 200KBps. It also makes perfect sense for the project - it can be implemented on any microcontroller with enough pins, without using additional hardware modules.
***▍*CPU (Central Processing Unit)
All that remains is that 32-bit CPU and MMU requirements. However, the AVR does not have an MMU, and it is 8-bit. To overcome this difficulty, I wrote an ARM emulator. ARM is the architecture I'm most familiar with, and it's simple enough for me to feel comfortable writing an emulator for it. Why write one instead of porting one?
Well, porting someone else's code is no fun, plus I've seen no documented documentation of easily porting emulators to 8-bit devices. One reason: the AVR compiler's insistence on 16 bits for handling integers will cause you trouble with simple "(1

***▍*Other functions
The board communicates with the real world through a serial port. Currently it's connected via a serial port to a minicom running on my PC, but an alternative connection it could test would be a keyboard and character LCD connected to the circuit that would make it completely standalone. There are two more LEDs on the board. They indicate access to the SD card. One represents the read operation and the other represents the write operation. There is also a button on the circuit board. When pressed and held for 1 second it will take the serial port out of the currently effective speed of the emulated CPU. The main frequency of the AVR is 24MHz (a slight overclock above the original 20MHz).
***▍*How fast is it?
uARM definitely does not have a rate daemon. It took about 2 hours to boot into the BASH prompt ("init=/bin/bash" kernel command line). Then it took more than 4 hours to start the entire Ubuntu ("exec init" and then log in). Starting X will take longer. The effective emulated CPU speed is about 6.5KHz, which is about what you'd expect emulating a 32-bit CPU and MMU on a measly 8-bit microcontroller. Oddly, once booted, the system is somewhat usable. You can enter a command and get a response within a minute. Which means you can actually use it. For example, I used it to format my SD card today. It's definitely not the fastest, but I feel like it's probably the cheapest, slowest, easiest to assemble by hand, has the lowest parts count, and is the lowest-end Linux PC. The circuit board is hand-soldered using wires, without even the need for a printed circuit board (PCB).
***▍*Details of the emulator?
The emulator is quite modular, allowing it to be expanded to emulate other SoCs (systems on a chip) and hardware configurations at will. The simulated CPU is ARMv5TE. Some time ago, I started working on supporting ARMv6, but it has not been completed (as can be seen from the code) because it is not very needed. The simulated SoC is PXA255.
Due to the modular design, you can replace the SoC.c file and compile a complete new SoC using the same ARMv5TE core, or replace the core, or replace the peripherals as you wish. This is on purpose, I mean this code is also a pretty neat example of how an ARM SoC works. The code of the CPU emulator itself isn't too neat, so, well, it's a CPU emulator. This was written a few years ago in over 6 months of free time and then put aside. It was recently resurrected specifically for this project. The emulator implements i-cache to improve speed. This gives the AVR a lot of help, allowing the internal memory to be accessed at over 5MB per second unlike my external RAM. I haven't gotten around to implementing d-cache (data caching) yet, but it's on my to-do list. Accessing block devices is not emulated as SD devices. This turned out to be too slow. Instead there is a paravirtualized disk device (pvdisk, see pvDisk.tar.bz2, GPL licensed), which I wrote using an invalid opcode to load the emulator and access the disk. The ramdisk (virtual disk) in my image loads this pvdisk and then changes the root directory to /dev/pvd1.
ramdisk is included in "rd.img". The "machine type" I'm using is PalmTE2. Why? Since I'm very familiar with this hardware, it's the first type of PXA255 machine I've seen.
***▍*Hypercall?
There are some services you can make requests to the emulator by using a special opcode. In ARM it's 0xF7BBBBBB, in Thumb it's 0xBBBB. These were picked because they are in a range where ARM guarantees are undefined. The hypercall number is passed in register R12, the parameters are passed in registers R0-R3, and the return value is placed in R0.
transfer:
· 0 = Stop simulation
· 1 = print decimal number
· 2 = print characters
· 3 = Get RAM size
· 4 = Block device operation (R0 = operation, R1 = sector number). Note that these do not write to the emulated RAM, they use another hypercall to fill the emulator's internal buffer accessed by the emulated user, one word at a time. I meant to implement DMA, but haven't gotten around to it yet.
operate:
· 0 = Get information (if the sector number is 0, return the number of sectors; if the sector number is 1, return the sector size in bytes)
· 1 = sector read
· 2 = Sector Write
· 5 = Block device buffer access (R0 = value in/value out, R1 = number of words, R2 = 1 if written, 0 otherwise)
***▍*Thumb support?
Fully supports Thumb. I cheated a bit and decoded each Thumb instruction string (instr) into the equivalent ARM instruction string and executed it instead of using the ARM emulator function. It's not as fast as the original, but it's simple and the code is small. It is possible to use a 256KB lookup table, but I feel that 256KB is too large for the microcontroller's flash memory. Some Thumb instructions cannot be converted to ARM instructions, they are processed correctly instead.
I want to build one!
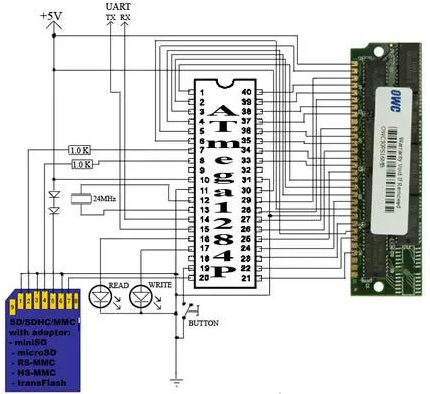
For non-commercial purposes, you can definitely do this. The wiring method is as follows:
· RAM’s DQ0-DQ7 are connected to AVR’s C0-C7;
· A0-A7 of RAM is connected to A0-A7 of AVR;
· A8-A11 of RAM is connected to B0-B3 of AVR;
· RAM nRAM nRAS nCAS nWE connected to AVR D7 B4 B5;
·SD’s DI SCK DO is connected to AVR’s B6 B7 D6;
· The read write of LED is connected to D2 D3 of AVR (other pins of LED are connected to ground);
· The button is connected to D4 of the AVR (other pins are connected to ground).

The RAM can be any 30-pin 16MB SIMM that can run at a CAS-before-RAS refresh rate of 4000 cycles every 64 milliseconds. The one I use (OWC) can be purchased online for a few bucks. The schematic is shown here, click to enlarge.
***▍*Source code?
This code is a bit messy, but it works (the code cannot be downloaded in China). To set up the emulator on your PC and try it out type "make". To run use "./uARM DISK_IMAGE". To build the optimized PC version use "make BUILD=opt". To build a running version of AVR use "make BUILD=avr". Now, it is compiled to target ATmega1284P. To compile with ATmega644 as the target, in addition to modifying the makefile, reduce the number in icache.h so that the i-cache is small enough to match the RAM inside the 644. Also included in the archive are the final hex files for 1284p.
▍Startup process
To preserve code space in AVR, almost no startup code exists in the emulator. In fact, the "ROM" totals 50 bytes: 8 bytes are used to select Thumb mode, and some Thumb code reads the first sector of the SD card and jumps to Thumb mode (see embeddedBoot.c). The SD card's MBR has another bootloader (writing in Thumb mode). This bootloader looks at the MBR, finds the active partition and loads its contents to the end of RAM. Then, it jumps to destination RAM address 512 (see mbrBoot.c). The third and largest bootloader, ELLE (see ELLE.c), is running here. This bootloader relocates the ramdisk, sets up ATAGS, and calls the kernel. I provide all binaries and source code so that you can make your own image if you wish. The boot process is reminiscent of PC booting. :) The included mkbooting.sh tool can be used to create a working image for the boot partition.
The above is the detailed content of Can Linux run on 8-bit MCU?. For more information, please follow other related articles on the PHP Chinese website!

Hot AI Tools

Undresser.AI Undress
AI-powered app for creating realistic nude photos

AI Clothes Remover
Online AI tool for removing clothes from photos.

Undress AI Tool
Undress images for free

Clothoff.io
AI clothes remover

AI Hentai Generator
Generate AI Hentai for free.

Hot Article

Hot Tools

Notepad++7.3.1
Easy-to-use and free code editor

SublimeText3 Chinese version
Chinese version, very easy to use

Zend Studio 13.0.1
Powerful PHP integrated development environment

Dreamweaver CS6
Visual web development tools

SublimeText3 Mac version
God-level code editing software (SublimeText3)

Hot Topics
 deepseek web version entrance deepseek official website entrance
Feb 19, 2025 pm 04:54 PM
DeepSeek is a powerful intelligent search and analysis tool that provides two access methods: web version and official website. The web version is convenient and efficient, and can be used without installation; the official website provides comprehensive product information, download resources and support services. Whether individuals or corporate users, they can easily obtain and analyze massive data through DeepSeek to improve work efficiency, assist decision-making and promote innovation.
 How to install deepseek
Feb 19, 2025 pm 05:48 PM
There are many ways to install DeepSeek, including: compile from source (for experienced developers) using precompiled packages (for Windows users) using Docker containers (for most convenient, no need to worry about compatibility) No matter which method you choose, Please read the official documents carefully and prepare them fully to avoid unnecessary trouble.
 Ouyi okx installation package is directly included
Feb 21, 2025 pm 08:00 PM
Ouyi OKX, the world's leading digital asset exchange, has now launched an official installation package to provide a safe and convenient trading experience. The OKX installation package of Ouyi does not need to be accessed through a browser. It can directly install independent applications on the device, creating a stable and efficient trading platform for users. The installation process is simple and easy to understand. Users only need to download the latest version of the installation package and follow the prompts to complete the installation step by step.
 BITGet official website installation (2025 beginner's guide)
Feb 21, 2025 pm 08:42 PM
BITGet is a cryptocurrency exchange that provides a variety of trading services including spot trading, contract trading and derivatives. Founded in 2018, the exchange is headquartered in Singapore and is committed to providing users with a safe and reliable trading platform. BITGet offers a variety of trading pairs, including BTC/USDT, ETH/USDT and XRP/USDT. Additionally, the exchange has a reputation for security and liquidity and offers a variety of features such as premium order types, leveraged trading and 24/7 customer support.
 Get the gate.io installation package for free
Feb 21, 2025 pm 08:21 PM
Gate.io is a popular cryptocurrency exchange that users can use by downloading its installation package and installing it on their devices. The steps to obtain the installation package are as follows: Visit the official website of Gate.io, click "Download", select the corresponding operating system (Windows, Mac or Linux), and download the installation package to your computer. It is recommended to temporarily disable antivirus software or firewall during installation to ensure smooth installation. After completion, the user needs to create a Gate.io account to start using it.
 Ouyi Exchange Download Official Portal
Feb 21, 2025 pm 07:51 PM
Ouyi, also known as OKX, is a world-leading cryptocurrency trading platform. The article provides a download portal for Ouyi's official installation package, which facilitates users to install Ouyi client on different devices. This installation package supports Windows, Mac, Android and iOS systems. Users can choose the corresponding version to download according to their device type. After the installation is completed, users can register or log in to the Ouyi account, start trading cryptocurrencies and enjoy other services provided by the platform.
 How to automatically set permissions of unixsocket after system restart?
Mar 31, 2025 pm 11:54 PM
How to automatically set the permissions of unixsocket after the system restarts. Every time the system restarts, we need to execute the following command to modify the permissions of unixsocket: sudo...
 Why does an error occur when installing an extension using PECL in a Docker environment? How to solve it?
Apr 01, 2025 pm 03:06 PM
Causes and solutions for errors when using PECL to install extensions in Docker environment When using Docker environment, we often encounter some headaches...


