

The 5 specification introduces many new features, one of the most anticipated is the element. HTML 5 provides a method of drawing graphics through JavaScript, which is simple to use but powerful. Each element has a "context" (think of a page on a drawing board) in which any shape can be drawn. Browsers support multiple canvas contexts and provide graphics drawing capabilities through different . The 5 specification introduces many new features, one of the most anticipated is the element. 5 provides a method for drawing graphics through JavaScript that is simple to use but powerful. Each element has a "context" (think of a page on a drawing board) in which any shape can be drawn. Browsers support multiple canvas contexts and provide graphics drawing capabilities through different .
Most browsers support the 2D canvas context - including Opera, Firefox, Konqueror and Safari. Moreover, some versions of Opera also support 3D canvas, and Firefox can also support 3D canvas through plug-ins:
This article introduces the basics of 2D canvas
and how to use basic canvas functions, such as lines, shapes, images and text, etc. In order to understand this article, you'd better know JavaScript basics.
You can click here to download the example code of this article in batches
The method to create canvas is very simple, just add <font face="NSimsun"><canvas><u></u></canvas></font>in the HTML<font face="NSimsun"><canvas></canvas></font> page > Element:
<code><canvas id="myCanvas" width="300" height="150">
Fallback content, in case the browser does not support Canvas.
</canvas></code>
In order to reference elements in JavaScript, it is best to set an ID for the element; you also need to set the height and width of the canvas.
After creating the canvas, let’s prepare the brush. To draw graphics in the canvas you need JavaScript. First find the canvas<font face="NSimsun"> getElementById</font> element through the <font face="NSimsun"> getElementById<br></font> function, and then initialize the context. Various graphics can then be drawn using the context API. The following script draws a rectangle in canvas (click here to see the effect):
<code>// Get a reference to the element.
var elem = document.getElementById('myCanvas');

// Always check for properties 和 methods, to make sure your code doesn't break
// in other browsers.
if (elem && elem.getContext) {
  // Get the 2d context.
  // Remember: you can only initialize one context per element.
  var context = elem.getContext('2d');
  if (context) {
    // You are done! Now you can draw your first rectangle.
    // You only need to provide the (x,y) coordinates, followed by the width and
    // height dimensions.
    context.fillRect(0, 0, 150, 100);
  }
}</code>You can place the above code in the <font face="NSimsun">head<code><font face="NSimsun">head</font> section of the document, or in an external file.
After introducing how to create canvas, let's take a look at the 2D canvas API and see what can be done with these functions.
The example above shows how easy it is to draw a rectangle.
You can easily set the fill and line of the rectangle through the fillStyle and strokeStyle properties. Color values use methods and hexadecimal numbers, (), () and () (if the browser supports it, such as Opera10 and Firefox 3). Hexadecimal numbers, (), () and () (if supported by the browser, such as Opera10 and Firefox 3).
With <font face="NSimsun">fillRect<code><font face="NSimsun">fillRect</font> you can draw a filled rectangle. Use <font face="NSimsun">strokeRect<code><font face="NSimsun">strokeRect</font> to draw a rectangle with only a border and no fill. If you want to clear part of the canvas, you can use <font face="NSimsun">clearRect<code><font face="NSimsun">clearRect</font>. The parameters of the above three methods are the same: x, y, width, height. The first two parameters set the (x,y) coordinates, and the last two parameters set the height and width of the rectangle.
You can use the lineWidth attribute to change the line thickness. Let's look at using <font face="NSimsun">fillRect<code><font face="NSimsun">fillRect</font>,<font face="NSimsun">strokeRect<code><font face="NSimsun">strokeRect</font> <font face="NSimsun">clearRect<code><font face="NSimsun">clearRect</font> and other examples:
<code>context.fillStyle   = '#00f'; // blue
context.strokeStyle = '#f00'; // red
context.lineWidth   = 4;

// Draw some rectangles.
context.fillRect  (0,   0, 150, 50);
context.strokeRect(0,  60, 150, 50);
context.clearRect (30, 25,  90, 60);
context.strokeRect(30, 25,  90, 60);</code>
The rendering of this example is shown in Figure 1.
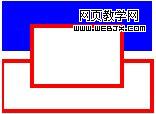
Figure 1: fillRect, strokeRect and
clearRect renderings
Any shape can be drawn through the canvas path. You can draw the outline first, then the border and fill. Creating a custom shape is simple, use <font face="NSimsun"> beginPath()<code><font face="NSimsun"> beginPath()</font> to start drawing, then use lines, curves, and other shapes to draw your shape. After drawing, call <font face="NSimsun">fill<code><font face="NSimsun">fill</font> and <font face="NSimsun">stroke<code><font face="NSimsun">stroke</font> to add fill or set border . Call <font face="NSimsun"> closePath()<code><font face="NSimsun"> closePath()</font> to end custom graphics drawing.
Here is an example of drawing a triangle:
<code>// Set the style properties.
context.fillStyle   = '#00f';
context.strokeStyle = '#f00';
context.lineWidth   = 4;

context.beginPath();
// Start from the top-left point.
context.moveTo(10, 10); // give the (x,y) coordinates
context.lineTo(100, 10);
context.lineTo(10, 100);
context.lineTo(10, 10);

// Done! Now fill the shape, 和 draw the stroke.
// Note: your shape will not be visible until you call any of the two methods.
context.fill();
context.stroke();
context.closePath();</code>
The rendering is shown in Figure 2.

图 2: 三角形
另一个较负责的例子中使用了直线、曲线和圆弧。
<font face="NSimsun">drawImage</font> 方法允许在 canvas 中插入其他图像
(<font face="NSimsun"> img</font> 和 <font face="NSimsun">canvas</font> 元素) 。在 Opera 中可以再 canvas 中绘制 SVG 图形。此方法比较复杂,可以有3个、5个或9个参数:
<font face="NSimsun">drawImage</font> 使用方法。一个参数指定图像位置,另两个参数设置图像在 canvas中的位置。 <font face="NSimsun">drawImage</font> 使用方法,包括上面所述3个参数,加两个参数指明插入图像宽度和高度 (如果你想改变图像大小)。 <font face="NSimsun">drawImage</font> 杂使用方法,包含上述5个参数外,另外4个参数设置源图像中的位置和高度宽度。这些参数允许你在显示图像前动态裁剪源图像。 下面是上述三个使用方法的例子:
<code>// Three arguments: the element, destination (x,y) coordinates.
context.drawImage(<var>img_elem</var>, <var>dx</var>, <var>dy</var>);

// Five arguments: the element, destination (x,y) coordinates, and destination
// width and height (if you want to resize the source image).
context.drawImage(<var>img_elem</var>, <var>dx</var>, <var>dy</var>, <var>dw</var>, <var>dh</var>);

// Nine arguments: the element, source (x,y) coordinates, source width and
// height (for cropping), destination (x,y) coordinates, and destination width
// and height (resize).
context.drawImage(<var>img_elem</var>, <var>sx</var>, <var>sy</var>, <var>sw</var>, <var>sh</var>, <var>dx</var>, <var>dy</var>, <var>dw</var>, <var>dh</var>);</code>
其效果见图3.

图 3: <font face="NSimsun">drawImage</font> 效果图。
2D Context API 提供了三个方法用于像素级操作:<font face="NSimsun">createImageData</font>, <font face="NSimsun">getImageData</font>, 和<font face="NSimsun">putImageData</font>。
<font face="NSimsun">ImageData</font>对象保存了图像像素值。每个对象有三个属性: width, height 和
data。data 属性类型为CanvasPixelArray,用于储存<font face="NSimsun"><var>width</var>*<var>height</var>*4</font>个像素值。每一个像素有RGB值和透明度alpha值(其值为 0 至
255,包括alpha在内!)。像素的顺序从左至右,从上到下,按行存储。
为了更好的理解其原理,让我们来看一个例子——绘制红色矩形
<code>// Create an ImageData object.
var imgd = context.createImageData(50,50);
var pix = imgd.data;

// Loop over each pixel 和 set a transparent red.
for (var i = 0; n = pix.length, i </code>
注意: 不是所有浏览器都实现了<font face="NSimsun"> createImageData</font>。在支持的浏览器中,需要通过<font face="NSimsun"> getImageData</font> 方法获取<font face="NSimsun"> ImageData</font> 对象。请参考示例代码。
通过 <font face="NSimsun">ImageData</font> 可以完成很多功能。如可以实现图像滤镜,或可以实现数学可视化 (如分形和其他特效)。下面特效实现了简单的颜色反转滤镜:
<code>// Get the <code>CanvasPixelArray</code> from the given coordinates and dimensions.
var imgd = context.getImageData(<var>x</var>, <var>y</var>, <var>width</var>, <var>height</var>);
var pix = imgd.data;

// Loop over each pixel and invert the color.
for (var i = 0, n = pix.length; i ImageData</code> at the given (x,y) coordinates.
context.putImageData(imgd, <var>x</var>, <var>y</var>);
图 4 显示了使用此滤镜后的 Opera
图像 (图 3是原图)。

图 4: 颜色反转滤镜
虽然最近的 WebKit 版本和 Firefox 3.1 nightly build 才开始支持 Text API ,为了保证文章完整性我决定仍在这里介绍文字 API 。
<font face="NSimsun">context</font> 对象可以设置以下 text 属性:
<font face="NSimsun">font</font>:文字字体,同属性 属性 <font face="NSimsun">textAlign</font>:文字水平对齐方式。可取属性值: <font face="NSimsun">start</font>, <font face="NSimsun">end</font>, <font face="NSimsun">left</font>,<font face="NSimsun">right</font>, <font face="NSimsun">center</font>。默认值:<font face="NSimsun">start</font>. <font face="NSimsun">textBaseline</font>:文字竖直对齐方式。可取属性值:<font face="NSimsun">top</font>, <font face="NSimsun">hanging</font>, <font face="NSimsun">middle</font>,<font face="NSimsun">alphabetic</font>, <font face="NSimsun">ideographic</font>, <font face="NSimsun">bottom</font>。默认值:<font face="NSimsun">alphabetic</font>. 有两个方法可以绘制文字: <font face="NSimsun">fillText</font> 和 <font face="NSimsun">strokeText</font>。第一个绘制带 fillStyle 填充的文字,后者绘制只有 strokeStyle 边框的文字。两者的参数相同:要绘制的文字和文字的位置(x,y) 坐标。还有一个可选选项——最大宽度。如果需要的话,浏览器会缩减文字以让它适应指定宽度。
文字对齐属性影响文字与设置的
(x,y) 坐标的相对位置。
下面是一个在 canvas 中绘制"hello world" 文字的例子
<code>context.fillStyle    = '#00f';
context.font         = 'italic 30px sans-serif';
context.textBaseline = 'top';
context.fillText  ('Hello world!', 0, 0);
context.font         = 'bold 30px sans-serif';
context.strokeText('Hello world!', 0, 50);</code>图 5 是其效果图。

图 5: 文字效果
目前只有 Konqueror 和 Firefox 3.1 nightly build 支持 Shadows API 。API 的属性为:
<font face="NSimsun">shadowColor</font>:阴影颜色。其值和 CSS 颜色值一致。 <font face="NSimsun">shadowBlur</font>:设置阴影模糊程度。此值越大,阴影越模糊。其效果和 Photoshop 的高斯模糊滤镜相同。 <font face="NSimsun">shadowOffsetX</font> 和 <font face="NSimsun">shadowOffsetY</font>:阴影的 x 和 y 偏移量,单位是像素。 下面是 canvas 阴影的例子:
<code>context.shadowOffsetX = 5;
context.shadowOffsetY = 5;
context.shadowBlur    = 4;
context.shadowColor   = 'rgba(255, 0, 0, 0.5)';
context.fillStyle     = '#00f';
context.fillRect(20, 20, 150, 100);</code>
其效果见图 6。
图 6: canvas 阴影效果——蓝色矩形,红色阴影
除了 CSS 颜色,<font face="NSimsun"> fillStyle</font> 和 <font face="NSimsun">strokeStyle</font> 属性可以设置为 <font face="NSimsun">CanvasGradient</font> 对象。——通过 <font face="NSimsun">CanvasGradient</font>可以为线条和填充使用颜色渐变。
欲创建 <font face="NSimsun">CanvasGradient</font> 对象,可以使用两个方法:<font face="NSimsun">createLinearGradient</font> 和 <font face="NSimsun">createRadialGradient</font>。前者创建线性颜色渐变,后者创建圆形颜色渐变。
创建颜色渐变对象后,可以使用对象的 <font face="NSimsun">addColorStop</font> 方法添加颜色中间值。
下面的代码演示了颜色渐变使用方法:
<code>// You need to provide the source 和 destination (x,y) coordinates
// for the gradient (from where it starts 和 where it ends).
var gradient1 = context.createLinearGradient(<var>sx</var>, <var>sy</var>, <var>dx</var>, <var>dy</var>);

// Now you can add colors in your gradient.
// The first argument tells the position for the color in your gradient. The
// accepted value range is from 0 (gradient start) to 1 (gradient end).
// The second argument tells the color you want, using the CSS color format.
gradient1.addColorStop(0,   '#f00'); // red
gradient1.addColorStop(0.5, '#ff0'); // yellow
gradient1.addColorStop(1,   '#00f'); // blue

// For the radial gradient you also need to provide source
// 和 destination circle radius.
// The (x,y) coordinates define the circle center points (start 和
// destination).
var gradient2 = context.createRadialGradient(<var>sx</var>, <var>sy</var>, <var>sr</var>, <var>dx</var>, <var>dy</var>, <var>dr</var>);

// Adding colors to a radial gradient is the same as adding colors to linear
// gradients.</code>
我也准备了一个更复杂的例子,使用了线性颜色渐变、阴影和文字。其效果见图 7。

图 7: 使用线性颜色渐变的例子
如果你想知道使用 Canvas可以做些什么,可以参看以下的工程:
Canvas 是 HTML 5最让人期待的特性之一,目前已获得大部分 Web 浏览器支持。Canvas 可以帮助创建游戏、增强图形用户界面。2D context
API 提供大量图形绘制功能——我希望通过本文你了解了 canvas 使用,并且你有兴趣了解更多!


![[Web front-end] Node.js quick start](https://img.php.cn/upload/course/000/000/067/662b5d34ba7c0227.png)


