 Software Tutorial
 Mobile Application
 How to limit the number of people in an Apple hotspot 'Attachment: Detailed steps for setting up an iPhone hotspot'
How to limit the number of people in an Apple hotspot 'Attachment: Detailed steps for setting up an iPhone hotspot'
php editor Strawberry will introduce to you how to limit the number of people connected to Apple hotspots. The hotspot function provides convenient network sharing on iPhone, but sometimes we want to limit the number of people connected to ensure the stability and speed of the hotspot. In this article, we will introduce you in detail the steps to limit the number of people when setting up an iPhone hotspot to help you easily control the number of users connected to the hotspot. Let’s take a look at how to set it up!
Have you ever wanted to share your iPhone's 3G/4G cellular connection with nearby Wi-Fi-only devices such as laptops and non-cellular iPads? You're in luck: It's easy to set up your iPhone as a portable Wi-Fi hotspot, opening its network connection to anyone who's close enough and has the password. That's it.
Should I create a Wi-Fi hotspot with my iPhone?
If you're traveling with an iPhone and a Wi-Fi-only iPad and want to get some work done, you have two options: work on a large-screen device but can't connect to an online resource; or go online , but only on smaller screens.
You can set your iPhone as a Wi-Fi hotspot so you can connect your laptop and tablet conveniently. This is very practical for working on the go.
Set your iPhone as a hotspot is simple, but you may need to contact your phone carrier or check your contract terms and conditions first. Most networks support tethering, but some may discourage it and may charge additional fees or limit data allowances. If you're a monthly paying user, the network may count tethering as part of your data quota, but if you're a prepaid user, you may need to pay extra. So before setting up a hotspot, make sure to check with your carrier to avoid unnecessary charges.
One more thing to remember when it comes to data quotas: If your quota is limited, you should only use your Wi-Fi hotspot briefly. Please note that your Mac or PC may consume data quickly compared to just browsing on your iPhone.
How to Turn on a Hotspot on iPhone
Creating a hotspot turns your iPhone into a Wi-Fi router, just like the router in your home. The iPhone connects to the Internet using its 3G/4G cellular data connection, which then broadcasts via a Wi-Fi connection to which a Mac, iPad, PC, or other device can connect. You can also create a wired connection to your computer's USB port.
Please note that once the hotspot is turned on, the iPhone will use 3G or 4G for the data connection. This fact is obvious, but worth mentioning because you might be logging into your hotel Wi-Fi with your iPhone and thinking you can share it this way: you can't.
There are two ways to create a hotspot on iPhone.
Turn on iPhone Hotspot - Quick Method
If you have iOS 13 installed on your iPhone, the fastest way to turn on the hotspot is to do the following:
On iPhone X, XS, XR , drag 11 down from the top corner to bring up Control Center. On older iPhones, swipe up from the bottom to open Control Center. Firmly press the four icon blocks representing Airplane Mode, Wi-Fi, and Bluetooth. This will open a larger block of icons, including AirDrop and Personal Hotspot. Just click on "Personal Hotspot" and it will become "Discoverable".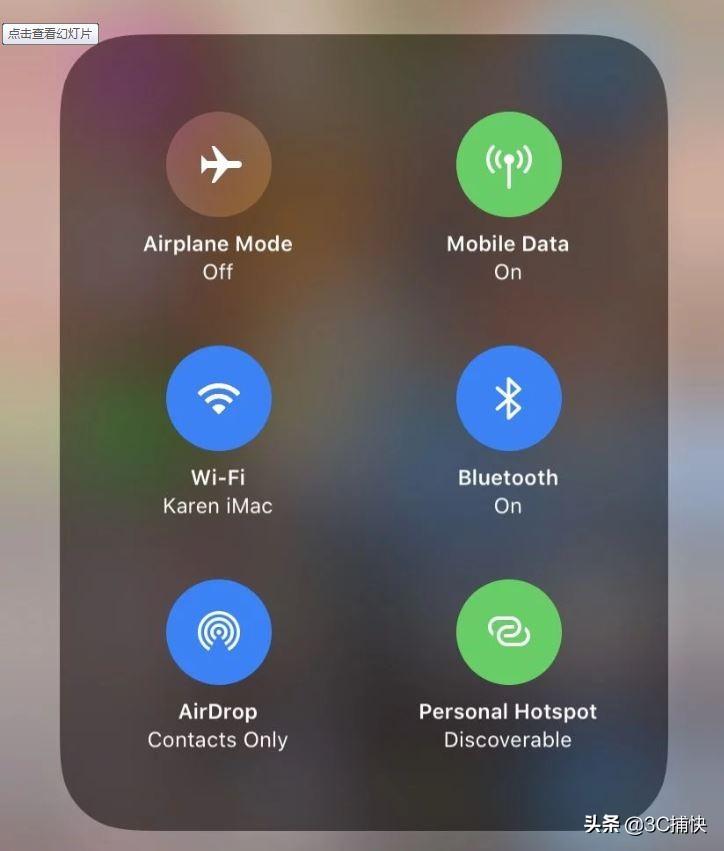

Open iPhone Hotspot through Settings
In older iOS versions, there is no way to open Hotspot from within Control Center. Hotspots can only be set up in settings. It's still possible to turn on hotspots through Settings in iOS 13, but it works slightly differently.
In iOS 13
Open Settings and click "Personal Hotspot" (under "Mobile Data/Cellular Data"). This will automatically open your Hotspot in iOS 13. New options in iOS 13 include new options to "Share a personal hotspot with Family Sharing members" and "Allow others to join." If you want to create a hotspot, you need to allow others to join, even if you don't plan to let others join. Your Hotspot will automatically become "discoverable", but others will need to enter a password to join the Hotspot.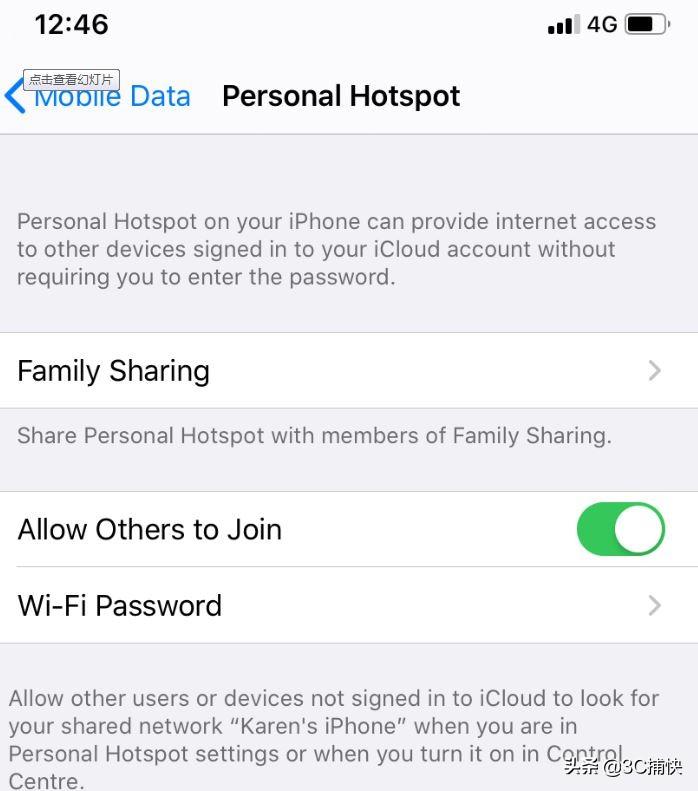

You and anyone you share with Home in iOS 13 will be able to automatically sign in to Hotspot without using this password: hence the new " Home Sharing tab. Click the button and you'll see the option to allow other family members to join your hotspot. You can choose between "Ask for approval" or "Automatically" to determine how they join the hotspot. You and your family will be identified through iCloud collateral.
Read other iOS 13 features we love here.
Pre-iOS 13 versions
Open the Settings app and tap Mobile Data/Cellular Data. (In iOS 10 or later. In some older versions of iOS, you can just select Mobile/Cellular.) Tap Personal Hotspot, then set Personal Hotspot to On. (Tap the slider so it turns green.) If Wi-Fi and/or Bluetooth are turned off, iOS will ask you if you want to turn them back on. We recommend this - without them the hotspot will be USB only. (Which is more secure.) Tap Wi-Fi Password and enter an appropriate password. (This has nothing to do with your Apple ID or regular Wi-Fi connection.) Now, check the hotspot name listed under “Connect using Wi-Fi” (in our case, “David’s iPhone”).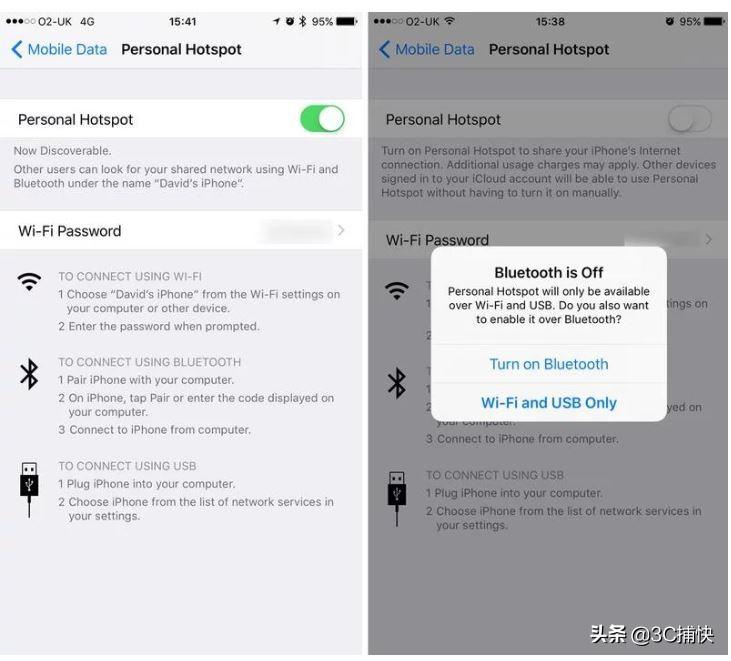

How to connect to an iPhone hotspot from your iPhone or iPad
Connecting your iPhone or iPad to a hotspot is simple. Follow these steps:
When sharing a hotspot from an iPhone, open the second iPhone, or open the iPad's Settings. Click WLAN. Various Wi-Fi networks will appear. These should include hotspots created by the iPhone. Select this hotspot. You may need to log in (depending on the version of iOS you are running). If a password is required, please view it on the Hotspot shared iPhone. You'll see it in Settings >Personal Hotspot (or Settings > Mobile Data >Personal Hotspot).Now you will be connected to the web through that iPhone's data connection.
If you are connecting to a Hotspot broadcast by your own device, any other devices you own should be able to connect without a password as long as you are logged in to iCloud. If you're running iOS 13 and using Family Sharing, you can automatically connect to your family members' Hotspots (and their Hotspots) without a password.
In iOS 13
We love this new feature in iOS 13 for changing the WiFi network you're connected to:
Open Control Center on your iPhone (depending on the one you're using iPhone, drag down from the top right corner or swipe up from the bottom). Press and hold the icon group containing the Wi-Fi icon. Now, press and hold the Wi-Fi icon. Look! A new screen will open with all the Wi-Fi networks in the surrounding area, so you can choose the one you want.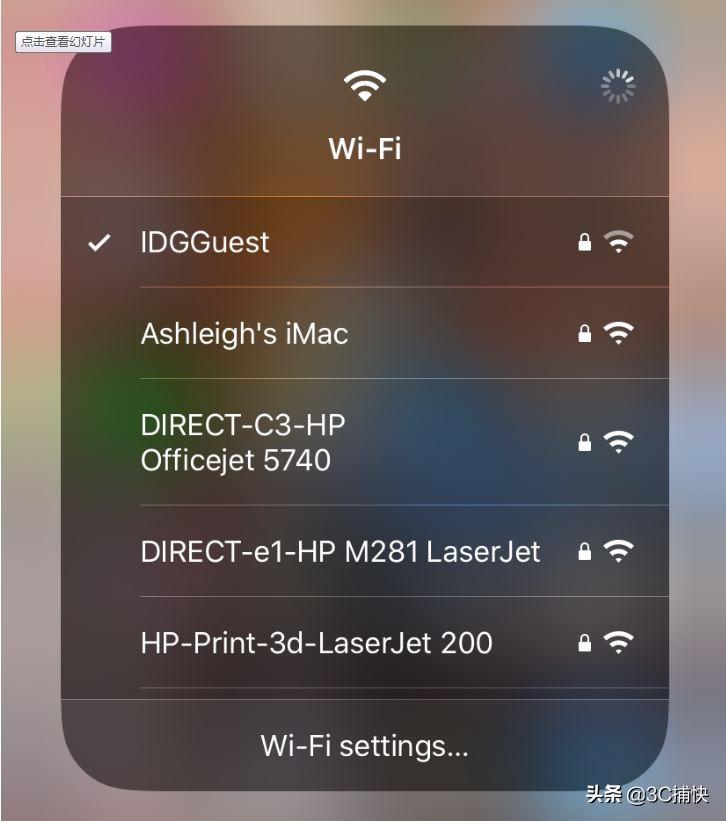

How to connect to iPhone hotspot from Mac
Now you can share the hotspot from your iPhone and you can easily connect from your Mac to it. That's it:
1 Click the Wi-Fi icon in your Mac's menu bar. You'll see a number of Wi-Fi networks that can be seen locally. If necessary, turn on Wi-Fi.
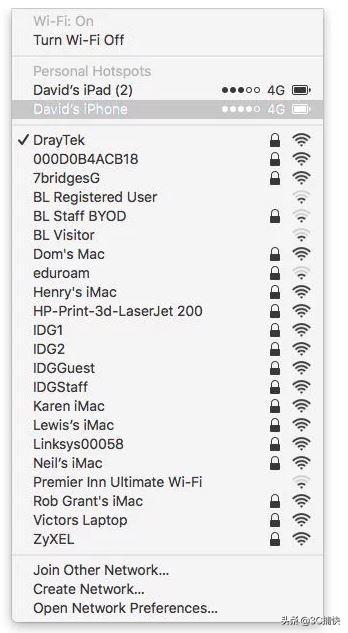

2 In the Personal Hotspot section you should see your iPhone’s hotspot (if you don’t have a Personal Hotspot section, you should find it below). Select it.
3 If you are using iOS 13, your Mac will automatically connect as soon as you are logged into iCloud, otherwise enter the password shown in the Personal Hotspot section on your iPhone.
If you don’t have a Wi-Fi icon in your Mac’s menu bar, open System Preferences and click Network. Select Wi-Fi in the list on the left. Select iPhone Hotspot from the network name drop-down menu.
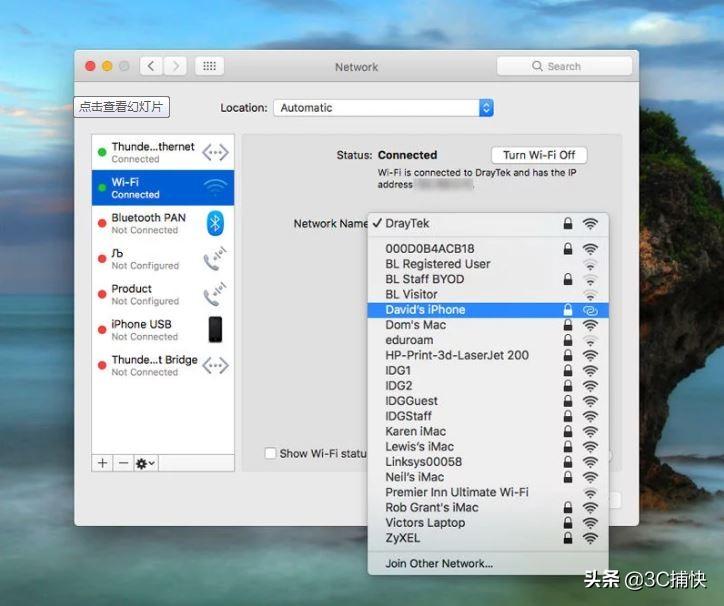

While you’re here, there should be a checkmark next to “Show Wi-Fi status in menu bar.”
Now you can browse the internet on your Mac or iPad using the data connection on your iPhone. However, your mileage may vary depending on your iPhone's network connection. You may find that your internet is running a little slower than before.
When finished, don't forget to tap "Settings" > "Mobile" > "Personal Hotspot" on your iPhone and set it to "Off".
What to do if your Mac can’t connect to a Wi-FI hotspot?
There is a problem connecting your Mac to a Wi-Fi hotspot created by your iPhone. It eventually fixed itself, which may indicate an issue with iOS 13 that prevented Hotspot sharing from working properly.
How to Connect to iPhone Hotspot from PC (Windows)
After sharing the hotspot from your iPhone, you should be able to see the Wi-Fi hotspot and connect to it through your PC.
First turn on Wi-Fi. Then click on the Wi-Fi icon in the taskbar. Choose your iPhone. Click Connect.enter password.
How to connect to an iPhone hotspot via Bluetooth
You can connect using Bluetooth. You need to use the code to pair your iPhone and computer.
On a Mac, you need to open System Preferences > Bluetooth > Turn on Bluetooth, look for it on your iPhone and click Connect. On a PC, you need to click Join Personal Area Network > Add Device and select your iPhone from the devices displayed.How to Connect to an iPhone Hotspot via USB
You can also use a USB cable to connect directly from your Mac to your iPhone if you are in a location with a lot of competitive Wi-Fi networks, or because you don't feel comfortable doing so , this might be your best choice. Broadcasting your connection is secure (although no one should be able to piggy-back on it without a password), but it's also likely to be faster using a USB connection than Wi-Fi. That's it:
You need the latest version of iTunes on your Mac (this version is no longer needed as you manage your iPhone through Finder once Catalina launches).
Connect your iPhone to your Mac using the USB cable that came with your iPhone (this will be the USB cable - if your Mac has USB-C, you will need an adapter).
You should see a warning asking if you "Trust this computer". Click Trust.
Now, select iPhone from the list of networks that you can see when you click on the Wi-Fi logo in the menu bar.
Dangers & Warnings
What if someone tries to hijack your connection, burn your data connection, and/or access dodgy websites and content?
You should be able to because the iPhone hotspot is password protected. (A more important reason not to choose the word "password" or something else that's easy to guess.) You'll see a small notification at the top of your iPhone screen when the device accesses its hotspot, so you'll be warned if you're in a train car Someone did manage to guess your password.
A more important warning involves your own surfing data limits. It's easy to forget about 3G or 4G data limits when accessing the web through devices that are typically limited to Wi-Fi connections. Just remember, so to speak, and we recommend you avoid downloading large apps or similar.
ok, this article ends here. I hope it can help you to a certain extent. After reading it, I think this article How to Limit the Number of People in Apple Hotspots "Attachment: Detailed steps for setting up iPhone hotspots" If it’s good, don’t forget to give it a thumbs up!
The above is the detailed content of How to limit the number of people in an Apple hotspot 'Attachment: Detailed steps for setting up an iPhone hotspot'. For more information, please follow other related articles on the PHP Chinese website!

Hot AI Tools

Undresser.AI Undress
AI-powered app for creating realistic nude photos

AI Clothes Remover
Online AI tool for removing clothes from photos.

Undress AI Tool
Undress images for free

Clothoff.io
AI clothes remover

AI Hentai Generator
Generate AI Hentai for free.

Hot Article

Hot Tools

Notepad++7.3.1
Easy-to-use and free code editor

SublimeText3 Chinese version
Chinese version, very easy to use

Zend Studio 13.0.1
Powerful PHP integrated development environment

Dreamweaver CS6
Visual web development tools

SublimeText3 Mac version
God-level code editing software (SublimeText3)

Hot Topics
 1378
1378
 52
52
 iPhone 16 Pro and iPhone 16 Pro Max official with new cameras, A18 Pro SoC and larger screens
Sep 10, 2024 am 06:50 AM
Apple has finally lifted the covers off its new high-end iPhone models. The iPhone 16 Pro and iPhone 16 Pro Max now come with larger screens compared to their last-gen counterparts (6.3-in on the Pro, 6.9-in on Pro Max). They get an enhanced Apple A1
 iPhone parts Activation Lock spotted in iOS 18 RC — may be Apple\'s latest blow to right to repair sold under the guise of user protection
Sep 14, 2024 am 06:29 AM
Earlier this year, Apple announced that it would be expanding its Activation Lock feature to iPhone components. This effectively links individual iPhone components, like the battery, display, FaceID assembly, and camera hardware to an iCloud account,
 iPhone parts Activation Lock may be Apple\'s latest blow to right to repair sold under the guise of user protection
Sep 13, 2024 pm 06:17 PM
Earlier this year, Apple announced that it would be expanding its Activation Lock feature to iPhone components. This effectively links individual iPhone components, like the battery, display, FaceID assembly, and camera hardware to an iCloud account,
 Gate.io trading platform official app download and installation address
Feb 13, 2025 pm 07:33 PM
This article details the steps to register and download the latest app on the official website of Gate.io. First, the registration process is introduced, including filling in the registration information, verifying the email/mobile phone number, and completing the registration. Secondly, it explains how to download the Gate.io App on iOS devices and Android devices. Finally, security tips are emphasized, such as verifying the authenticity of the official website, enabling two-step verification, and being alert to phishing risks to ensure the safety of user accounts and assets.
 Multiple iPhone 16 Pro users report touchscreen freezing issues, possibly linked to palm rejection sensitivity
Sep 23, 2024 pm 06:18 PM
If you've already gotten your hands on a device from the Apple's iPhone 16 lineup — more specifically, the 16 Pro/Pro Max — chances are you've recently faced some kind of issue with the touchscreen. The silver lining is that you're not alone—reports
 Anbi app official download v2.96.2 latest version installation Anbi official Android version
Mar 04, 2025 pm 01:06 PM
Binance App official installation steps: Android needs to visit the official website to find the download link, choose the Android version to download and install; iOS search for "Binance" on the App Store. All should pay attention to the agreement through official channels.
 How to solve the problem of 'Undefined array key 'sign'' error when calling Alipay EasySDK using PHP?
Mar 31, 2025 pm 11:51 PM
Problem Description When calling Alipay EasySDK using PHP, after filling in the parameters according to the official code, an error message was reported during operation: "Undefined...
 Download link of Ouyi iOS version installation package
Feb 21, 2025 pm 07:42 PM
Ouyi is a world-leading cryptocurrency exchange with its official iOS app that provides users with a convenient and secure digital asset management experience. Users can download the Ouyi iOS version installation package for free through the download link provided in this article, and enjoy the following main functions: Convenient trading platform: Users can easily buy and sell hundreds of cryptocurrencies on the Ouyi iOS app, including Bitcoin and Ethereum. and Dogecoin. Safe and reliable storage: Ouyi adopts advanced security technology to provide users with safe and reliable digital asset storage. 2FA, biometric authentication and other security measures ensure that user assets are not infringed. Real-time market data: Ouyi iOS app provides real-time market data and charts, allowing users to grasp encryption at any time


