
 Software Tutorial
Mobile Application
How to divide disk partitions Attached: Disk partitioning tutorial
Software Tutorial
Mobile Application
How to divide disk partitions Attached: Disk partitioning tutorial
How to divide disk partitions Attached: Disk partitioning tutorial

php editor Yuzai brings you a detailed tutorial on disk partitioning to help you understand how to partition the disk. Disk partitioning is to divide the hard disk into multiple logical partitions to better manage and utilize storage space. In this tutorial, we will introduce the basic concepts of disk partitioning, how to use partitioning tools, and provide practical cases to help you better understand and apply disk partitioning technology. Whether you are a beginner or an experienced user, this tutorial can provide you with useful guidance, allowing you to easily master the methods and techniques of disk partitioning.
How to divide disk partitions? Sometimes, we may find that our computer is slightly different from other people's computers. What is the difference? The partitions of the hard disk will be somewhat different, and there may even be partitions with only one or two hard disks, or there may be redundant hard disk partitions.


# It may bring some inconvenience to our daily entertainment and office file classification. But we don’t have to sit back and watch. Below I will introduce how to partition a computer disk and how to prevent data loss after partitioning the disk. I hope to be helpful!
Conceptual science: What is a disk partition?
How to divide disk partitions? Chen Min thinks that before understanding the method, let’s first know what disk partitioning is! Many users feel numb due to the trouble of this step of disk partitioning, but we must first understand what the concept of computer hard disk partitioning is and why partitioning is necessary. Hard disk partitioning refers to creating multiple independent logical units on a physical hard disk to facilitate file management and use. These logical units are the so-called c, d, e drives, etc. Hard disk partitioning is essentially a formatting of the hard disk.

#Operation method: How to divide disk partitions?
After understanding the explanation of what disk partitioning is, I believe that everyone has almost an understanding of the concept of hard disk partitioning! Now let’s take a look at how to divide disk partitions! Let’s take a look below!
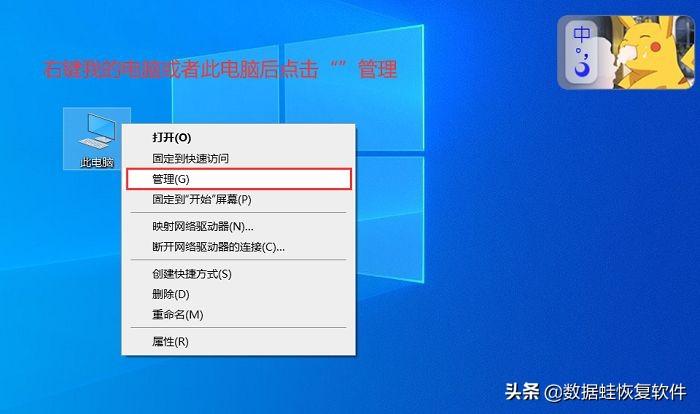
Step 1: Right-click "This Computer (some computer systems show it as My Computer)" on your computer, and then click "Manage";
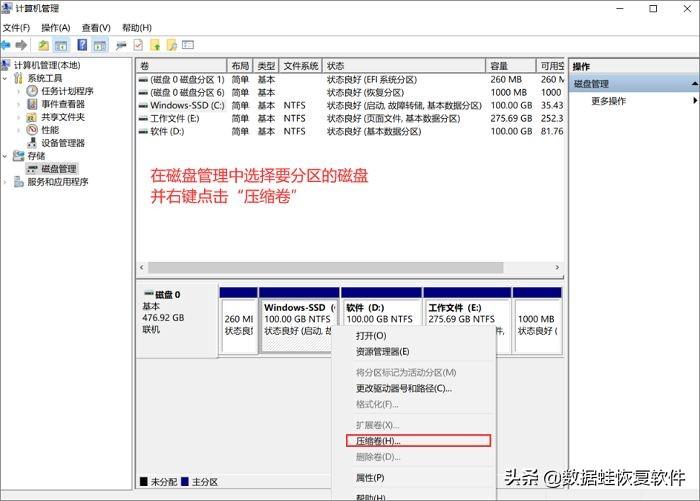
Step 2: Find and click " "Disk Management", right-click the disk that needs to be partitioned and click "Compress Volume";
Step 3: The system will pop up the interface to compress the disk size. This interface has four space size values, the first one is the disk The total size, the second is the size of the available disk space, the third is the size of the compressed space you need to enter, the compressed space size cannot exceed the available space, and the fourth is the size of the compressed disk. Enter the size of the compressed space and click [Compress];
Step 4: After the compression is completed, you will clearly see a new green disk in the window. This part of the memory space is the new one you just separated. Disk area, right-click to create a new simple volume;
Step 5: The hard disk partition instruction wizard will pop up. Select the size, hard disk name, format or not, and finally click Finish. This completes the hard disk partition, you will find that a new hard disk partition has been added when you open the computer again;
Prevention measures : Data recovery after disk partition?
We not only learned from the above what disk partitioning is, but also how to divide disk partitions. Now Chen Min wants to give you a preventive method: data recovery after disk partitioning! There are many cases of data lost due to disk partitioning. Many computer players don’t know what to do after such a situation occurs. Let’s take a look at how to retrieve lost data if this happens. Disk data!
Solution: Use software to retrieve data lost after disk partitioning
This situation is different from deletion. If you delete a file, you can try to find it in the recycle bin. Even if it cannot be found in the recycle bin, you can also use the registry to retrieve it, so you want to retrieve it. These data need to use some special methods, which can be done using the software - Data Frog Data Recovery Expert. Let’s verify it together!
Software functions:
Data Frog Data Recovery Expert is a professional data recovery software that supports the recovery of more than 300 file formats such as files, photos, and videos. Supported device types include: computers/notebooks, recycle bins, USB flash drives, hard drives, mobile hard drives, memory cards, digital devices, etc. The company has a professional recovery team that provides free technical support, preview before recovery, free scanning, and one-click recovery. Friends who need to recover data must give it a try. I hope it can help everyone successfully recover data!
Operation Instructions:
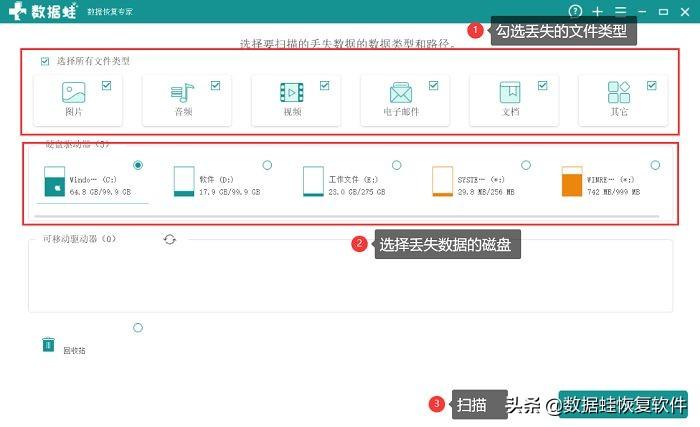
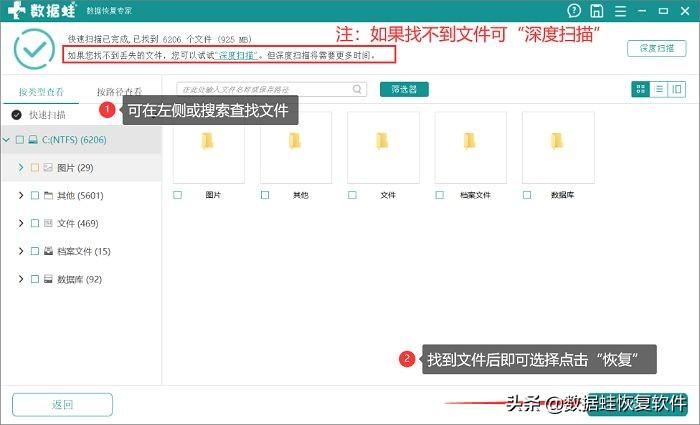
Step 1: After entering the Data Frog Data Recovery Expert, select the file type and file path to be scanned, and then click Scan;
Data Recovery Expert - Data Frog professionally provides computer and laptop data recovery software downloads!
Step 2: If you can’t find the file type you need after the scan, you can also perform a “deep scan”. Of course, if you can find it (on the left side of the software or search through the search), select it. You can click "Restore" directly!
How to divide disk partitions? And "Chen Min has shared with you the method of data recovery after disk partitioning. If data is lost after partitioning, use the preventive methods shared by Chen Min to try to retrieve it! Okay, this sharing is completed, if it succeeds To retrieve lost data, don’t forget to like and follow Chen Min!
The above is all the content of this article. It is a very happy thing to be able to help everyone. After reading this If you don’t understand how to divide disk partitions in "Attachment: Disk Partition Tutorial", I suggest you read it again. Please continue to check out other related content on this site’s learning network!
The above is the detailed content of How to divide disk partitions Attached: Disk partitioning tutorial. For more information, please follow other related articles on the PHP Chinese website!

Hot AI Tools

Undresser.AI Undress
AI-powered app for creating realistic nude photos

AI Clothes Remover
Online AI tool for removing clothes from photos.

Undress AI Tool
Undress images for free

Clothoff.io
AI clothes remover

AI Hentai Generator
Generate AI Hentai for free.

Hot Article
Hot Tools

Notepad++7.3.1
Easy-to-use and free code editor

SublimeText3 Chinese version
Chinese version, very easy to use

Zend Studio 13.0.1
Powerful PHP integrated development environment

Dreamweaver CS6
Visual web development tools

SublimeText3 Mac version
God-level code editing software (SublimeText3)
Hot Topics
 1378
1378
 52
52

 How to use sql datetime
Apr 09, 2025 pm 06:09 PM
How to use sql datetime
Apr 09, 2025 pm 06:09 PM
The DATETIME data type is used to store high-precision date and time information, ranging from 0001-01-01 00:00:00 to 9999-12-31 23:59:59.99999999, and the syntax is DATETIME(precision), where precision specifies the accuracy after the decimal point (0-7), and the default is 3. It supports sorting, calculation, and time zone conversion functions, but needs to be aware of potential issues when converting precision, range and time zones.
 Can I retrieve the database password in Navicat?
Apr 08, 2025 pm 09:51 PM
Can I retrieve the database password in Navicat?
Apr 08, 2025 pm 09:51 PM
Navicat itself does not store the database password, and can only retrieve the encrypted password. Solution: 1. Check the password manager; 2. Check Navicat's "Remember Password" function; 3. Reset the database password; 4. Contact the database administrator.
 How to view database password in Navicat for MariaDB?
Apr 08, 2025 pm 09:18 PM
How to view database password in Navicat for MariaDB?
Apr 08, 2025 pm 09:18 PM
Navicat for MariaDB cannot view the database password directly because the password is stored in encrypted form. To ensure the database security, there are three ways to reset your password: reset your password through Navicat and set a complex password. View the configuration file (not recommended, high risk). Use system command line tools (not recommended, you need to be proficient in command line tools).
 How to delete rows that meet certain criteria in SQL
Apr 09, 2025 pm 12:24 PM
How to delete rows that meet certain criteria in SQL
Apr 09, 2025 pm 12:24 PM
Use the DELETE statement to delete data from the database and specify the deletion criteria through the WHERE clause. Example syntax: DELETE FROM table_name WHERE condition; Note: Back up data before performing a DELETE operation, verify statements in the test environment, use the LIMIT clause to limit the number of deleted rows, carefully check the WHERE clause to avoid misdeletion, and use indexes to optimize the deletion efficiency of large tables.
 Navicat's method to view PostgreSQL database password
Apr 08, 2025 pm 09:57 PM
Navicat's method to view PostgreSQL database password
Apr 08, 2025 pm 09:57 PM
It is impossible to view PostgreSQL passwords directly from Navicat, because Navicat stores passwords encrypted for security reasons. To confirm the password, try to connect to the database; to modify the password, please use the graphical interface of psql or Navicat; for other purposes, you need to configure connection parameters in the code to avoid hard-coded passwords. To enhance security, it is recommended to use strong passwords, periodic modifications and enable multi-factor authentication.
 How to recover data after SQL deletes rows
Apr 09, 2025 pm 12:21 PM
How to recover data after SQL deletes rows
Apr 09, 2025 pm 12:21 PM
Recovering deleted rows directly from the database is usually impossible unless there is a backup or transaction rollback mechanism. Key point: Transaction rollback: Execute ROLLBACK before the transaction is committed to recover data. Backup: Regular backup of the database can be used to quickly restore data. Database snapshot: You can create a read-only copy of the database and restore the data after the data is deleted accidentally. Use DELETE statement with caution: Check the conditions carefully to avoid accidentally deleting data. Use the WHERE clause: explicitly specify the data to be deleted. Use the test environment: Test before performing a DELETE operation.
 How to add columns in PostgreSQL?
Apr 09, 2025 pm 12:36 PM
How to add columns in PostgreSQL?
Apr 09, 2025 pm 12:36 PM
PostgreSQL The method to add columns is to use the ALTER TABLE command and consider the following details: Data type: Select the type that is suitable for the new column to store data, such as INT or VARCHAR. Default: Specify the default value of the new column through the DEFAULT keyword, avoiding the value of NULL. Constraints: Add NOT NULL, UNIQUE, or CHECK constraints as needed. Concurrent operations: Use transactions or other concurrency control mechanisms to handle lock conflicts when adding columns.
 How to clean all data with redis
Apr 10, 2025 pm 05:06 PM
How to clean all data with redis
Apr 10, 2025 pm 05:06 PM
How to clean all Redis data: Redis 2.8 and later: The FLUSHALL command deletes all key-value pairs. Redis 2.6 and earlier: Use the DEL command to delete keys one by one or use the Redis client to delete methods. Alternative: Restart the Redis service (use with caution), or use the Redis client (such as flushall() or flushdb()).
