

Keyboard cannot capitalize after mac upgrade?

php editor Banana will give you the answer: After upgrading the Mac system, sometimes you will encounter the problem that the keyboard cannot capitalize. This may be caused by the auto-capitalization feature set by the system. You can fix this issue by following these steps: First, click on the Apple icon in the upper right corner of the screen and select "System Preferences." Then, in the window that opens, click "Keyboard." Next, click the "Input Sources" tab and make sure the selected input source matches the type of keyboard you're actually using. Finally, uncheck the "Auto-capitalize" option. If the problem persists, you can try restarting your computer or contact Apple's official customer service for help.
How to type capital letters on Apple Mac?
The method to type capital letters on Apple Mac is very simple: hold down the Shift key and enter the letters that need to be capitalized at the same time to enter capital letters. Additionally, you can use the Caps Lock key to lock caps mode.
The uppercase key on MacBook is the "caps lock" key. You can find the "caps lock" button on the keyboard and click it to enable it. When you press the Shift key, you can switch to the English input method, and press the "caps lock" key to switch between uppercase and lowercase letters. This is because the English input method has requirements for distinguishing between uppercase and lowercase letters.
In the English input method, press the Shift key to switch between uppercase and lowercase letters, and press the Caps Lock key to lock the uppercase state. When the Caps Lock light is on, it means it is in uppercase mode; when the light is off, it means it is in lowercase mode.
On Apple computers, you can use different methods to enter uppercase characters. First, you can click the [caps lock] key in the open editable text to switch to uppercase mode. In addition, you can also use the [shift] [letter key] key combination on the keyboard to temporarily enter uppercase letters. If you are using an Apple computer's text edit box, you can directly output uppercase characters. These methods can help you enter uppercase characters on your Apple computer.
The specific operation is as follows: First, find and click the [Memo] icon where the arrow in the picture below points. Then, after opening the software, create a new blank memo according to the arrow in the picture below. Finally, click the [Spell] icon at the top according to the arrow in the picture below.
The Shift key on a Mac keyboard is located below the left and right sides of the keyboard with an upward arrow symbol. Holding down the Shift key switches the letter keys on your keyboard to uppercase letters.
How to switch the capitalization of letters in the Apple notebook input method
There are three ways to switch the capitalization of letters in the Apple notebook. Method one is to hold down the Shift key, and you can input uppercase letters no matter in Chinese or lowercase English mode. The second method is to hold down the Caps Lock key for 2 seconds. When the Caps Lock light lights up, it means switching to uppercase input state. Method three is to customize the keyboard settings to switch between upper and lower case. All three methods can easily switch between upper and lower case.
Press the "Caps Lock" key to switch to uppercase, and release the "Caps Lock" key to switch back to lowercase. If you want to customize the case switching key, you can open the keyboard options in the preferences, and then click the modifier key in the lower right corner to set it.
Before switching the input method, check the input method display in the upper right corner of the computer screen. If it is displayed as [中] or [平], press the [caps lock] key to switch to uppercase mode, and press the [caps lock] key again to switch back to Chinese mode.
4. Method 1: Press the Chinese/English key on the keyboard, and the indicator light will light up. Press the letter you want to type on the keyboard. All letters pressed produce uppercase letters. Method 2: Press the up arrow key on the keyboard and don't let go. Press the letter keys simultaneously. The letter you press will be capitalized.

How to switch keyboard case on Mac computer
1. Open editable text on Apple computer; on the keyboard, click [caps lock] in uppercase mode key; on the keyboard, click the [shift] [letter key] key combination to temporarily switch between uppercase and lowercase letters; in the Apple computer text editing box, output uppercase characters.
2. Method 1: Whether in Chinese or lowercase English mode, just hold down the shift key to input uppercase letters. Method 2: Press and hold the caps lock key for 2 seconds until the caps lock light turns on to switch to uppercase input state. Method 3: Define your own keyboard to switch between upper and lower case.
3. You can customize a button to switch between uppercase letters. For example, customize [fn] to switch to uppercase. Then first click on Preferences. Click on this keyboard. Click the keyboard again and click the modifier key in the lower right corner. Click [caps lock] and set it to no operation.
How to switch to uppercase letters in macbook input method
Method 1: Whether in Chinese state or lowercase English state, just hold down the shift key to achieve uppercase input. Method 2: Press and hold the caps lock key for 2 seconds until the caps lock light turns on to switch to uppercase input state. Method 3: Define your own keyboard to switch between upper and lower case.
Shift key. On Apple laptops, the key to switch between uppercase and lowercase is the Shift key. In the lower left corner of the keyboard, we can find this key and use it to switch letter case.
Use command space on the macbook keyboard to switch input methods. Hold down command and click space again to switch to the next input method. To temporarily switch to lowercase letters, press shift. To temporarily switch to uppercase letters, press capslock. Switch back to the original input method and press the original key again.
How to switch macbook to lowercase (how to switch macbook to uppercase but no response)
How to switch macbook to uppercase: First, you need to switch the input method to English input method. The default method is to hold down "control" and the space bar at the same time to switch. After switching the input method to English input method, click the "capslock" button on the keyboard to turn on letter capitalization.
If the uppercase and lowercase keys of Apple computers cannot be switched, it may be caused by a problem with the keyboard keys or a problem with the system settings. Specific troubleshooting methods: In Mac systems, the Caps Lock switch of the keyboard can be set. Check this setting first.
Shift key. On Apple laptops, the key to switch between uppercase and lowercase is the Shift key. In the lower left corner of the keyboard, we can find this key and use it to switch letter case.
First switch the input method to the default "Chinese state" and click the "Chinese-English switch key". At this time, the computer's input method switches to "English state" 2. Open a place where you can type, such as txtwordexcel3 Press and hold the Shift key on your keyboard, then press the capitalization you want to type because.
How to switch between uppercase and lowercase in Apple notebooks: Method 1: Whether in Chinese or lowercase English, just hold down the shift key to input uppercase letters. Method 2: Press and hold the caps lock key for 2 seconds until the caps lock light turns on to switch to uppercase input state. Method 3: Define your own keyboard to switch between upper and lower case.
How to solve the problem that Mac computers cannot use the CapsLock key to lock capitalization
1. The first step is to click the [Apple] icon in the upper left corner as pointed by the arrow in the picture below. The second step is to click on the [System Preferences] option in the pop-up menu bar as pointed by the arrow in the picture below. Step 3: In the pop-up window, click the [Keyboard] option according to the arrow in the picture below.
2. Find the keyboard on the system preference panel, click to enter and then click to switch to the "Input Method" tab. After selecting the system input method, uncheck "Use Caps Lock Key" below. , detailed steps: If you just click once briefly, the Chinese and English input methods will be switched.
3. Taking Windows system as an example, first find the language preference in the lower right corner of the computer desktop. Find spelling, typing, and keyboard settings. Then find the advanced keyboard settings. Find the language bar option. Select Advanced key settings. After selecting the capslock key, confirm, and the capslock shortcut key can be used normally.
4. Method: Press the Caps Lock key again. If you press the Caps Lock key to turn it on, you need to press the Caps Lock key again to turn it off. The Caps Lock key is located very close to the Shift and Tab keys, making it easy to press the wrong key, so it's best to disable it entirely. You can disable it on Windows computers and Mac computers.
5. Press the "capslock" key to lock the uppercase state, and do not lock the "capslock" key to lock the lowercase state. Then use your own custom keyboard to switch between uppercase and lowercase, open the keyboard in preferences, and click the modifier key in the lower right corner.
Conclusion: The above is what this site has introduced to you about the inability to capitalize on the keyboard after mac upgrade. I hope it will be helpful to everyone. If you want to know more about this, remember to bookmark and follow it. This site.
The above is the detailed content of Keyboard cannot capitalize after mac upgrade?. For more information, please follow other related articles on the PHP Chinese website!

Hot AI Tools

Undresser.AI Undress
AI-powered app for creating realistic nude photos

AI Clothes Remover
Online AI tool for removing clothes from photos.

Undress AI Tool
Undress images for free

Clothoff.io
AI clothes remover

AI Hentai Generator
Generate AI Hentai for free.

Hot Article
Hot Tools

Notepad++7.3.1
Easy-to-use and free code editor

SublimeText3 Chinese version
Chinese version, very easy to use

Zend Studio 13.0.1
Powerful PHP integrated development environment

Dreamweaver CS6
Visual web development tools

SublimeText3 Mac version
God-level code editing software (SublimeText3)
Hot Topics


 How to correct the yellowing of the computer screen
Apr 30, 2024 am 08:58 AM
How to correct the yellowing of the computer screen
Apr 30, 2024 am 08:58 AM
How to adjust the computer screen when it turns yellow? 1. Move the slider in the window to adjust the screen color, and the problem is solved. The method may be caused by a problem with the monitor data cable or poor contact. You can check whether the interface is loose and then replace the connection cable with a new one. 2. Click the Windows icon in the lower left corner of the computer, and then click Settings. In the settings interface, click System. Select Display, click Advanced display settings, and that's it. First open the control panel. 3. Move the slider in the window to adjust the gamma value. Finally, move the slider in the window to adjust the screen color and the problem is solved. Why does the computer screen turn yellow? It is relatively rare that the computer screen turns yellow due to a malfunction of the graphics card itself. It is recommended to have it checked for maintenance. Monitor display mode problem some display
 A simple way to set up automatic line wrapping with Beyond Compare
Apr 22, 2024 pm 01:04 PM
A simple way to set up automatic line wrapping with Beyond Compare
Apr 22, 2024 pm 01:04 PM
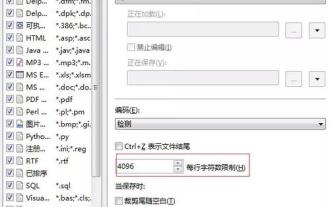
In fact, BeyondCompare does not support automatic line wrapping. In the new version BeyondCompare4, you can limit the characters of each line of the file to achieve the purpose of automatic line wrapping for easy modification. You can follow the steps below: Click: Tools (T) in the menu bar, then select: File Format (F) in the pop-up list; find 'Characters per line' in the [Convert] tab on the right side of the pop-up box For the word "limit", modify the previous value (the default is 4096) and save it. Generally, it can be set to 80 to 90 or more. Of course, in BeyondCompare, you can also consider other ways to slightly improve it. The solution is as follows: Solution 1: Temporarily switch to the upper and lower layout. Select under the [View] menu
 How many centimeters is an 8-inch tablet?
Apr 22, 2024 pm 04:25 PM
How many centimeters is an 8-inch tablet?
Apr 22, 2024 pm 04:25 PM
How big is an eight-inch tablet? 1. The size of an 8-inch tablet is 32 cm; the size of a 9-inch tablet is 286 cm; the size of a 7-inch tablet is 2638 cm; and the size of a 10-inch tablet is 24 cm. 2. The aspect ratio of a 2-inch tablet computer is 16:9, so the screen length and width are 32 cm and 11 cm respectively. The so-called 8-inch tablet computer refers to the size of the screen, not the size of the overall machine. The 8-inch screen size refers to the diagonal length of the screen. 1 inch is equal to 54 centimeters, so 8 inches is equal to 32 centimeters. 3. The eight-inch tablet is 128 cm long and 80 cm wide. An eight-inch tablet refers to a tablet with a screen diagonal length of 8 inches. Based on the common screen aspect ratio of 16:10, it can be calculated that its length is approximately 128 cm.
 Laptop has mouse arrows but black screen
Apr 10, 2024 pm 01:20 PM
Laptop has mouse arrows but black screen
Apr 10, 2024 pm 01:20 PM
After turning on the laptop, the screen goes black and there is nothing on the desktop. There is no icon, only a mouse arrow... Damage to the picture tube or line output circuit. Failure of the picture tube or line output circuit will also cause a black screen without raster when the monitor is powered on. It is also the main cause of a black screen after the notebook is turned on. Sometimes the inability to boot is caused by a short circuit in some components, such as external USB devices, keyboards, mice, or power adapters. Try unplugging these devices and booting with only the battery installed to see if you can enter the BIOS. some type of. A black screen may occur when the computer starts up because the motherboard, monitor and graphics card in the computer are damaged, or the computer configuration is too old. This phenomenon may also occur. Most of the reasons are caused by process errors.
 How to disable automatic backup in Windows 10
Apr 18, 2024 pm 07:49 PM
How to disable automatic backup in Windows 10
Apr 18, 2024 pm 07:49 PM
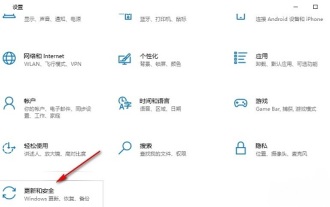
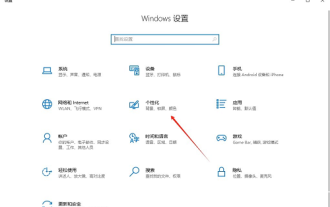
Some Windows 10 users have found that the system's built-in automatic backup function is activated during use. Although this function helps ensure data security, some users may not feel the need to continue enabling it due to storage space considerations or other reasons. This function. Therefore, if you want to turn off the automatic backup function in Windows 10 system, the correct operation steps are particularly important. Next, this article will introduce in detail how to turn off the automatic backup function of the Win10 system for the reference implementation of users who have this need. Close method 1. Use the "win+i" shortcut key to quickly open the "Settings" page. After entering the new page, you need to click the "Update and Security" option. 2. In the new interface that opens, click in the left column
 How to adjust the computer screen if it is a bit yellow?
Apr 11, 2024 pm 01:46 PM
How to adjust the computer screen if it is a bit yellow?
Apr 11, 2024 pm 01:46 PM
The computer screen is a little yellowish. What's going on? The computer screen may be a little yellowish due to a variety of reasons. The following are some common solutions: Adjust the screen color mode: You can select it through the display menu of the monitor or the display settings of the computer operating system. Suitable color mode, such as RGB mode or sRGB mode. Monitor color temperature setting problem: If the monitor color temperature is set too high, the screen will appear yellowish, so the color temperature setting needs to be adjusted. At this time, you need to enter the display settings of the computer, find the color temperature option, and adjust it to the appropriate value. Graphics card driver problem: There may be a problem with the graphics card driver, causing the screen to display abnormally. If the score is very low, it means there is a problem with the graphics card, and you need to find a professional to identify and replace the graphics card. How yellow is the computer screen?
 How to hide or turn off the taskbar volume icon in Windows 10
Apr 15, 2024 pm 05:19 PM
How to hide or turn off the taskbar volume icon in Windows 10
Apr 15, 2024 pm 05:19 PM
In the Windows 10 operating system, the taskbar usually displays an intuitive volume icon under default settings, allowing users to adjust the system volume at any time. Some friends hope to turn off or hide this volume control icon due to personal preference or interface simplicity. The following is a detailed operation plan for everyone, let’s take a look. Close method 1. Use the "win+i" shortcut key to open the "Settings" interface. After entering the "Settings" interface, you need to click the "Personalization" option. 2. In the new interface that opens, you need to click the "Taskbar" option in the left column. 3. Then click "Select which icons appear on the taskbar" in the "Notification Area" on the right. 4. Then find the "Volume", and finally click the switch button on the right.
 Laptop external monitor cannot go full screen
Apr 19, 2024 pm 04:16 PM
Laptop external monitor cannot go full screen
Apr 19, 2024 pm 04:16 PM
What to do if the laptop screen is not full screen? Steps: 1. Turn on the computer, right-click on the desktop and click the "Display Settings" option. Adjust the resolution so that the monitor fills the entire screen. If you don't want to change the current resolution, click "Advanced display settings". In the interface, find and click the "Display Adapter Properties for Monitor 1" option. If the computer monitor cannot display in full screen, it may be because the screen resolution setting is incorrect, or the monitor OSD setting is wrong. You can correct the settings to restore full screen display. The specific operation method is as follows: Set the screen resolution correctly (taking WIN7 as an example): right-click a blank space on the desktop and select "Screen Resolution". Adjust the resolution so that the monitor fills the entire screen. If you don't want to change the current resolution, click "Advanced display settings". In the interface, find and click "
