 System Tutorial
 LINUX
LINUX
 Detailed explanation of Linux hard disk partition fdisk and parted commands
Detailed explanation of Linux hard disk partition fdisk and parted commands
In Linux systems, there are two main partition commands available: fdisk and parted. The fdisk command is widely used, but one limitation is that it does not support partitions larger than 2TB. If you need to create a partition larger than 2TB, then you need to use the parted command. Of course, the parted command can also be used to create smaller partitions. Now, let us take a look at how to use the fdisk command to partition.
The traditional MBR (Master Boot Record) partitioning method limits a hard disk to be divided into up to four primary partitions. Even if the hard disk still has unallocated space, you cannot continue to create more primary partitions.

If you need more partitions, you need to create logical partitions in the extended partition. The solution is as follows

fdisk command
View new disk information
[root@localhost ~]# fdisk ~l
#列出系统分区
[root@localhost ~]# fdisk 设备文件名
#给硬盘分区
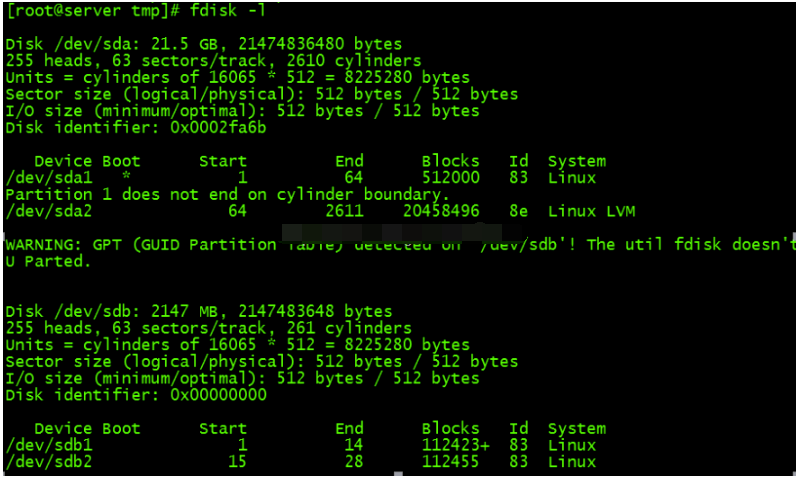
Note: Never try to use fdisk on the current hard disk. This will completely delete the entire system. Be sure to find another hard disk or use a virtual machine.
The lower part of the information is the partition information, with a total of 7 columns, the meaning is as follows:
- Device: The device file name of the partition.
- Boot: Whether it is the boot partition. Here /dev/sda1 is the boot partition.
- Start: Starting cylinder, representing where the partition starts.
- End: Terminating cylinder, representing where the partition ends.
- Blocks: The size of the partition, in KB.
- id: ID of the file system in the partition. In the fdisk command, you can use "i" to view.
- System: What is the system installed in the partition.
Partition Command
[root@localhost omc]# fdisk/dev/sda2

Enter p to list the current partition status of the disk

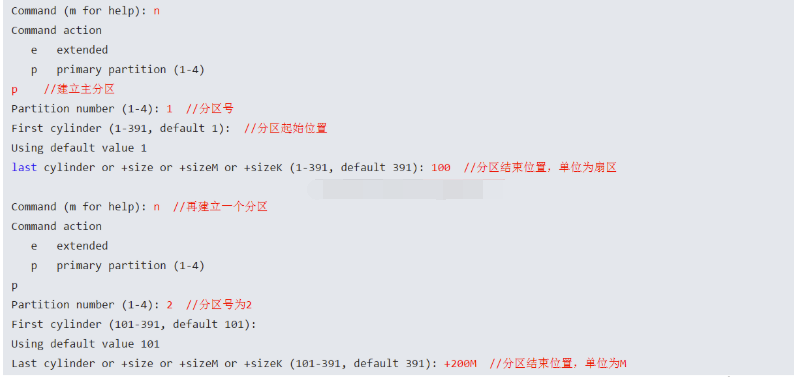
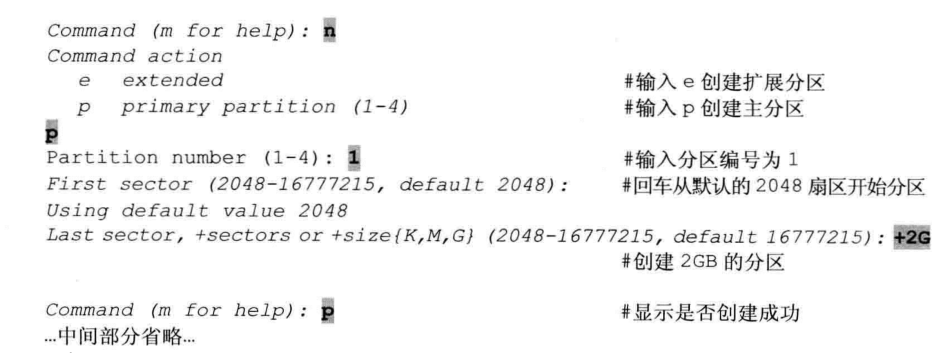
Enter n to create a new disk partition. First create two primary disk partitions:
‘
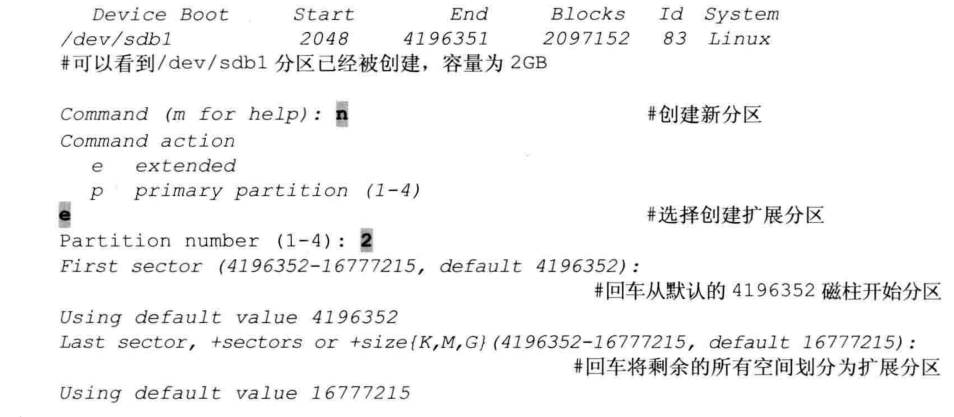
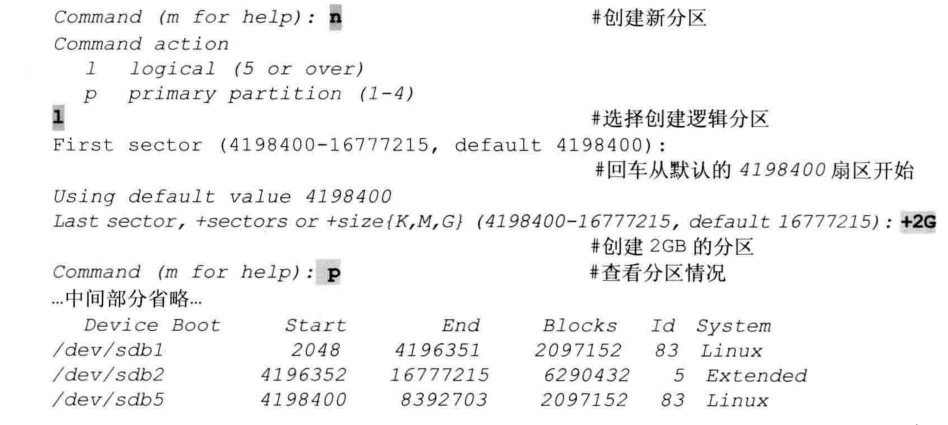

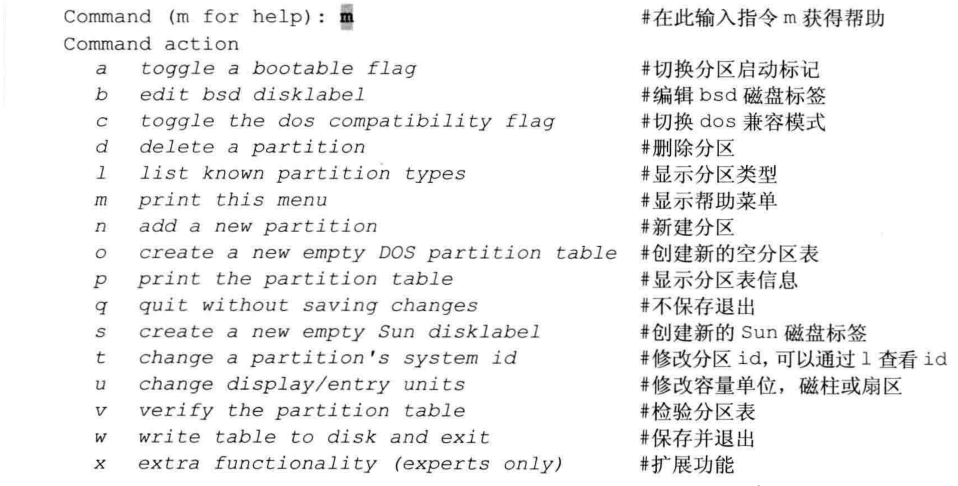
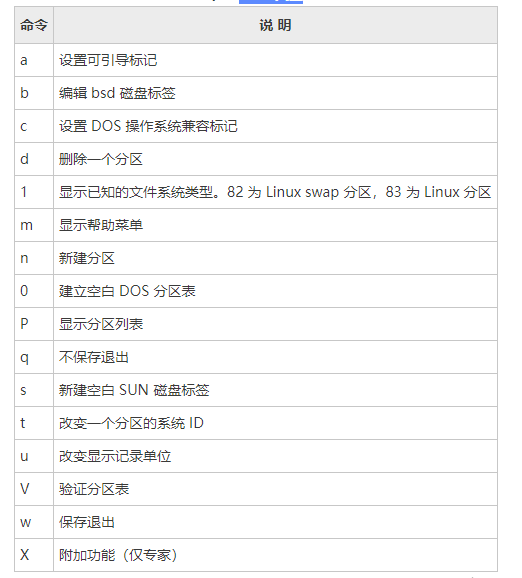
fdisk interactive command is as follows:
parted command
The partprobe command tells the kernel to read the new partition table immediately, so that the newly created partition can be recognized without restarting the system.
The parted partitioning tool belongs to the GPT partitioning method. It is different from the traditional MBR partitioning method. It is limited to a maximum of 4 primary partitions. GPT partitioning provides redundancy of the partition table to achieve backup and security of the partition table.
Command format
[root@localhost omc]# parted 【选项】 【硬盘 【命令】】
1. View system partition table information
[root@localhost omc]# parted /dev/sdc print

2. Create partition
[root@localhost omc]# parted 【硬盘】 mkpart 分区类型 文件系统类型 开始 结束
其中,mkpart指令为创建新的分区,分区类型有:primary,logical,extended三种,文件系统类型有:fat16,fat32,ext2,ext3,linux-swap等,开始与结束标记区分开始与结束的位置(默认单位为MB)
示例
[root@localhost omc]# parted /dev/sdc mkpart primary ext3 1 2G
ext3的主分区,从磁盘的第1MB开始分区,到2GB的位置,大小为2GB的主分区
[root@localhost omc]# parted /dev/sdc mkpart primary ext3 2G 4G创建
创建一个容量为2GB的分区,从硬盘的第2个GB位置开始分区,到第4个GB的位置结束。
3、修改分区表格式
[root@localhost omc]# parted /dev/sdc mklabel gpt

4、删除分区
[root@localhost omc]# parted /dev/sdc rm2使用
rm指令可以删除分区
利用pared命令除了基本的分区创建和删除外,还可以进行分区检查,调整分区大小,还原误删除分区等操作。
The above is the detailed content of Detailed explanation of Linux hard disk partition fdisk and parted commands. For more information, please follow other related articles on the PHP Chinese website!

Hot AI Tools

Undresser.AI Undress
AI-powered app for creating realistic nude photos

AI Clothes Remover
Online AI tool for removing clothes from photos.

Undress AI Tool
Undress images for free

Clothoff.io
AI clothes remover

AI Hentai Generator
Generate AI Hentai for free.

Hot Article

Hot Tools

Notepad++7.3.1
Easy-to-use and free code editor

SublimeText3 Chinese version
Chinese version, very easy to use

Zend Studio 13.0.1
Powerful PHP integrated development environment

Dreamweaver CS6
Visual web development tools

SublimeText3 Mac version
God-level code editing software (SublimeText3)

Hot Topics
 1377
1377
 52
52
 Four ways to implement multithreading in C language
Apr 03, 2025 pm 03:00 PM
Multithreading in the language can greatly improve program efficiency. There are four main ways to implement multithreading in C language: Create independent processes: Create multiple independently running processes, each process has its own memory space. Pseudo-multithreading: Create multiple execution streams in a process that share the same memory space and execute alternately. Multi-threaded library: Use multi-threaded libraries such as pthreads to create and manage threads, providing rich thread operation functions. Coroutine: A lightweight multi-threaded implementation that divides tasks into small subtasks and executes them in turn.
 Unable to log in to mysql as root
Apr 08, 2025 pm 04:54 PM
The main reasons why you cannot log in to MySQL as root are permission problems, configuration file errors, password inconsistent, socket file problems, or firewall interception. The solution includes: check whether the bind-address parameter in the configuration file is configured correctly. Check whether the root user permissions have been modified or deleted and reset. Verify that the password is accurate, including case and special characters. Check socket file permission settings and paths. Check that the firewall blocks connections to the MySQL server.
 libv are two
Apr 03, 2025 pm 08:03 PM
I developed a project called Lua-Libuv and am happy to share my experience. The original intention of the project is to explore how to use Libuv (an asynchronous I/O library written in C) to build a simple HTTP server without having to learn the C language in depth. With the help of ChatGPT, I completed the basic code of HTTP.C. When dealing with persistent connections, I successfully implemented closing the connection and freeing resources at the right time. At first I tried to create a simple server that ended the main program by closing the connection, but I had some problems. I've tried sending blocks of data using streaming, and while it works, this blocks the main thread. In the end, I decided to give up on this approach because my goal was not to learn C language in depth. Finally, I
 C language conditional compilation: a detailed guide for beginners to practical applications
Apr 04, 2025 am 10:48 AM
C language conditional compilation is a mechanism for selectively compiling code blocks based on compile-time conditions. The introductory methods include: using #if and #else directives to select code blocks based on conditions. Commonly used conditional expressions include STDC, _WIN32 and linux. Practical case: Print different messages according to the operating system. Use different data types according to the number of digits of the system. Different header files are supported according to the compiler. Conditional compilation enhances the portability and flexibility of the code, making it adaptable to compiler, operating system, and CPU architecture changes.
 【Rust Self-study】Introduction
Apr 04, 2025 am 08:03 AM
1.0.1 Preface This project (including code and comments) was recorded during my self-taught Rust. There may be inaccurate or unclear statements, please apologize. If you benefit from it, it's even better. 1.0.2 Why is RustRust reliable and efficient? Rust can replace C and C, with similar performance but higher security, and does not require frequent recompilation to check for errors like C and C. The main advantages include: memory security (preventing null pointers from dereferences, dangling pointers, and data contention). Thread-safe (make sure multi-threaded code is safe before execution). Avoid undefined behavior (e.g., array out of bounds, uninitialized variables, or access to freed memory). Rust provides modern language features such as generics
 How to solve mysql cannot be started
Apr 08, 2025 pm 02:21 PM
There are many reasons why MySQL startup fails, and it can be diagnosed by checking the error log. Common causes include port conflicts (check port occupancy and modify configuration), permission issues (check service running user permissions), configuration file errors (check parameter settings), data directory corruption (restore data or rebuild table space), InnoDB table space issues (check ibdata1 files), plug-in loading failure (check error log). When solving problems, you should analyze them based on the error log, find the root cause of the problem, and develop the habit of backing up data regularly to prevent and solve problems.
 Where is the C language function library? How to add the C language function library?
Apr 03, 2025 pm 11:39 PM
The C language function library is a toolbox containing various functions, which are organized in different library files. Adding a library requires specifying it through the compiler's command line options, for example, the GCC compiler uses the -l option followed by the abbreviation of the library name. If the library file is not under the default search path, you need to use the -L option to specify the library file path. Library can be divided into static libraries and dynamic libraries. Static libraries are directly linked to the program at compile time, while dynamic libraries are loaded at runtime.
 What are the 5 basic components of Linux?
Apr 06, 2025 am 12:05 AM
The five basic components of Linux are: 1. The kernel, managing hardware resources; 2. The system library, providing functions and services; 3. Shell, the interface for users to interact with the system; 4. The file system, storing and organizing data; 5. Applications, using system resources to implement functions.


