Currently, IP addresses in most systems are automatically assigned, but in some cases, we may need to change them manually. Today we share several methods to modify the system IP address.
As a system administrator, changing the IP address of a machine is a very common task. IP addresses in most systems are currently assigned automatically, but in some cases we may need to change them manually.
Today we share several methods to modify the system IP address.
Before taking action, we can use the following command to view the current IP address:
ip a
The above command will also display the network port (interface) name while displaying the IP address. The network port name will be used when modifying the IP address.
Use the ip command to set the IP address
We introduced the ip command in a previous article, which can view the IP address of the local machine. This command is available on most Linux distributions. Use the ip command to set the IP address. You can use the following command:
ip addr add [ip_address] dev [interface]
For example, to add an IP address to the network port eth1, you can use the following command:
sudo ip addr add 192.168.56.21/24 dev eth1
Now, there are two IP addresses in the network port eth1, one is originally configured, and the other is newly added using the command:

As shown in the picture above, if you delete the old IP address, there will be only one IP address left.
Set static IP address
The IP address set through the above method will be modified after the system restarts, and the IP address is dynamic.
If you are using an older version of Ubuntu (version number less than 17.10), you can change the IP to static and permanent by editing the file /etc/network/interfaces.
sudo nano /etc/network/interfaces
If the file content is as follows, it means that the IP address of the system is set by the DHCP client:
auto eth0iface eth0 inet dhcp
We can set a static IP address by modifying the above file. For example, if you want to set the IP address to 192.168.56.20, you can modify the content of the above file to:
auto enp0s3iface enp0s3 inet staticaddress 192.168.56.20netmask 255.255.255.0gateway
 192.168.40.31
The above content is easy to understand for users who often use Linux systems. For the modification to take effect, you need to run the following command:
$ sudo systemctl restart networking.service
Tip: On RedHat-based systems, the file used to configure the network interface is /etc/sysconfig/networking-scripts/ifcfg-*
Use Netplan for network configuration (for Ubuntu)
Ubuntu has a tool for network configuration called Netplan.
We configure the IP address on Ubuntu 20.04 as an example, using NetworkManager as the renderer for the network configuration.
You can view the current IP address in the Netplan configuration file. The file is in YAML format. If it does not exist, you can create it:
sudo nano /etc/netplan/config.yaml
If the IP address is dynamic, you will see the dhcp4 parameter set to true.
If you have currently configured a static IP, you will see the following content:
---network: version: 2 renderer: networkd ethernets: eth1: addresses:
- 192.168.56.66/24 nameservers: addresses: - 8.8.8.8 routes: - to: default via: 10.0.2.2
Set a new address by modifying the IP address above. In addition, you can also keep the old IP address and add another one to the above network port (eth1).
After configuring, test it before applying:
sudo netplan try
After confirming the changes, make the configuration take effect:
sudo netplan apply
Then check whether the configuration has taken effect:

One of the advantages of using Netplan is that the configuration modification is permanent. After the machine is restarted, the configuration will still take effect, that is, the configured IP is static .
Change the system IP address using the graphical interface (for desktop users)
Using a graphical interface to manage IP addresses is the easiest way. On Ubuntu systems, the network settings contain all the necessary configurations.
Open Settings in the GNOME Dashboard, find the Network option, and then select the settings icon in the available network of the system, as shown in the following figure:

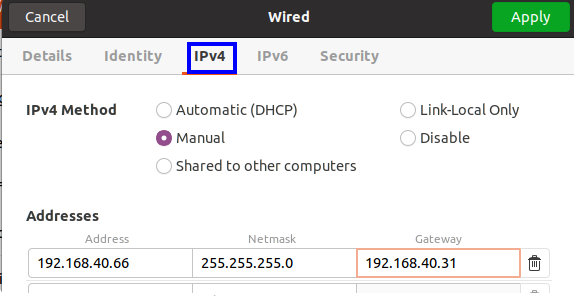
In the newly opened window, select the IPv4 tab, then under IPv4 method, select the Manual (manual) option and enter the new IP address:

Then restart the network connection and check the IP address:

As you can see from the screenshot above, the IP address has been changed.
The ip command is available on all Linux systems; Netplan is a new way to manage your network and is a very simple method for Ubuntu systems.
The above is the detailed content of Share several methods to change IP address in Linux system. For more information, please follow other related articles on the PHP Chinese website!


