

Linux basics: cgroup principle and implementation

This article will analyze the implementation principle of CGroup in detail by studying the source code (Linux version 2.6.25 is used here). Before diving into the source code, let's first understand a few key data structures, because CGroup uses these data structures to manage the use of various resources by process groups.
cgroup structure
As mentioned earlier, cgroup is used to control the use of various resources by the process group. In the kernel, cgroup is described through the cgroup structure. Let us take a look at its definition:
struct cgroup {
    unsigned long flags;        /* "unsigned long" so bitops work */
    atomic_t count;
    struct list_head sibling;   /* my parent's children */
    struct list_head children;  /* my children */
    struct cgroup *parent;      /* my parent */
    struct dentry *dentry;      /* cgroup fs entry */
    struct cgroup_subsys_state *subsys[CGROUP_SUBSYS_COUNT];
    struct cgroupfs_root *root;
    struct cgroup *top_cgroup;
    struct list_head css_sets;
    struct list_head release_list;
};
Let’s introduce the purpose of each field of the cgroup structure:
-
flags: Used to identify the current status ofcgroup. -
count: Reference counter, indicating how many processes are using thiscgroup. -
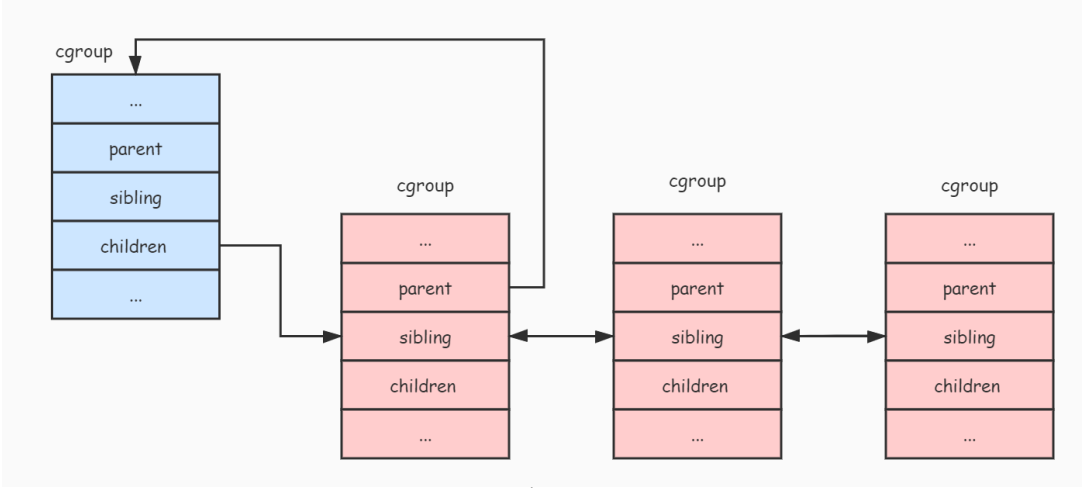
sibling, children, parent: Sincecgroupis managed throughlevel, these three fields refer to the samelevelAllcgroupare connected into a tree.parentpoints to the parent node of the currentcgroup,siblingis connected to all sibling nodes, andchildrenis connected to the currentcgroupAll child nodes. -
dentry: Sincecgroupis managed throughvirtual file system, when introducing the use ofcgroup, it was said thatcgroupis regarded as a directory inlevel, so thedentryfield is used to describe this directory. -
subsys: As mentioned before,subsystemcan be attached tolevel, andsubsystemattached tolevelAll have their own algorithms and statistics that limit the resource usage of process groups. Therefore, thesubsysfield is provided to eachsubsystemto store statistical data that limits the resources used by the process group. We can see that thesubsysfield is an array, and each element in the array represents asubsystemrelated statistical data. From an implementation point of view,cgrouponly organizes multiple processes into control process groups, but what really limits resource usage is eachsubsystem. -
root: Used to save some data oflevel, such as: the root node oflevel, attached to thesubsystem oflevellevelcan have multiplesubsystemsattached), and how manycgroupnodes thislevelhas, etc. . -
top_cgroup: The root node (root cgroup) oflevel.
We use the following picture to describe the tree-like relationship composed of each cgroup in level:
 cgroup-links
cgroup_subsys_state 结构体
每个 子系统 都有属于自己的资源控制统计信息结构,而且每个 cgroup 都绑定一个这样的结构,这种资源控制统计信息结构就是通过 cgroup_subsys_state 结构体实现的,其定义如下:
struct cgroup_subsys_state {
    struct cgroup *cgroup;
    atomic_t refcnt;
    unsigned long flags;
};
下面介绍一下 cgroup_subsys_state 结构各个字段的作用:
-
cgroup: 指向了这个资源控制统计信息所属的cgroup。 -
refcnt: 引用计数器。 -
flags: 标志位,如果这个资源控制统计信息所属的cgroup是层级的根节点,那么就会将这个标志位设置为CSS_ROOT表示属于根节点。
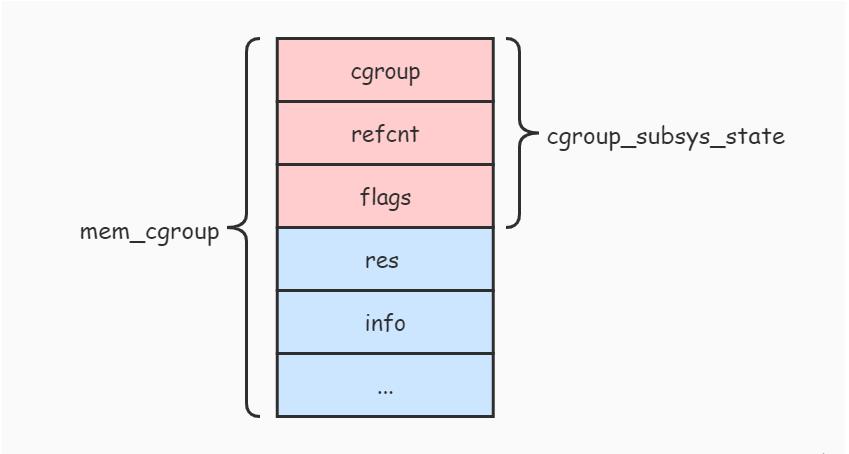
从 cgroup_subsys_state 结构的定义看不到各个 子系统 相关的资源控制统计信息,这是因为 cgroup_subsys_state 结构并不是真实的资源控制统计信息结构,比如 内存子系统 真正的资源控制统计信息结构是 mem_cgroup,那么怎样通过这个 cgroup_subsys_state 结构去找到对应的 mem_cgroup 结构呢?我们来看看 mem_cgroup 结构的定义:
struct mem_cgroup {
    struct cgroup_subsys_state css; // 注意这里
    struct res_counter res;
    struct mem_cgroup_lru_info info;
    int prev_priority;
    struct mem_cgroup_stat stat;
};
从 mem_cgroup 结构的定义可以发现,mem_cgroup 结构的第一个字段就是一个 cgroup_subsys_state 结构。下面的图片展示了他们之间的关系:
 cgroup-state-memory
从上图可以看出,mem_cgroup 结构包含了 cgroup_subsys_state 结构,内存子系统 对外暴露出 mem_cgroup 结构的 cgroup_subsys_state 部分(即返回 cgroup_subsys_state 结构的指针),而其余部分由 内存子系统 自己维护和使用。
由于 cgroup_subsys_state 部分在 mem_cgroup 结构的首部,所以要将 cgroup_subsys_state 结构转换成 mem_cgroup 结构,只需要通过指针类型转换即可。
cgroup 结构与 cgroup_subsys_state 结构之间的关系如下图:
 cgroup-subsys-state
css_set 结构体
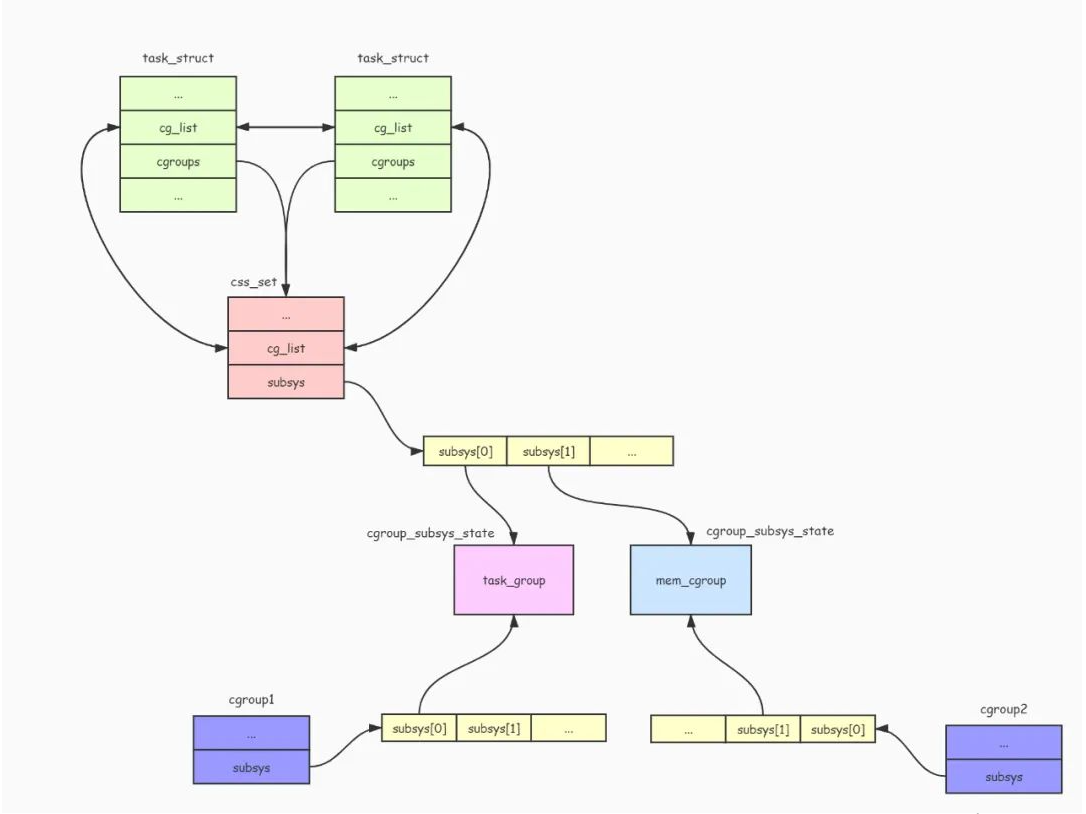
由于一个进程可以同时添加到不同的 cgroup 中(前提是这些 cgroup 属于不同的 层级)进行资源控制,而这些 cgroup 附加了不同的资源控制 子系统。所以需要使用一个结构把这些 子系统 的资源控制统计信息收集起来,方便进程通过 子系统ID 快速查找到对应的 子系统 资源控制统计信息,而 css_set 结构体就是用来做这件事情。css_set 结构体定义如下:
struct css_set {
    struct kref ref;
    struct list_head list;
    struct list_head tasks;
    struct list_head cg_links;
    struct cgroup_subsys_state *subsys[CGROUP_SUBSYS_COUNT];
};
下面介绍一下 css_set 结构体各个字段的作用:
-
ref: 引用计数器,用于计算有多少个进程在使用此css_set。 -
list: 用于连接所有css_set。 -
tasks: 由于可能存在多个进程同时受到相同的cgroup控制,所以用此字段把所有使用此css_set的进程连接起来。 -
subsys: 用于收集各种子系统的统计信息结构。
进程描述符 task_struct 有两个字段与此相关,如下:
struct task_struct {
    ...
    struct css_set *cgroups;
    struct list_head cg_list;
    ...
}
可以看出,task_struct 结构的 cgroups 字段就是指向 css_set 结构的指针,而 cg_list 字段用于连接所有使用此 css_set 结构的进程列表。
task_struct 结构与 css_set 结构的关系如下图:
cgroup-task-cssset
cgroup_subsys 结构
CGroup 通过 cgroup_subsys 结构操作各个 子系统,每个 子系统 都要实现一个这样的结构,其定义如下:
struct cgroup_subsys {
    struct cgroup_subsys_state *(*create)(struct cgroup_subsys *ss,
                          struct cgroup *cgrp);
    void (*pre_destroy)(struct cgroup_subsys *ss, struct cgroup *cgrp);
    void (*destroy)(struct cgroup_subsys *ss, struct cgroup *cgrp);
    int (*can_attach)(struct cgroup_subsys *ss,
              struct cgroup *cgrp, struct task_struct *tsk);
    void (*attach)(struct cgroup_subsys *ss, struct cgroup *cgrp,
            struct cgroup *old_cgrp, struct task_struct *tsk);
    void (*fork)(struct cgroup_subsys *ss, struct task_struct *task);
    void (*exit)(struct cgroup_subsys *ss, struct task_struct *task);
    int (*populate)(struct cgroup_subsys *ss,
            struct cgroup *cgrp);
    void (*post_clone)(struct cgroup_subsys *ss, struct cgroup *cgrp);
    void (*bind)(struct cgroup_subsys *ss, struct cgroup *root);

    int subsys_id;
    int active;
    int disabled;
    int early_init;
    const char *name;
    struct cgroupfs_root *root;
    struct list_head sibling;
    void *private;
};
cgroup_subsys 结构包含了很多函数指针,通过这些函数指针,CGroup 可以对 子系统 进行一些操作。比如向 CGroup 的 tasks 文件添加要控制的进程PID时,就会调用 cgroup_subsys 结构的 attach() 函数。当在 层级 中创建新目录时,就会调用 create() 函数创建一个 子系统 的资源控制统计信息对象 cgroup_subsys_state,并且调用 populate() 函数创建 子系统 相关的资源控制信息文件。
除了函数指针外,cgroup_subsys 结构还包含了很多字段,下面说明一下各个字段的作用:
-
subsys_id: 表示了子系统的ID。 -
active: 表示子系统是否被激活。 -
disabled: 子系统是否被禁止。 -
name: 子系统名称。 -
root: 被附加到的层级挂载点。 -
sibling: 用于连接被附加到同一个层级的所有子系统。 -
private: 私有数据。
内存子系统 定义了一个名为 mem_cgroup_subsys 的 cgroup_subsys 结构,如下:
struct cgroup_subsys mem_cgroup_subsys = {
    .name = "memory",
    .subsys_id = mem_cgroup_subsys_id,
    .create = mem_cgroup_create,
    .pre_destroy = mem_cgroup_pre_destroy,
    .destroy = mem_cgroup_destroy,
    .populate = mem_cgroup_populate,
    .attach = mem_cgroup_move_task,
    .early_init = 0,
};
另外 Linux 内核还定义了一个 cgroup_subsys 结构的数组 subsys,用于保存所有 子系统 的 cgroup_subsys 结构,如下:
static struct cgroup_subsys *subsys[] = {
    cpuset_subsys,
    debug_subsys,
    ns_subsys,
    cpu_cgroup_subsys,
    cpuacct_subsys,
    mem_cgroup_subsys
};
CGroup 的挂载
前面介绍了 CGroup 相关的几个结构体,接下来我们分析一下 CGroup 的实现。
要使用 CGroup 功能首先必须先进行挂载操作,比如使用下面命令挂载一个 CGroup:
$ mount -t cgroup -o memory memory /sys/fs/cgroup/memory
在上面的命令中,-t 参数指定了要挂载的文件系统类型为 cgroup,而 -o 参数表示要附加到此 层级 的子系统,上面表示附加了 内存子系统,当然可以附加多个 子系统。而紧随 -o 参数后的 memory 指定了此 CGroup 的名字,最后一个参数表示要挂载的目录路径。
挂载过程最终会调用内核函数 cgroup_get_sb() 完成,由于 cgroup_get_sb() 函数比较长,所以我们只分析重要部分:
static int cgroup_get_sb(struct file_system_type *fs_type,
     int flags, const char *unused_dev_name,
     void *data, struct vfsmount *mnt)
{
    ...
    struct cgroupfs_root *root;
    ...
    root = kzalloc(sizeof(*root), GFP_KERNEL);
    ...
    ret = rebind_subsystems(root, root->subsys_bits);
    ...

    struct cgroup *cgrp = &root->top_cgroup;

    cgroup_populate_dir(cgrp);
    ...
}
cgroup_get_sb() 函数会调用 kzalloc() 函数创建一个 cgroupfs_root 结构。cgroupfs_root 结构主要用于描述这个挂载点的信息,其定义如下:
struct cgroupfs_root {
    struct super_block *sb;
    unsigned long subsys_bits;
    unsigned long actual_subsys_bits;
    struct list_head subsys_list;
    struct cgroup top_cgroup;
    int number_of_cgroups;
    struct list_head root_list;
    unsigned long flags;
    char release_agent_path[PATH_MAX];
};
下面介绍一下 cgroupfs_root 结构的各个字段含义:
-
sb: Mounted file system superblock. -
subsys_bits/actual_subsys_bits: Subsystem flags attached to this level. -
subsys_list: List of subsystems (cgroup_subsys) attached to this level. -
top_cgroup: The root cgroup of this level. -
number_of_cgroups: How many cgroups are in the hierarchy. -
root_list: Connect to all cgroupfs_roots in the system. -
flags: Flag bit.
The most important are the subsys_list and top_cgroup fields, subsys_list represents all # attached to this level ##Subsystem, while top_cgroup represents the root cgroup of this level.
接着调用 rebind_subsystems() 函数把挂载时指定要附加的 子系统 添加到 cgroupfs_root 结构的 subsys_list 链表中,并且为根 cgroup 的 subsys 字段设置各个 子系统 的资源控制统计信息对象,最后调用 cgroup_populate_dir() 函数向挂载目录创建 cgroup 的管理文件(如 tasks 文件)和各个 子系统 的管理文件(如 memory.limit_in_bytes 文件)。
向 CGroup 添加要进行资源控制的进程
通过向 CGroup 的 tasks 文件写入要进行资源控制的进程PID,即可以对进程进行资源控制。例如下面命令:
$ echo 123012 > /sys/fs/cgroup/memory/test/tasks
向 tasks 文件写入进程PID是通过 attach_task_by_pid() 函数实现的,代码如下:
static int attach_task_by_pid(struct cgroup *cgrp, char *pidbuf)
{
    pid_t pid;
    struct task_struct *tsk;
    int ret;

    if (sscanf(pidbuf, "%d", &pid) != 1) // 读取进程pid
        return -EIO;

    if (pid) { // 如果有指定进程pid
        ...
        tsk = find_task_by_vpid(pid); // 通过pid查找对应进程的进程描述符
        if (!tsk || tsk->flags & PF_EXITING) {
            rcu_read_unlock();
            return -ESRCH;
        }
        ...
    } else {
        tsk = current; // 如果没有指定进程pid, 就使用当前进程
        ...
    }

    ret = cgroup_attach_task(cgrp, tsk); // 调用 cgroup_attach_task() 把进程添加到cgroup中
    ...
    return ret;
}
attach_task_by_pid() 函数首先会判断是否指定了进程pid,如果指定了就通过进程pid查找到进程描述符,如果没指定就使用当前进程,然后通过调用 cgroup_attach_task() 函数把进程添加到 cgroup 中。
我们接着看看 cgroup_attach_task() 函数的实现:
int cgroup_attach_task(struct cgroup *cgrp, struct task_struct *tsk)
{
    int retval = 0;
    struct cgroup_subsys *ss;
    struct cgroup *oldcgrp;
    struct css_set *cg = tsk->cgroups;
    struct css_set *newcg;
    struct cgroupfs_root *root = cgrp->root;

    ...
    newcg = find_css_set(cg, cgrp); // 根据新的cgroup查找css_set对象
    ...
    rcu_assign_pointer(tsk->cgroups, newcg); // 把进程的cgroups字段设置为新的css_set对象
    ...
    // 把进程添加到css_set对象的tasks列表中
    write_lock(&css_set_lock);
    if (!list_empty(&tsk->cg_list)) {
        list_del(&tsk->cg_list);
        list_add(&tsk->cg_list, &newcg->tasks);
    }
    write_unlock(&css_set_lock);

    // 调用各个子系统的attach函数
    for_each_subsys(root, ss) {
        if (ss->attach)
            ss->attach(ss, cgrp, oldcgrp, tsk);
    }
    ...
    return 0;
}
cgroup_attach_task() 函数首先会调用 find_css_set() 函数查找或者创建一个 css_set 对象。前面说过 css_set 对象用于收集不同 cgroup 上附加的 子系统 资源统计信息对象。
因为一个进程能够被加入到不同的 cgroup 进行资源控制,所以 find_css_set() 函数就是收集进程所在的所有 cgroup 上附加的 子系统 资源统计信息对象,并返回一个 css_set 对象。接着把进程描述符的 cgroups 字段设置为这个 css_set 对象,并且把进程添加到这个 css_set 对象的 tasks 链表中。
最后,cgroup_attach_task() 函数会调用附加在 层级 上的所有 子系统 的 attach() 函数对新增进程进行一些其他的操作(这些操作由各自 子系统 去实现)。
限制 CGroup 的资源使用
本文主要是使用 内存子系统 作为例子,所以这里分析内存限制的原理。
可以向 cgroup 的 memory.limit_in_bytes 文件写入要限制使用的内存大小(单位为字节),如下面命令限制了这个 cgroup 只能使用 1MB 的内存:
$ echo 1048576 > /sys/fs/cgroup/memory/test/memory.limit_in_bytes
向 memory.limit_in_bytes 写入数据主要通过 mem_cgroup_write() 函数实现的,其实现如下:
static ssize_t mem_cgroup_write(struct cgroup *cont, struct cftype *cft,
                struct file *file, const char __user *userbuf,
                size_t nbytes, loff_t *ppos)
{
    return res_counter_write(&mem_cgroup_from_cont(cont)->res,
                cft->private, userbuf, nbytes, ppos,
                mem_cgroup_write_strategy);
}
其主要工作就是把 内存子系统 的资源控制对象 mem_cgroup 的 res.limit 字段设置为指定的数值。
限制进程使用资源
当设置好 cgroup 的资源使用限制信息,并且把进程添加到这个 cgroup 的 tasks 列表后,进程的资源使用就会受到这个 cgroup 的限制。这里使用 内存子系统 作为例子,来分析一下内核是怎么通过 cgroup 来限制进程对资源的使用的。
当进程要使用内存时,会调用 do_anonymous_page() 来申请一些内存页,而 do_anonymous_page() 函数会调用 mem_cgroup_charge() 函数来检测进程是否超过了 cgroup 设置的资源限制。而 mem_cgroup_charge() 最终会调用 mem_cgroup_charge_common() 函数进行检测,mem_cgroup_charge_common() 函数实现如下:
static int mem_cgroup_charge_common(struct page *page, struct mm_struct *mm,
                gfp_t gfp_mask, enum charge_type ctype)
{
    struct mem_cgroup *mem;
    ...
    mem = rcu_dereference(mm->mem_cgroup); // 获取进程对应的内存限制对象
    ...
    while (res_counter_charge(&mem->res, PAGE_SIZE)) { // 判断进程使用内存是否超出限制
        if (!(gfp_mask & __GFP_WAIT))
            goto out;

        if (try_to_free_mem_cgroup_pages(mem, gfp_mask)) // 如果超出限制, 就释放一些不用的内存
            continue;

        if (res_counter_check_under_limit(&mem->res))
            continue;

        if (!nr_retries--) {
            mem_cgroup_out_of_memory(mem, gfp_mask); // 如果尝试过5次后还是超出限制, 那么发出oom信号
            goto out;
        }
        ...
    }
    ...
}
mem_cgroup_charge_common() 函数会对进程内存使用情况进行检测,如果进程已经超过了 cgroup 设置的限制,那么就会尝试进行释放一些不用的内存,如果还是超过限制,那么就会发出 OOM (out of memory) 的信号。
The above is the detailed content of Linux basics: cgroup principle and implementation. For more information, please follow other related articles on the PHP Chinese website!

Hot AI Tools

Undresser.AI Undress
AI-powered app for creating realistic nude photos

AI Clothes Remover
Online AI tool for removing clothes from photos.

Undress AI Tool
Undress images for free

Clothoff.io
AI clothes remover

AI Hentai Generator
Generate AI Hentai for free.

Hot Article
Hot Tools

Notepad++7.3.1
Easy-to-use and free code editor

SublimeText3 Chinese version
Chinese version, very easy to use

Zend Studio 13.0.1
Powerful PHP integrated development environment

Dreamweaver CS6
Visual web development tools

SublimeText3 Mac version
God-level code editing software (SublimeText3)
Hot Topics
 1378
1378
 52
52

 How to start nginx in Linux
Apr 14, 2025 pm 12:51 PM
How to start nginx in Linux
Apr 14, 2025 pm 12:51 PM
Steps to start Nginx in Linux: Check whether Nginx is installed. Use systemctl start nginx to start the Nginx service. Use systemctl enable nginx to enable automatic startup of Nginx at system startup. Use systemctl status nginx to verify that the startup is successful. Visit http://localhost in a web browser to view the default welcome page.
 How to check whether nginx is started
Apr 14, 2025 pm 01:03 PM
How to check whether nginx is started
Apr 14, 2025 pm 01:03 PM
How to confirm whether Nginx is started: 1. Use the command line: systemctl status nginx (Linux/Unix), netstat -ano | findstr 80 (Windows); 2. Check whether port 80 is open; 3. Check the Nginx startup message in the system log; 4. Use third-party tools, such as Nagios, Zabbix, and Icinga.
 How to start nginx server
Apr 14, 2025 pm 12:27 PM
How to start nginx server
Apr 14, 2025 pm 12:27 PM
Starting an Nginx server requires different steps according to different operating systems: Linux/Unix system: Install the Nginx package (for example, using apt-get or yum). Use systemctl to start an Nginx service (for example, sudo systemctl start nginx). Windows system: Download and install Windows binary files. Start Nginx using the nginx.exe executable (for example, nginx.exe -c conf\nginx.conf). No matter which operating system you use, you can access the server IP
 How to solve nginx304 error
Apr 14, 2025 pm 12:45 PM
How to solve nginx304 error
Apr 14, 2025 pm 12:45 PM
Answer to the question: 304 Not Modified error indicates that the browser has cached the latest resource version of the client request. Solution: 1. Clear the browser cache; 2. Disable the browser cache; 3. Configure Nginx to allow client cache; 4. Check file permissions; 5. Check file hash; 6. Disable CDN or reverse proxy cache; 7. Restart Nginx.
 How to check whether nginx is started?
Apr 14, 2025 pm 12:48 PM
How to check whether nginx is started?
Apr 14, 2025 pm 12:48 PM
In Linux, use the following command to check whether Nginx is started: systemctl status nginx judges based on the command output: If "Active: active (running)" is displayed, Nginx is started. If "Active: inactive (dead)" is displayed, Nginx is stopped.
 How to solve nginx403 error
Apr 14, 2025 pm 12:54 PM
How to solve nginx403 error
Apr 14, 2025 pm 12:54 PM
The server does not have permission to access the requested resource, resulting in a nginx 403 error. Solutions include: Check file permissions. Check the .htaccess configuration. Check nginx configuration. Configure SELinux permissions. Check the firewall rules. Troubleshoot other causes such as browser problems, server failures, or other possible errors.
 Difference between centos and ubuntu
Apr 14, 2025 pm 09:09 PM
Difference between centos and ubuntu
Apr 14, 2025 pm 09:09 PM
The key differences between CentOS and Ubuntu are: origin (CentOS originates from Red Hat, for enterprises; Ubuntu originates from Debian, for individuals), package management (CentOS uses yum, focusing on stability; Ubuntu uses apt, for high update frequency), support cycle (CentOS provides 10 years of support, Ubuntu provides 5 years of LTS support), community support (CentOS focuses on stability, Ubuntu provides a wide range of tutorials and documents), uses (CentOS is biased towards servers, Ubuntu is suitable for servers and desktops), other differences include installation simplicity (CentOS is thin)
 Centos stops maintenance 2024
Apr 14, 2025 pm 08:39 PM
Centos stops maintenance 2024
Apr 14, 2025 pm 08:39 PM
CentOS will be shut down in 2024 because its upstream distribution, RHEL 8, has been shut down. This shutdown will affect the CentOS 8 system, preventing it from continuing to receive updates. Users should plan for migration, and recommended options include CentOS Stream, AlmaLinux, and Rocky Linux to keep the system safe and stable.
