

usb boot disk into pe system

php editor Youzi will introduce to you today how to use a USB boot disk to enter the PE system. As computer operating systems are constantly updated and upgraded, sometimes we may need to enter the PE system to perform some operations and maintenance work. Using a USB boot disk to enter the PE system is a convenient and fast method. With simple steps, we can install the PE system into a USB flash drive, and then start the computer through the USB flash drive to enter the PE system. Next, let’s learn about the specific steps!
The method of making a USB bootable disk is simple. There are many tools to choose from online, such as the GeekDog Installation Master software. It not only supports online system reinstallation, but can also be used to create a USB boot disk.

Although there are many such tools on the market, the usage methods in the tutorials are often briefly explained, which leads some friends to find that they don’t know how to use them after making a USB boot disk. For example, how to let the computer enter the USB boot disk PE system?

For reinstalling the system or maintaining the system from the USB disk, the first step is to ensure that the USB disk can be started. Only by setting up a USB disk to boot can you enter the PE environment and use PE's built-in tools for system reinstallation or maintenance.
Below, the editor will briefly introduce the steps for booting from a USB disk. Although it is a bit boring, this step is essential for reinstalling the system using a USB disk.
Under normal circumstances, that is, when we do not reinstall the system, the computer boots from the hard disk and directly enters the operating system desktop.
Now, we need to change the startup mode to a U disk, so that we can enter the U disk PE system.
 Setting method 1: Shortcut key setting for U disk startup
1. According to your computer brand and type, check the U disk startup hotkeys, usually F2/F11/F12.
PS: Different brands and types of computers may have different startup hotkeys. You can refer to the following U disk startup hotkeys for various types of computers.

2. Insert the USB boot disk into the computer.

3. Restart the computer or turn it on, immediately press the startup hotkey, and press it several times. (Because it is set during computer startup)

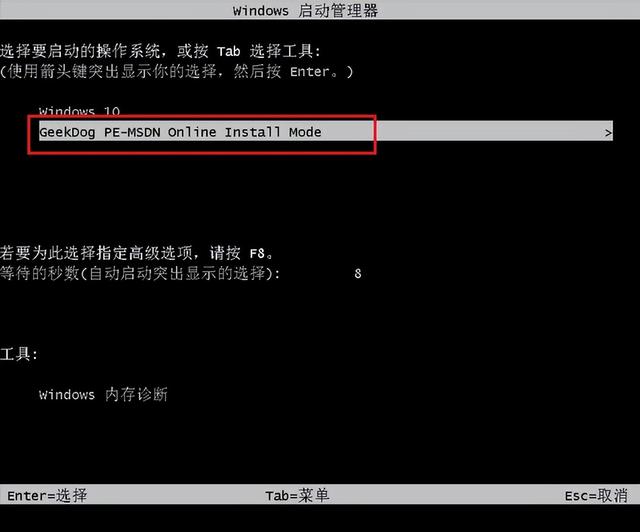
4. Enter the following startup menu page.
PS: The startup menu page may be different if you don’t use a computer, but the setting method is similar.
5. The key step is here. On this page, we need to select the U disk so that we can boot from the U disk. Generally, the USB flash drive will display the name of your USB flash drive or the USB type. For example, the editor should select "KingstonDataTraveler G2 1.00" here. This is the Kingston USB disk. Just press Enter after selecting it.
 Setting method two: Enter bios to set up the USB boot disk
 1. After inserting the USB boot disk into the computer, restart the computer. Pay attention to the startup logo page, which will prompt you what button to press to enter the bios. For example, the MSI motherboard displays, Press DEL key to run setup, and when booting, press the DEL key to enter the BIOS.
PS: As shown in the picture, pressing the F11 key is the USB boot shortcut key. Press this key to enter the settings in method one.

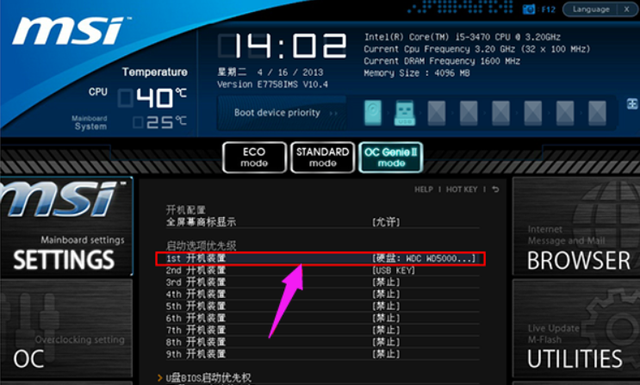
2. After entering bios, click on the upper right corner to switch the language to Chinese, and then click "SETTINGS".

3. Select "Start" and press Enter.

4. Select "1st boot device" to start the device first, and press Enter.
5. Then, select the recognized USB disk, such as kingstondata, and press Enter to confirm.
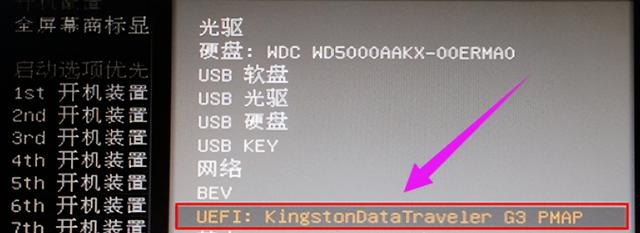
4. After setting the USB disk as the first startup item, press F10 to keep the settings and restart the computer.

Okay, the content of this issue is shared here. Note that depending on the motherboard of the computer, the page for setting up the USB disk boot will be slightly different, but the overall idea is the same. Friends who don’t understand can refer to the tutorial~
The above is the detailed content of usb boot disk into pe system. For more information, please follow other related articles on the PHP Chinese website!

Hot AI Tools

Undresser.AI Undress
AI-powered app for creating realistic nude photos

AI Clothes Remover
Online AI tool for removing clothes from photos.

Undress AI Tool
Undress images for free

Clothoff.io
AI clothes remover

AI Hentai Generator
Generate AI Hentai for free.

Hot Article
Hot Tools

Notepad++7.3.1
Easy-to-use and free code editor

SublimeText3 Chinese version
Chinese version, very easy to use

Zend Studio 13.0.1
Powerful PHP integrated development environment

Dreamweaver CS6
Visual web development tools

SublimeText3 Mac version
God-level code editing software (SublimeText3)
Hot Topics
 1378
1378
 52
52

 How to install WinNTSetup into Win11 system_How to install WinNTSetup into Win11 system
May 08, 2024 am 11:19 AM
How to install WinNTSetup into Win11 system_How to install WinNTSetup into Win11 system
May 08, 2024 am 11:19 AM
First download the latest Win11 system ISO image, and then in Win10 system, you can directly right-click on the downloaded ISO image file and select [Load]; if it is under WinPE, WinXP, or Win7 system, you need to use the virtual optical drive tool to load the ISO Image; or you can directly decompress the ISO image file without using a virtual optical drive. Then run WinNTSetup. The software interface is as shown in the figure: First locate the location of the install.wim file. You can find the install.wim file in the sources directory of the Win11 ISO image loaded or decompressed by the virtual optical drive. Then set the location of the boot disk and installation disk. Generally, you are going to put W
 How to enter bios on hp motherboard
May 04, 2024 pm 09:01 PM
How to enter bios on hp motherboard
May 04, 2024 pm 09:01 PM
How to set up the U disk boot in the HP notebook bios (how to enter the HP computer bios) and then insert the U disk to be booted first into the USB port of the notebook. If you want to install the system, the system program must have been prepared in the U disk. First, open the laptop. Make sure the laptop is turned off. Setting the bios must be done with the computer turned off. Then insert the U disk that you want to boot first into the USB port of the notebook. If you want to install the system, the prerequisite is that the system program has been prepared in the U disk. Take the HP ProDesk400G5SFF desktop computer as an example. Set the BIOS disk startup method: First, restart the computer and wait for the startup screen to appear. There are two ways to set up USB disk startup on HP notebooks. One is to directly press the shortcut key to select
 How to install Windows system on tablet computer
May 03, 2024 pm 01:04 PM
How to install Windows system on tablet computer
May 03, 2024 pm 01:04 PM
How to flash the Windows system on BBK tablet? The first way is to install the system on the hard disk. As long as the computer system does not crash, you can enter the system and download things, you can use the computer hard drive to install the system. The method is as follows: Depending on your computer configuration, you can install the WIN7 operating system. We choose to download Xiaobai's one-click reinstallation system in vivopad to install it. First, select the system version suitable for your computer, and click "Install this system" to next step. Then we wait patiently for the installation resources to be downloaded, and then wait for the environment to be deployed and restarted. The steps to install win11 on vivopad are: first use the software to check whether win11 can be installed. After passing the system detection, enter the system settings. Select the Update & Security option there. Click
 How to enter bios after assembling a computer? How to enter bios when assembling a computer?
May 07, 2024 am 09:13 AM
How to enter bios after assembling a computer? How to enter bios when assembling a computer?
May 07, 2024 am 09:13 AM
How to enter bios after assembling a computer? Before entering the BIOS, you need to make sure that the computer is completely shut down and powered off. Here are several common ways to enter the BIOS: 1. Use shortcut keys: Most computer manufacturers will display a prompt message at startup telling you which key to press to enter the BIOS settings. Usually the F2, F10, F12 or Delete key. After pressing the appropriate keys, you should be able to see a screen with information about your computer's hardware and BIOS settings. 2. Use the button on the motherboard: Some computer motherboards have a dedicated button for entering BIOS settings. This button is usually labeled "BIOS" or "UEFI". After pressing the button you should be able to see
 MSI motherboard boot logo
May 08, 2024 pm 02:20 PM
MSI motherboard boot logo
May 08, 2024 pm 02:20 PM
How to cancel the MSI motherboard icon when booting 1. Press the DEL key when booting to enter the BIOS. Generally, in the "Advanced Features" item, you can find the words MSI motherboard LOGO screen. Select DISABLED, save and exit. There will no longer be this MSI motherboard LOGO screen when you turn on the computer in the future. MSI motherboard refers to the motherboard brand developed by MSI (MSI Technology Company). 2. The logo displayed when the computer is turned on is basically that of the motherboard manufacturer. You can set QUICKPOST to DISENABLE in the BIOS, so that the logo will generally no longer be displayed. It will display computer configuration-related information and give you more details. 3. First, teach you how to flash the BIOS in Windows environment. First: Go online
 How to upgrade Gigabyte motherboard to Win11_How to upgrade Gigabyte motherboard to Win11
May 06, 2024 pm 12:04 PM
How to upgrade Gigabyte motherboard to Win11_How to upgrade Gigabyte motherboard to Win11
May 06, 2024 pm 12:04 PM
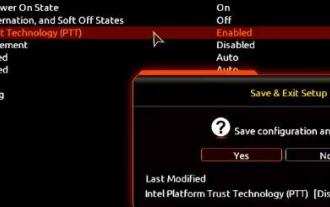
1. Win11 does not have very high requirements for the motherboard. You can first download healthcheck or whynotwin11 to check whether your other hardware devices support it (you can download it from this site). 2. If other conditions are met and only tpm does not meet the requirements, you can enable tpm in the bios settings. 3. Restart the system, and then press [DEL] on the keyboard to enter the BIOS settings when the logo pops up. 4. Enter the [Settings] option and [Miscellaneous] option in sequence. 5. Find [Intel Platform Trust Technology (PTT)] below and set it to [Start]. 6. If it is an AMD platform, then
 How to upgrade Win11 system on old computers_Tutorial on upgrading Win11 system on old computers
May 07, 2024 pm 08:07 PM
How to upgrade Win11 system on old computers_Tutorial on upgrading Win11 system on old computers
May 07, 2024 pm 08:07 PM
1. First we need to download the win11 image file. 2. Put the downloaded win11 image into another disk. 3. Then we find the win11 image file among the searched image files. 4. Then when we come to this interface, we select install.wim to proceed to the next step. 5. Then select the Windows 11 system and click OK to restore the image file. 6. Then we wait for pe to download and install. Wait patiently. After the download is completed, click restart according to the prompts. 7. Then come to this interface, we select the second xiaobaiPE. After selecting, the win11 system will be automatically installed for us. After the installation is completed, click to restart the computer immediately according to the prompts. 8. Finally, the system installation is completed, and we come to
 How to enable tpm2.0 in win11_How to enable tpm2.0 in win11
May 08, 2024 pm 06:10 PM
How to enable tpm2.0 in win11_How to enable tpm2.0 in win11
May 08, 2024 pm 06:10 PM
1. Gigabyte motherboard 1. First, we restart the computer and use the keyboard [DEL] to enter the BIOS settings when restarting. 2. Find and enter the [Settings] tab above. 3. Then find and enter [Miscellaneous] under settings. 4. Set [Intel Platform Trust Technology (PTT)] to [Enabled]. 5. After the settings are completed, use the keyboard [F10] to save, and then click [YES] to exit. 2. ASUS motherboard 1. First restart the computer and continuously tap [del] on the keyboard to enter the bios settings when booting. 2. Click [AdvancedMode] or press [F7] to find [A
