

How to make a USB boot disk in deepin


php editor Baicao will share with you a simple method to create a U disk boot disk for the deepin system. Making a USB boot disk can facilitate us to quickly install the deepin system when needed, and make system maintenance and repair more convenient. Let us take a look at the specific production steps below.
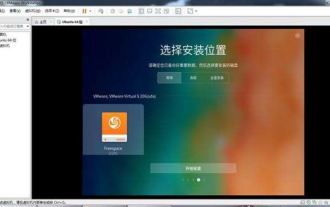
In order to let some friends who like domestic operations experience Deepin as soon as possible, Xiaoyu will teach you how to install the Deepin domestic operating system? Just a USB flash drive is enough!
Hardware requirements of Deepin systemIn order to ensure the smooth operation of Deepin operating system, appropriate hardware configuration is required. According to Deepin official recommendations, the minimum hardware requirements include:
Processor: Intel Pentium IV 2GHz or faster processor Memory: at least 2G memory (RAM), 4G or above is the recommended value for better performance Hard drive: at least 25 GB of free spaceThe above is the detailed content of How to make a USB boot disk in deepin. For more information, please follow other related articles on the PHP Chinese website!

Hot AI Tools

Undresser.AI Undress
AI-powered app for creating realistic nude photos

AI Clothes Remover
Online AI tool for removing clothes from photos.

Undress AI Tool
Undress images for free

Clothoff.io
AI clothes remover

AI Hentai Generator
Generate AI Hentai for free.

Hot Article
Hot Tools

Notepad++7.3.1
Easy-to-use and free code editor

SublimeText3 Chinese version
Chinese version, very easy to use

Zend Studio 13.0.1
Powerful PHP integrated development environment

Dreamweaver CS6
Visual web development tools

SublimeText3 Mac version
God-level code editing software (SublimeText3)
Hot Topics


 What should I do if the deepin taskbar does not show up? What should I do if the deepin taskbar disappears?
Feb 29, 2024 am 11:01 AM
What should I do if the deepin taskbar does not show up? What should I do if the deepin taskbar disappears?
Feb 29, 2024 am 11:01 AM
When our computer system is updated, some computer novices can't wait to install and use the new system, but they don't know that new computer systems often have many bugs. For example, the new system deepin system, many friends found that the taskbar was missing during the process of downloading and using it! So how do we find the taskbar? The editor will take you to take a look at it below! Method 1: 1. Turn off taskbar synchronization in cloud synchronization. 2. Delete the rm~/.config/dconf or rm~/.config/dconf-rf folder. 3. Restart to solve the problem. Method 2: 1. Press "ctrl+alt+t" to enter the terminal. 2. Then enter the command: sudoapt-getu
 Operation steps and techniques for booting into PE system from USB disk
Mar 25, 2024 pm 07:00 PM
Operation steps and techniques for booting into PE system from USB disk
Mar 25, 2024 pm 07:00 PM
In the field of computer repair and system reinstallation, booting into the PE system from a USB flash drive is a very practical skill. This article will introduce in detail the steps and techniques for booting into the PE system from a USB flash drive to help you easily master this practical skill and solve computer system failures and system reinstallation problems. Tool materials: System version: Windows 11 Professional Edition Brand model: Lenovo ThinkPad 2. Prepare a USB flash drive with a capacity of no less than 8GB, and use the micro PE toolbox to create a PE bootable USB flash drive. During the production process, the software will
 How to set the screen resolution in deepin system? How to set the resolution in deepin
Jan 06, 2024 pm 09:30 PM
How to set the screen resolution in deepin system? How to set the resolution in deepin
Jan 06, 2024 pm 09:30 PM
It is very common to set the resolution in deepin. How to set it? Let’s take a look at the detailed tutorial below. Method 1. Setting under graphics 1. Click "Control Center" on the taskbar. 2. Select "Display" in the Control Center. 3. In the display, click "Resolution". 4. In the pop-up window, you can see the resolutions supported by the current system, and select the corresponding resolution to set. Method 2. Command setting method 1. You can set the screen resolution through the xrandr command. First query the current resolution and currently supported resolutions. The current resolution of xrandr-q is 1680x10502, you can pass the -s parameter
 deepin operating system 20.9 released today: Qt version upgraded to 5.15.8
Feb 29, 2024 am 09:55 AM
deepin operating system 20.9 released today: Qt version upgraded to 5.15.8
Feb 29, 2024 am 09:55 AM
Deepin is a Linux distribution developed by a Chinese team. Deepin operating system 20.9 has been officially released. The core goal of deepin20.9 version is to provide users with a stable system running version. This version does not integrate new functions of the system, but mainly fixes and optimizes a large number of stability problems existing in the 20.8 version system. Currently, the deepin20.9Qt version has been upgraded to 5.15.8, and applications such as log viewer, photo album, drawing board, and system package manager have been updated; many issues affecting the experience have been fixed to further improve the system experience. The following is the specific update content: new and optimized Qt version upgraded to 5.15.8; updated
 How to check the version number of deepin system
Dec 29, 2023 pm 01:57 PM
How to check the version number of deepin system
Dec 29, 2023 pm 01:57 PM
If you want to check the system version information under the deepinlinux system, how to check it? We can query through the graphical interface, through commands, or by installing software. Let’s talk about it in detail below. Method 1. Check the deepinlinux version on the graphical interface and click "Control Center" on the taskbar. Click "System Information". You can view the version information of deepinlinux. Method 2. View the deepinlinux system version on the command line. You can view the deepinlinux system version on the command line by viewing the /etc/os-release file. You can also use the lsb-release command
 What should I do if deepin v20 cannot start after installation? What should I do if deepinv20 cannot start?
Mar 01, 2024 am 11:55 AM
What should I do if deepin v20 cannot start after installation? What should I do if deepinv20 cannot start?
Mar 01, 2024 am 11:55 AM
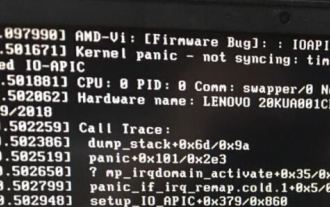
Recently, someone encountered the problem of being unable to start when using deepinv20. Every time the computer is turned on and the system is entered, the error code interface as shown in the picture will appear. I don’t know how to solve it. At this time, we can try to switch the kernel or run the Linux command line Add content to solve the problem. What to do if deepinv20 cannot start: Method 1: 1. If we use a new computer, it may not be compatible with the old version of deepin kernel. 2. At this time, we can try to replace the latest system kernel, or directly upgrade the system version to solve the problem. Method 2: 1. Restart the computer and press "F1" during boot to enter the bios settings. 2. Then under the boot option, find “se
 How to switch as root user in Deepin Linux? How to switch to root privileges in Deepin Linux
Dec 27, 2023 pm 02:23 PM
How to switch as root user in Deepin Linux? How to switch to root privileges in Deepin Linux
Dec 27, 2023 pm 02:23 PM
How to switch to root user in Deepin system? Let’s take a look at the detailed graphic tutorial below. First press "ctrl+lat+t" to open the terminal, then set a password for the root user and execute the su command. Enter the root user's password and switch to the root user. When using administrator privileges to perform simple operations, you will encounter more problems when using the sudo command. When you get a simple prompt that the command cannot be found, you can directly use the sudo command to elevate the permissions. You can also switch to the root user and execute it. If you create a new user and need to use root permissions, you can execute the following command sudovisudo to modify the sudo configuration file, as shown below. Just add the new user to the location shown, for example
 How to set the mouse to be left-handed? How to set the left-handed mouse in deepin20
Jan 11, 2024 pm 08:15 PM
How to set the mouse to be left-handed? How to set the left-handed mouse in deepin20
Jan 11, 2024 pm 08:15 PM
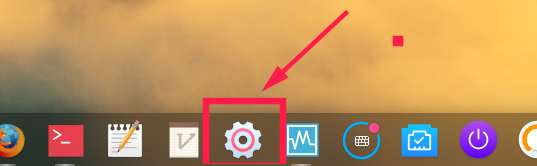
Generally, the computer mouse settings are right-handed mode, but some people like to use their left hand to operate the mouse. How to set the mouse to left-handed mode? Let’s take a look at the detailed tutorial below. 1. First, click [Launcher] on the taskbar. 2. Click the gear button in the middle of the launcher to open the [Control Center]. 3. Click [Mouse] in [Control Center]. 4. Find the [Left-Hand Mode] option. 5. Turn on the [Left-Hand Mode] switch button.
