
 System Tutorial
LINUX
How to build 4 virtual disks to build a distributed MinIO cluster in Linux?
System Tutorial
LINUX
How to build 4 virtual disks to build a distributed MinIO cluster in Linux?
How to build 4 virtual disks to build a distributed MinIO cluster in Linux?

Since I have recently started to be responsible for the construction and stability operation and maintenance of object storage-related systems, as a novice in "object storage", I need to strengthen my learning in this area.
Since the company currently uses MinIO to build the company's object storage system, I will gradually share my learning experience about MinIO in the future. Everyone is welcome to continue to pay attention.
This article mainly introduces how to build MinIO in the test environment. This is also the most basic step in building a MinIO learning environment.
1. Prepare the experimental environment
Use Oracle VM VirtualBox virtual machine, install a minimal version of Linux, and then add 4 virtual disks to serve as MinIO virtual disks.
The experimental environment is as follows:
Next, I will briefly introduce the establishment of the virtual environment.
Step1: Specific method of adding a virtual disk:
Operation path: [Settings]-[Storage], add [plus sign] to control SATA

Step2: Click [Create] to create a disk. The operation is as shown below:
After creating four disks, restart the server.
Step3: Check whether the operating system recognizes the disk
First we can run lsblk, the execution results are as follows:
[root@localhost ~]# lsblk
NAME            MAJ:MIN RM  SIZE RO TYPE MOUNTPOINT
sda               8:0    0   50G  0 disk
├─sda1            8:1    0    1G  0 part /boot
└─sda2            8:2    0   49G  0 part
  ├─centos-root 253:0    0 45.1G  0 lvm  /
  └─centos-swap 253:1    0  3.9G  0 lvm  [SWAP]
sdb               8:16   0   10G  0 disk
sdc               8:32   0   10G  0 disk
sdd               8:48   0   10G  0 disk
sde               8:64   0   10G  0 disk
sr0              11:0    1 1024M  0 rom
According to the size of the created file, we can see the four created virtual disks sdb, sdc, sdd, and sde, but they are not mounted (MOUNTPOINT is empty)
But at this time, using the df -h command, these disks cannot be viewed. The results are as follows:
[root@localhost ~]# df -h
文件系统                 容量  已用  可用 已用% 挂载点
devtmpfs                 1.9G     0  1.9G    0% /dev
tmpfs                    1.9G     0  1.9G    0% /dev/shm
tmpfs                    1.9G  8.7M  1.9G    1% /run
tmpfs                    1.9G     0  1.9G    0% /sys/fs/cgroup
/dev/mapper/centos-root   46G  1.3G   44G    3% /
/dev/sda1               1014M  151M  864M   15% /boot
tmpfs                    379M     0  379M    0% /run/user/0
But you can also query the four virtual disk information using the fdisk -l command, as shown below:
[root@localhost ~]# fdisk -l

磁盘 /dev/sde:10.7 GB, 10737418240 字节,20971520 个扇区
Units = 扇区 of 1 * 512 = 512 bytes
扇区大小(逻辑/物理):512 字节 / 512 字节
I/O 大小(最小/最佳):512 字节 / 512 字节


磁盘 /dev/sdd:10.7 GB, 10737418240 字节,20971520 个扇区
Units = 扇区 of 1 * 512 = 512 bytes
扇区大小(逻辑/物理):512 字节 / 512 字节
I/O 大小(最小/最佳):512 字节 / 512 字节


磁盘 /dev/sdc:10.7 GB, 10737418240 字节,20971520 个扇区
Units = 扇区 of 1 * 512 = 512 bytes
扇区大小(逻辑/物理):512 字节 / 512 字节
I/O 大小(最小/最佳):512 字节 / 512 字节


磁盘 /dev/sda:53.7 GB, 53687091200 字节,104857600 个扇区
Units = 扇区 of 1 * 512 = 512 bytes
扇区大小(逻辑/物理):512 字节 / 512 字节
I/O 大小(最小/最佳):512 字节 / 512 字节
磁盘标签类型:dos
磁盘标识符:0x000b5407

   设备 Boot      Start         End      Blocks   Id  System
/dev/sda1   *        2048     2099199     1048576   83  Linux
/dev/sda2         2099200   104857599    51379200   8e  Linux LVM

磁盘 /dev/sdb:10.7 GB, 10737418240 字节,20971520 个扇区
Units = 扇区 of 1 * 512 = 512 bytes
扇区大小(逻辑/物理):512 字节 / 512 字节
I/O 大小(最小/最佳):512 字节 / 512 字节


磁盘 /dev/mapper/centos-root:48.4 GB, 48444211200 字节,94617600 个扇区
Units = 扇区 of 1 * 512 = 512 bytes
扇区大小(逻辑/物理):512 字节 / 512 字节
I/O 大小(最小/最佳):512 字节 / 512 字节


磁盘 /dev/mapper/centos-swap:4160 MB, 4160749568 字节,8126464 个扇区
Units = 扇区 of 1 * 512 = 512 bytes
扇区大小(逻辑/物理):512 字节 / 512 字节
I/O 大小(最小/最佳):512 字节 / 512 字节
How to mount four virtual disks to the file system?
Step4: Create a partition, format the disk, and mount it to a file. The specific commands are as follows:
[root@localhost ~]# fdisk /dev/sdb
欢迎使用 fdisk (util-linux 2.23.2)。

更改将停留在内存中,直到您决定将更改写入磁盘。
使用写入命令前请三思。

Device does not contain a recognized partition table
使用磁盘标识符 0x2bb131bd 创建新的 DOS 磁盘标签。

命令(输入 m 获取帮助):m
命令操作
   a   toggle a bootable flag
   b   edit bsd disklabel
   c   toggle the dos compatibility flag
   d   delete a partition
   g   create a new empty GPT partition table
   G   create an IRIX (SGI) partition table
   l   list known partition types
   m   print this menu
   n   add a new partition,创建一个分区
   o   create a new empty DOS partition table
   p   print the partition table
   q   quit without saving changes
   s   create a new empty Sun disklabel
   t   change a partition's system id
   u   change display/entry units
   v   verify the partition table
   w   write table to disk and exit
   x   extra functionality (experts only)

命令(输入 m 获取帮助):n
Partition type:
   p   primary (0 primary, 0 extended, 4 free)
   e   extended
Select (default p): p
分区号 (1-4,默认 1):1
起始 扇区 (2048-20971519,默认为 2048):
将使用默认值 2048
Last 扇区, +扇区 or +size{K,M,G} (2048-20971519,默认为 20971519):
将使用默认值 20971519
分区 1 已设置为 Linux 类型,大小设为 10 GiB

命令(输入 m 获取帮助):w
The partition table has been altered!

Calling ioctl() to re-read partition table.
正在同步磁盘。

## 这里格式为ext4,如果是新搭建MinIO集群,文件存储系统强烈推荐使用xfs,对应的命令:mkfs.xfs /dev/sdb
[root@localhost ~]# mkfs.ext4 /dev/sdb
mke2fs 1.42.9 (28-Dec-2013)
/dev/sdb is entire device, not just one partition!
无论如何也要继续? (y,n) y
文件系统标签=
OS type: Linux
块大小=4096 (log=2)
分块大小=4096 (log=2)
Stride=0 blocks, Stripe width=0 blocks
655360 inodes, 2621440 blocks
131072 blocks (5.00%) reserved for the super user
第一个数据块=0
Maximum filesystem blocks=2151677952
80 block groups
32768 blocks per group, 32768 fragments per group
8192 inodes per group
Superblock backups stored on blocks:
 32768, 98304, 163840, 229376, 294912, 819200, 884736, 1605632

Allocating group tables: 完成
正在写入inode表: 完成
Creating journal (32768 blocks): 完成
Writing superblocks and filesystem accounting information: 完成

[root@localhost ~]# mkdir /data1
# 注释:挂载到文件系统 /data1
[root@localhost ~]# mount -t ext4 /dev/sdb /data1
[root@localhost ~]# df -h
文件系统                 容量  已用  可用 已用% 挂载点
devtmpfs                 1.9G     0  1.9G    0% /dev
tmpfs                    1.9G     0  1.9G    0% /dev/shm
tmpfs                    1.9G  8.7M  1.9G    1% /run
tmpfs                    1.9G     0  1.9G    0% /sys/fs/cgroup
/dev/mapper/centos-root   46G  1.3G   44G    3% /
/dev/sda1               1014M  151M  864M   15% /boot
tmpfs                    379M     0  379M    0% /run/user/0
/dev/sdb                 9.8G   37M  9.2G    1% /data1
Use the same command to create partitions for /dev/sdc, /dev/sdd, and /dev/sde and mount them to /data2,/data3,/data4.
The final execution effect is as follows:
[root@localhost ~]# df -h
文件系统                 容量  已用  可用 已用% 挂载点
devtmpfs                 1.9G     0  1.9G    0% /dev
tmpfs                    1.9G     0  1.9G    0% /dev/shm
tmpfs                    1.9G  8.7M  1.9G    1% /run
tmpfs                    1.9G     0  1.9G    0% /sys/fs/cgroup
/dev/mapper/centos-root   46G  1.3G   44G    3% /
/dev/sda1               1014M  151M  864M   15% /boot
tmpfs                    379M     0  379M    0% /run/user/0
/dev/sdb                 9.8G   37M  9.2G    1% /data1
/dev/sdc                 9.8G   37M  9.2G    1% /data2
/dev/sdd                 9.8G   37M  9.2G    1% /data3
/dev/sde                 9.8G   37M  9.2G    1% /data4
At this point, the experimental environment is ready.
2. Deploy MinIO
MinIO supports three deployment architectures:
- Single-Node Single-Drive (SNSD or “Standalone”) Single-node single-drive
- Single-Node Multi-Drive (SNMD or “Standalone Multi-Drive”) Single-node multi-drive, pseudo-distributed, can use production features such as error correction codes.
- Multi-Node Multi-Drive (MNMD or “Distributed”) Multi-Node Multi-Drive, a distributed deployment architecture, is highly recommended for production environments.
Due to limited testing resources, this article uses Single-Node Multi-Drive for construction.
The SNMD deployment architecture supports drive (disk) fault tolerance. It is highly recommended to use the MNMD architecture in production environments.
2.1 Preparation before installation
MinIO strongly recommends directly connected JBOD arrays and xfs format disks for best performance.
DAS (Direct-Attached Storage) has significant performance and consistency advantages compared with network storage (NAS, SAN, NFS).
Deployments using non-xfs file systems (ext4, btrfs, zfs) often have lower performance. At the same time, file storage such as ext4 has a limit on the number of files in a single directory, which can easily affect availability.
Minio inherently has the advantage of distributed storage and uses erasure coding internally. RAID or similar technologies cannot provide additional elasticity or availability advantages, and usually reduce system performance.
Please ensure that all nodes in the server pool use the same type of drive (NVMe, SSD, or HDD) and have the same capacity. MinIO does not differentiate between drive types and cannot benefit from mixing storage types. also. MinIO limits the size of each drive to the capacity held by the smallest drive in the deployment. For example, if a deployment has 15 10TB drives and 1 1TB drive, MinIO limits the capacity of each drive to 1TB.
MinIO需要使用展开符号{x…y}用来表示Server Pool中每一个节点的一组磁盘驱动器,并且要求Server Pool中所有节点的磁盘驱动器序列相同。MinIO还要求物理驱动器的顺序在重新启动时保持不变,这样给定的挂载点总是指向相同的格式化驱动器。
2.2 如何一步一步安装MinIO
Step1:根据不同的操作系统与CPU架构,下载对应的安装包,例如当前虚拟机是amd,我们下载对应的RPM包,命令如下:
wget https://dl.min.io/server/minio/release/linux-amd64/archive/minio-

20230313194617.0.0.x86_64.rpm -O minio.rpm

sudo dnf install minio.rpm
通过该命令安装后,有关MinIO相关文件:
- /usr/local/bin/ MinIO 可执行文件所在的目录,该目录下就只有一个可执行文件 minio。
- /etc/systemd/system/minio.service MinIO系统服务文件
- /etc/default/minio MinIO环境变量文件
如果是使用二进制文件直接安装,其实就是要创建如上三个文件。
Step2:创建systemd系统服务文件
如果是基于rpm或者deb包进行安装的话,会自动创建systemd系统服务文件,如果是二级制安装模式,就需要自动创建该文件,文件的全路径为/etc/systemd/system/minio.service,具体的内容如下:
[Unit]
Description=MinIO
Documentation=https://min.io/docs/minio/linux/index.html
Wants=network-online.target
After=network-online.target
AssertFileIsExecutable=/usr/local/bin/minio

[Service]
WorkingDirectory=/usr/local

User=minio-user
Group=minio-user
ProtectProc=invisible

EnvironmentFile=-/etc/default/minio
ExecStartPre=/bin/bash -c "if [ -z \"${MINIO_VOLUMES}\" ]; then echo \"Variable MINIO_VOLUMES not set in /etc/default/minio\"

; exit 1; fi"
ExecStart=/usr/local/bin/minio server $MINIO_OPTS $MINIO_VOLUMES

# Let systemd restart this
service always
Restart=always

# Specifies the maximum file descriptor number that can be opened by this process
LimitNOFILE=65536

# Specifies the maximum number of threads this process can create
TasksMax=infinity

# Disable timeout logic and wait until process is stopped
TimeoutStopSec=infinity
SendSIGKILL=no

[Install]
WantedBy=multi-user.target

# Built for ${project.name}-${project.version} (${project.name})
默认情况下MinIO使用minio-user用户与minio-user用户组启动MinIO进程,故我们需要创建对应的用户与组,具体命令如下:
[root@localhost bin]# groupadd -r minio-user

[root@localhost bin]# useradd -M -r -g minio-user minio-user
# 主要是将minio需要用到的磁盘驱动器

设置为 minio-user:minio-user

[root@localhost bin]# chown minio-user:minio-user /data1 /data2 /data3 /data4
Step3:创建环境变量
默认需要创建 /etc/default/minio 文件,用于设置minio相关的环境变量(配置项)。关于MinIO的配置详细说明可以参考官方网站:https://min.io/docs/minio/linux/operations/install-deploy-manage/deploy-minio-single-node-multi-drive.html#id6
例如我们创建的最小化配置文件如下:
# MINIO_ROOT_USER and MINIO_ROOT_PASSWORD sets the root account for the MinIO server.
#
This user has unrestricted permissions to perform S3 and administrative API operations
on any resource in the deployment.
# Omit to use the default values 'minioadmin:minioadmin
'.
# MinIO recommends setting non-default values as a best practice, regardless of e
nvironment.

MINIO_ROOT_USER=myminioadmin
MINIO_ROOT_PASSWORD=minio-secret-key-change-me

# MINIO_VOLUMES sets the storage volumes or paths to use for the MinIO server.

# The specified path uses MinIO expansion notation to denote a sequential series of
drives between 1 and 4, inclusive.
# All drives or paths included in the expanded drive
list must exist *and* be empty or freshly formatted for MinIO to start successfully.

MINIO_VOLUMES="/data{1...4}"

# MINIO_SERVER_URL sets the hostname of the local machine
 for use with the MinIO Server.
# MinIO assumes your network control plane can correctly
 resolve this hostname to the local machine.

# Uncomment the following line and replace
the value with the correct hostname for the local machine.

#MINIO_SERVER_URL="http://minio
.example.net"
其中MINIO_VOLUMES参数用于指定MinIO集群的磁盘,这里由于是单节点,所有省略了HOSTNAME。
Step4:启动MinIO
通过在节点上使用如下命令启动MinIO(如果分布式环境下,分别在不同节点执行该命令)。
systemctl start minio.service
命令执行后,我们可以使用如下命令查看minio是否启动成功
systemctl status minio.service
该命令运行的截图如下所示:
其中Active(running)表示运行正常,并且可以看到Console的地址,我们可以在浏览器中输入console地址,打开MinIO内置的控制台:
用户名、密码是配置在MinIO环境变量配置文件中,输入用户名、密码即可登录。
当然MinIO也提供了对应mc 客户端命令访问服务端,关于运维命令,将会在后续文章介绍。
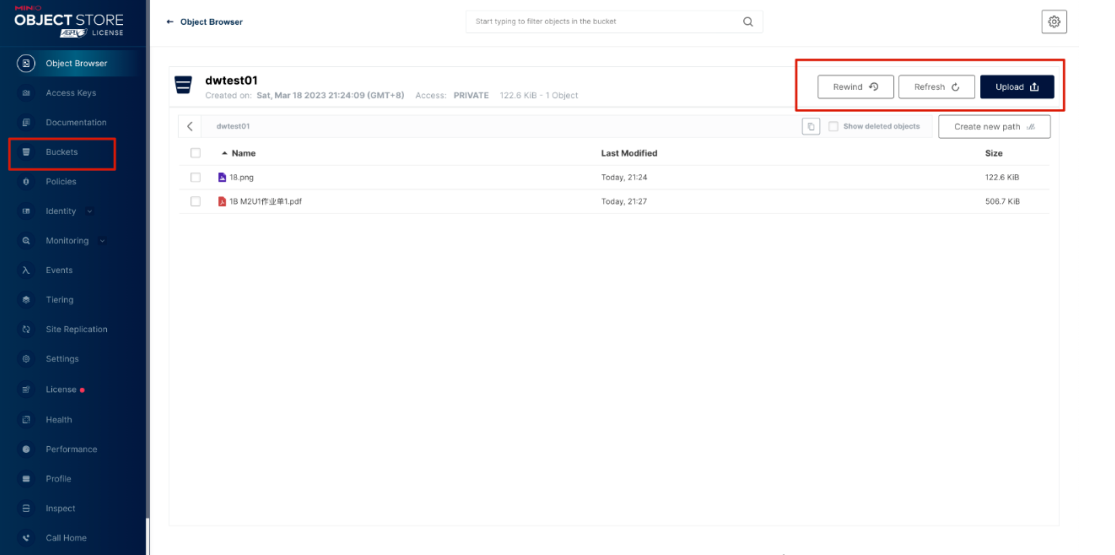
并基于MinIO Console成功创建了Bucket并成功上传了文件,效果如下图所示:
The above is the detailed content of How to build 4 virtual disks to build a distributed MinIO cluster in Linux?. For more information, please follow other related articles on the PHP Chinese website!

Hot AI Tools

Undresser.AI Undress
AI-powered app for creating realistic nude photos

AI Clothes Remover
Online AI tool for removing clothes from photos.

Undress AI Tool
Undress images for free

Clothoff.io
AI clothes remover

AI Hentai Generator
Generate AI Hentai for free.

Hot Article
Hot Tools

Notepad++7.3.1
Easy-to-use and free code editor

SublimeText3 Chinese version
Chinese version, very easy to use

Zend Studio 13.0.1
Powerful PHP integrated development environment

Dreamweaver CS6
Visual web development tools

SublimeText3 Mac version
God-level code editing software (SublimeText3)
Hot Topics
 1379
1379
 52
52

 Difference between centos and ubuntu
Apr 14, 2025 pm 09:09 PM
Difference between centos and ubuntu
Apr 14, 2025 pm 09:09 PM
The key differences between CentOS and Ubuntu are: origin (CentOS originates from Red Hat, for enterprises; Ubuntu originates from Debian, for individuals), package management (CentOS uses yum, focusing on stability; Ubuntu uses apt, for high update frequency), support cycle (CentOS provides 10 years of support, Ubuntu provides 5 years of LTS support), community support (CentOS focuses on stability, Ubuntu provides a wide range of tutorials and documents), uses (CentOS is biased towards servers, Ubuntu is suitable for servers and desktops), other differences include installation simplicity (CentOS is thin)
 How to install centos
Apr 14, 2025 pm 09:03 PM
How to install centos
Apr 14, 2025 pm 09:03 PM
CentOS installation steps: Download the ISO image and burn bootable media; boot and select the installation source; select the language and keyboard layout; configure the network; partition the hard disk; set the system clock; create the root user; select the software package; start the installation; restart and boot from the hard disk after the installation is completed.
 Centos stops maintenance 2024
Apr 14, 2025 pm 08:39 PM
Centos stops maintenance 2024
Apr 14, 2025 pm 08:39 PM
CentOS will be shut down in 2024 because its upstream distribution, RHEL 8, has been shut down. This shutdown will affect the CentOS 8 system, preventing it from continuing to receive updates. Users should plan for migration, and recommended options include CentOS Stream, AlmaLinux, and Rocky Linux to keep the system safe and stable.
 Detailed explanation of docker principle
Apr 14, 2025 pm 11:57 PM
Detailed explanation of docker principle
Apr 14, 2025 pm 11:57 PM
Docker uses Linux kernel features to provide an efficient and isolated application running environment. Its working principle is as follows: 1. The mirror is used as a read-only template, which contains everything you need to run the application; 2. The Union File System (UnionFS) stacks multiple file systems, only storing the differences, saving space and speeding up; 3. The daemon manages the mirrors and containers, and the client uses them for interaction; 4. Namespaces and cgroups implement container isolation and resource limitations; 5. Multiple network modes support container interconnection. Only by understanding these core concepts can you better utilize Docker.
 Centos options after stopping maintenance
Apr 14, 2025 pm 08:51 PM
Centos options after stopping maintenance
Apr 14, 2025 pm 08:51 PM
CentOS has been discontinued, alternatives include: 1. Rocky Linux (best compatibility); 2. AlmaLinux (compatible with CentOS); 3. Ubuntu Server (configuration required); 4. Red Hat Enterprise Linux (commercial version, paid license); 5. Oracle Linux (compatible with CentOS and RHEL). When migrating, considerations are: compatibility, availability, support, cost, and community support.
 What to do after centos stops maintenance
Apr 14, 2025 pm 08:48 PM
What to do after centos stops maintenance
Apr 14, 2025 pm 08:48 PM
After CentOS is stopped, users can take the following measures to deal with it: Select a compatible distribution: such as AlmaLinux, Rocky Linux, and CentOS Stream. Migrate to commercial distributions: such as Red Hat Enterprise Linux, Oracle Linux. Upgrade to CentOS 9 Stream: Rolling distribution, providing the latest technology. Select other Linux distributions: such as Ubuntu, Debian. Evaluate other options such as containers, virtual machines, or cloud platforms.
 How to use docker desktop
Apr 15, 2025 am 11:45 AM
How to use docker desktop
Apr 15, 2025 am 11:45 AM
How to use Docker Desktop? Docker Desktop is a tool for running Docker containers on local machines. The steps to use include: 1. Install Docker Desktop; 2. Start Docker Desktop; 3. Create Docker image (using Dockerfile); 4. Build Docker image (using docker build); 5. Run Docker container (using docker run).
 What computer configuration is required for vscode
Apr 15, 2025 pm 09:48 PM
What computer configuration is required for vscode
Apr 15, 2025 pm 09:48 PM
VS Code system requirements: Operating system: Windows 10 and above, macOS 10.12 and above, Linux distribution processor: minimum 1.6 GHz, recommended 2.0 GHz and above memory: minimum 512 MB, recommended 4 GB and above storage space: minimum 250 MB, recommended 1 GB and above other requirements: stable network connection, Xorg/Wayland (Linux)
