
 Computer Tutorials
Troubleshooting
How do you press F on a Gigabyte motherboard to enter the USB PE disk?
Computer Tutorials
Troubleshooting
How do you press F on a Gigabyte motherboard to enter the USB PE disk?
How do you press F on a Gigabyte motherboard to enter the USB PE disk?

php editor Apple tells you that the specific operation of pressing the F key on the Gigabyte motherboard to enter the USB flash drive PE is: During the boot process, press the F key on the computer motherboard, and then select the USB flash drive as the boot device to enter the USB drive. Disk PE system. This operation is very simple, but you need to determine the specific F key to press according to different Gigabyte motherboard models. By entering the USB disk PE system, users can perform system repairs, virus scanning and other operations to solve various computer problems conveniently and quickly.

On a Gigabyte motherboard, press F to enter the USB disk PE?
For Gigabyte motherboard, press F12 key to enter the USB disk PE.
1. Insert the prepared USB boot disk, restart the computer, and keep pressing the F12 startup hotkey when the Gigabyte logo appears;
2. At this time, the startup menu selection box will pop up. , press the ↓ direction key to select the recognized USB flash drive, such as KingstonDT, and press Enter to boot from the USB flash drive.
Method 2: BIOS settings USB boot steps
1. Insert the USB boot disk, restart and keep pressing the Del key to enter the BIOS setup interface, click on the upper right corner to select;
2. Click below, select the U disk option, and press Enter;
3. If you cannot find the U disk option, you need to turn off Secure Quick Start;
4. And set it to;
5. Press the F10 key to save and exit
How to enter the motherboard BIOS on a Gigabyte motherboard?
1.
The moment the computer is turned on and the Gigabyte logo interface pops up, immediately press the "Delete" key or the "F12" key to enter the Gigabyte motherboard BIOS interface
2.
Enter the Gigabyte motherboard BIOS settings, which are mainly divided into the upper menu bar, the left usage bar, the right reminder bar, etc. The main interface displays the host information settings. Below we can also set processor, memory and voltage related parameters.
How to enter the multi-boot menu when turning on a Gigabyte motherboard?
To enter the multi-boot menu of a Gigabyte motherboard, you first need to press a specific button when booting. Normally, you can try pressing or continuously pressing the F12 key to enter the multi-boot menu.
When you see the Gigabyte motherboard logo appear on the screen, quickly press the F12 key until the boot menu appears.
In the menu, you can choose to boot the system from different storage devices, such as booting from a hard disk, optical drive or USB device. In this way, you can easily choose the system startup method to adapt to different needs and situations.
How to disable overclocking in Gigabyte bios?
If you want to lift the overclocking restrictions in the GIGABYTE motherboard BIOS, you can try the following methods:
Enter BIOS settings: Turn on the computer and press the corresponding key (such as F2 , F10 or F12) to enter BIOS setup.
Find overclocking settings: In the BIOS settings, find options related to overclocking, such as "CPU Frequency", "CPU Core Voltage", etc.
Modify overclocking settings: Adjust the corresponding overclocking settings according to the motherboard model and processor specifications. It is recommended to start with a small overclock and then gradually increase it to ensure stable system operation.
Save settings and restart: After modifying the overclocking settings, save and exit the BIOS settings. The computer will boot with the new settings, and if everything is working properly, you will be able to lift the overclocking restrictions in the BIOS.
Please note that overclocking may cause hardware damage, system instability and other problems, so before overclocking, please make sure you understand the relevant knowledge and ensure that the device meets the overclocking requirements. At the same time, overclocking settings may vary between different motherboards and processors. It is recommended to refer to the specific hardware parameters and motherboard manual for settings.
Gigabyte motherboard, what should I do if del doesn’t work when I turn on f12?
This situation may be because the computer cannot detect a certain piece of hardware during self-test or is stuck in detecting a piece of hardware.
1. Keyboard and mouse. The power-on self-test will detect the mouse and keyboard. If a problem occurs, it will be stuck in the self-test interface. The solution is to unplug the keyboard and mouse and check whether it passes the self-test. If it passes the self-test, replace it. Mouse and keyboard.
2. Hard drive and optical drive, most likely hard drive and optical drive. For desktop computers, you need to open the case and unplug the power cord of the hard drive and optical drive to see if it passes the self-test. If it passes, further rule out the problem of the hard drive or the data cable.
3. If none of the above is true, then the most likely problem is that there is a problem with the motherboard bios and it needs to be returned to the factory for repair.
Gigabyte bios shortcut key?
The BIOS shortcut keys for Gigabyte motherboards may vary depending on the model. They are usually marked in the manual of the Gigabyte motherboard or on the motherboard. The following are some common Gigabyte motherboard BIOS shortcut keys:
- F2: Enter the BIOS setup interface
- F12: Enter the BIOS setup interface and boot the system from the hard disk
- DEL: Enter the BIOS setting interface
If you are not sure about the BIOS shortcut keys for your GIGABYTE motherboard, please refer to your motherboard manual or contact GIGABYTE customer service for consultation.
The above is the detailed content of How do you press F on a Gigabyte motherboard to enter the USB PE disk?. For more information, please follow other related articles on the PHP Chinese website!

Hot AI Tools

Undresser.AI Undress
AI-powered app for creating realistic nude photos

AI Clothes Remover
Online AI tool for removing clothes from photos.

Undress AI Tool
Undress images for free

Clothoff.io
AI clothes remover

AI Hentai Generator
Generate AI Hentai for free.

Hot Article
Hot Tools

Notepad++7.3.1
Easy-to-use and free code editor

SublimeText3 Chinese version
Chinese version, very easy to use

Zend Studio 13.0.1
Powerful PHP integrated development environment

Dreamweaver CS6
Visual web development tools

SublimeText3 Mac version
God-level code editing software (SublimeText3)
Hot Topics


 In which folder is the win10 graphics card driver located?
Apr 18, 2024 am 09:20 AM
In which folder is the win10 graphics card driver located?
Apr 18, 2024 am 09:20 AM
What is the installation path of the graphics card driver? 1. Turn on the computer, click Computer, and open the Device Manager. For all devices on our computer, find the installation directory location of the graphics card driver. Click on the display adapter, find the device to which the driver belongs, and click to select properties. After entering properties, select Update Driver. 2. The graphics card driver is best installed on the C drive. By default, some drives are installed on the system disk. Cannot make selection. If you want to choose, you can install it on other disks. It is better to divide the hard disk into multiple areas than one area. The access speed through the C drive is faster than the D drive, and the access speed through the D drive is faster than the E drive. 3. It cannot be changed otherwise problems will occur. The driver is installed in C:\ProgramFiles, and C:\WINDOW
 When I turn on the computer, it always stops at the motherboard logo screen. Nothing happens when I press anything, and I can't enter the bios?
Apr 23, 2024 am 09:13 AM
When I turn on the computer, it always stops at the motherboard logo screen. Nothing happens when I press anything, and I can't enter the bios?
Apr 23, 2024 am 09:13 AM
When I turn on the computer, it always stops at the motherboard logo screen. Nothing happens when I press anything, and I can't enter the bios? This is usually because the BIOS battery voltage is too low, and the system time has returned to the BIOS preset time, such as 2000.1.1, 00:00. You can use it after pressing F1 to enter the bios and set the time. Do not turn off the AC power after shutting down at night. Generally, the system time will not be lost when you turn on the computer the next day, and you can still enter the system normally. If the AC power is cut off, the battery voltage cannot sustain the power consumption of the bios, and the computer will be in the same state again the next day when it is turned on. Replacing the bios battery is the ultimate solution. Win11 is stuck on the motherboard logo interface when booting? 1. It is a problem with bios settings. We only need to find the corresponding setting items.
 How to enter bios on hp motherboard
May 04, 2024 pm 09:01 PM
How to enter bios on hp motherboard
May 04, 2024 pm 09:01 PM
How to set up the U disk boot in the HP notebook bios (how to enter the HP computer bios) and then insert the U disk to be booted first into the USB port of the notebook. If you want to install the system, the system program must have been prepared in the U disk. First, open the laptop. Make sure the laptop is turned off. Setting the bios must be done with the computer turned off. Then insert the U disk that you want to boot first into the USB port of the notebook. If you want to install the system, the prerequisite is that the system program has been prepared in the U disk. Take the HP ProDesk400G5SFF desktop computer as an example. Set the BIOS disk startup method: First, restart the computer and wait for the startup screen to appear. There are two ways to set up USB disk startup on HP notebooks. One is to directly press the shortcut key to select
 Tutorial on assembling a computer and installing a system? How to install win11 system when assembling a computer?
Apr 27, 2024 pm 03:38 PM
Tutorial on assembling a computer and installing a system? How to install win11 system when assembling a computer?
Apr 27, 2024 pm 03:38 PM
Tutorial on assembling a computer and installing a system? Nowadays, the system installation for assembling computers is very simple and convenient, and only requires a CD. First enter the bios settings, set the computer to boot first with the CD-ROM drive, then restart the computer and load the system CD into the CD-ROM drive. The CD will automatically enter the installation state. At this time, you only need to manually repartition the partitions, and the rest will be completed automatically. How to install win11 system when assembling a computer? 1. First, we need to download a win11 image file from this site before installing it. 2. The win11 image file has undergone a large number of professional tests to ensure stable installation and smooth operation. 3. After the download is completed, load the folder in the download path and run the "windowssetup" process in it.
 How to enter bios after assembling a computer? How to enter bios when assembling a computer?
May 07, 2024 am 09:13 AM
How to enter bios after assembling a computer? How to enter bios when assembling a computer?
May 07, 2024 am 09:13 AM
How to enter bios after assembling a computer? Before entering the BIOS, you need to make sure that the computer is completely shut down and powered off. Here are several common ways to enter the BIOS: 1. Use shortcut keys: Most computer manufacturers will display a prompt message at startup telling you which key to press to enter the BIOS settings. Usually the F2, F10, F12 or Delete key. After pressing the appropriate keys, you should be able to see a screen with information about your computer's hardware and BIOS settings. 2. Use the button on the motherboard: Some computer motherboards have a dedicated button for entering BIOS settings. This button is usually labeled "BIOS" or "UEFI". After pressing the button you should be able to see
 MSI motherboard boot logo
May 08, 2024 pm 02:20 PM
MSI motherboard boot logo
May 08, 2024 pm 02:20 PM
How to cancel the MSI motherboard icon when booting 1. Press the DEL key when booting to enter the BIOS. Generally, in the "Advanced Features" item, you can find the words MSI motherboard LOGO screen. Select DISABLED, save and exit. There will no longer be this MSI motherboard LOGO screen when you turn on the computer in the future. MSI motherboard refers to the motherboard brand developed by MSI (MSI Technology Company). 2. The logo displayed when the computer is turned on is basically that of the motherboard manufacturer. You can set QUICKPOST to DISENABLE in the BIOS, so that the logo will generally no longer be displayed. It will display computer configuration-related information and give you more details. 3. First, teach you how to flash the BIOS in Windows environment. First: Go online
 How to enable tpm2.0 in win11_How to enable tpm2.0 in win11
May 08, 2024 pm 06:10 PM
How to enable tpm2.0 in win11_How to enable tpm2.0 in win11
May 08, 2024 pm 06:10 PM
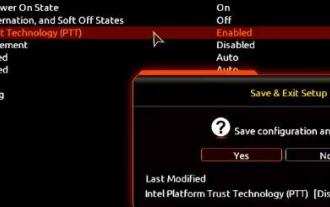
1. Gigabyte motherboard 1. First, we restart the computer and use the keyboard [DEL] to enter the BIOS settings when restarting. 2. Find and enter the [Settings] tab above. 3. Then find and enter [Miscellaneous] under settings. 4. Set [Intel Platform Trust Technology (PTT)] to [Enabled]. 5. After the settings are completed, use the keyboard [F10] to save, and then click [YES] to exit. 2. ASUS motherboard 1. First restart the computer and continuously tap [del] on the keyboard to enter the bios settings when booting. 2. Click [AdvancedMode] or press [F7] to find [A
 How to upgrade Gigabyte motherboard to Win11_How to upgrade Gigabyte motherboard to Win11
May 06, 2024 pm 12:04 PM
How to upgrade Gigabyte motherboard to Win11_How to upgrade Gigabyte motherboard to Win11
May 06, 2024 pm 12:04 PM
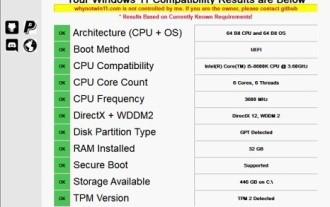
1. Win11 does not have very high requirements for the motherboard. You can first download healthcheck or whynotwin11 to check whether your other hardware devices support it (you can download it from this site). 2. If other conditions are met and only tpm does not meet the requirements, you can enable tpm in the bios settings. 3. Restart the system, and then press [DEL] on the keyboard to enter the BIOS settings when the logo pops up. 4. Enter the [Settings] option and [Miscellaneous] option in sequence. 5. Find [Intel Platform Trust Technology (PTT)] below and set it to [Start]. 6. If it is an AMD platform, then
