

From Beginner to Mastery: A Guide to Linux User Management

In Linux systems, users are the key to system security. Through good user management practices, you can ensure that systems are authorized only to authorized personnel and limit unauthorized access. Therefore, mastering Linux user management is an essential skill for every system administrator. Today, we will introduce you to one of the most basic and practical commands in Linux user management – useradd.
Environment: CentOS8 Requirements: Manually create a new user, the user name is zhangsan, the uid is set to 1024 (provided that the uid is not occupied), the gid is also set to 1024, the group name has the same name as the user name, and the home directory In /home/zhangsan, the default shell is /bin/bash
Note: The following steps are performed using the root user. Some commands and operations only have permissions for the root user.
Step 1: Modify the /etc/passwd file
vim Open the /etc/passwd file and append a line of information

Each line of the /etc/passwd file represents a user's information, and each field separated by a colon represents a different meaning.
- The first field: Username
- The second field: Password, the x here is just an identifier, the real password is encrypted and stored in /etc/shadow
- The third field: UID
- The fourth field: GID
- The fifth field: User description information, optional
- The sixth field: User home directory location
- The seventh field: default shell
Modification is completed, save and exit.
Step 2: Modify the /etc/shadow file
Use vim to open the /etc/shadow file and enter the input mode. The system will give a warning. It tells you that you are planning to modify a read-only file (in fact, you do not have read permission).

You can take a look, the shadow file does not have any permissions

But it doesn’t matter. The root user we use can do whatever we want. Press Enter to continue.
Append a line of information at the end of the shadow file.

The shadow file is also information about one user per line, and each field has a different meaning.
- The first field: Username
- Second field: Password. Users who have passwords here are a string of encrypted characters. I filled in two exclamation marks here to indicate that there is no password.
- The third field: the time elapsed from 1970/01/01 to the last password change, in days.
- The fourth field: How long does it take for the password to be changed, 0 means it can be changed at any time.
- Fifth field: Password validity period
- The sixth field: How many days before the password expires to remind the user, 7 means to remind the user one week in advance.
- The seventh field: How many days can you still log in after the password expires, but you must change the password to log in.
- The eighth field: Maximum password usage period
-
The ninth field: System reserved field
After modification, use wq! to save and exit, otherwise a warning will be given and cannot be saved.
Step 3: Modify the /etc/group file
Append the following information at the end

group file has four fields in one line
- The first field is the group name
- The second field is the group password. The x here is similar to the password field of /etc/passwd.
- The third field is GID
- The fourth field is the user in the group. If the group is the primary group of a user, then the user will not be displayed in this field, so I leave it blank here.
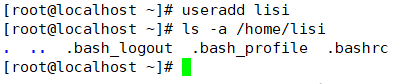
Step 4: Create a new user home directory
mdkir /home/zhangsan
Step 5: Copy the environment variable configuration file in the /etc/skel directory to the home directory

这几个文件里面是用户的环境变量配置信息,我们使用 useradd 命令新建用户也会复制这几个文件到用户的家目录下。
第六步:修改家目录的权限和属主
到现在为止,用户 zhangsan 的家目录和其中的所有文件都是root用户的
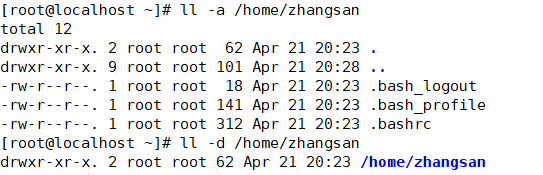
将这些文件的归属权给 zhangsan,并修改文件权限
# 将用户 zhangsan 的家目录 /home/zhangsan 的属主和组修改为 zhangsan
chown -R zhangsan:zhangsan /home/zhangsan

# 修改文件的权限,只允许属主有读写权限,其他用户和组没有任何权限
chmod 700 /home/zhangsan
修改后的结果如下

第七步:创建邮箱文件
# 创建邮箱文件
touch /var/spool/mail/zhangsan

# 同样需要修改邮箱的所有者
chown zhangsan:zhangsan /var/spool/mail/zhangsan
第八步:确认用户创建成功
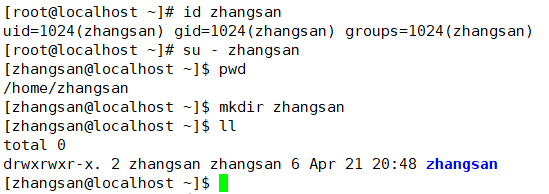
本文介绍了Linux用户管理命令useradd的基本使用方法和常用选项,包括用户创建、密码设置、家目录分配等。当然,Linux系统中还有其他强大的用户管理命令,例如userdel、usermod等。但是,掌握useradd对于初学者来说是非常重要的,它是学习更高级别用户管理命令的基础。希望本文能够帮助您更好地进行Linux用户管理,保障您的系统安全。
The above is the detailed content of From Beginner to Mastery: A Guide to Linux User Management. For more information, please follow other related articles on the PHP Chinese website!

Hot AI Tools

Undresser.AI Undress
AI-powered app for creating realistic nude photos

AI Clothes Remover
Online AI tool for removing clothes from photos.

Undress AI Tool
Undress images for free

Clothoff.io
AI clothes remover

Video Face Swap
Swap faces in any video effortlessly with our completely free AI face swap tool!

Hot Article
Hot Tools

Notepad++7.3.1
Easy-to-use and free code editor

SublimeText3 Chinese version
Chinese version, very easy to use

Zend Studio 13.0.1
Powerful PHP integrated development environment

Dreamweaver CS6
Visual web development tools

SublimeText3 Mac version
God-level code editing software (SublimeText3)
Hot Topics


 What computer configuration is required for vscode
Apr 15, 2025 pm 09:48 PM
What computer configuration is required for vscode
Apr 15, 2025 pm 09:48 PM
VS Code system requirements: Operating system: Windows 10 and above, macOS 10.12 and above, Linux distribution processor: minimum 1.6 GHz, recommended 2.0 GHz and above memory: minimum 512 MB, recommended 4 GB and above storage space: minimum 250 MB, recommended 1 GB and above other requirements: stable network connection, Xorg/Wayland (Linux)
 vscode cannot install extension
Apr 15, 2025 pm 07:18 PM
vscode cannot install extension
Apr 15, 2025 pm 07:18 PM
The reasons for the installation of VS Code extensions may be: network instability, insufficient permissions, system compatibility issues, VS Code version is too old, antivirus software or firewall interference. By checking network connections, permissions, log files, updating VS Code, disabling security software, and restarting VS Code or computers, you can gradually troubleshoot and resolve issues.
 How to run java code in notepad
Apr 16, 2025 pm 07:39 PM
How to run java code in notepad
Apr 16, 2025 pm 07:39 PM
Although Notepad cannot run Java code directly, it can be achieved by using other tools: using the command line compiler (javac) to generate a bytecode file (filename.class). Use the Java interpreter (java) to interpret bytecode, execute the code, and output the result.
 What is vscode What is vscode for?
Apr 15, 2025 pm 06:45 PM
What is vscode What is vscode for?
Apr 15, 2025 pm 06:45 PM
VS Code is the full name Visual Studio Code, which is a free and open source cross-platform code editor and development environment developed by Microsoft. It supports a wide range of programming languages and provides syntax highlighting, code automatic completion, code snippets and smart prompts to improve development efficiency. Through a rich extension ecosystem, users can add extensions to specific needs and languages, such as debuggers, code formatting tools, and Git integrations. VS Code also includes an intuitive debugger that helps quickly find and resolve bugs in your code.
 Can vscode be used for mac
Apr 15, 2025 pm 07:36 PM
Can vscode be used for mac
Apr 15, 2025 pm 07:36 PM
VS Code is available on Mac. It has powerful extensions, Git integration, terminal and debugger, and also offers a wealth of setup options. However, for particularly large projects or highly professional development, VS Code may have performance or functional limitations.
 How to use VSCode
Apr 15, 2025 pm 11:21 PM
How to use VSCode
Apr 15, 2025 pm 11:21 PM
Visual Studio Code (VSCode) is a cross-platform, open source and free code editor developed by Microsoft. It is known for its lightweight, scalability and support for a wide range of programming languages. To install VSCode, please visit the official website to download and run the installer. When using VSCode, you can create new projects, edit code, debug code, navigate projects, expand VSCode, and manage settings. VSCode is available for Windows, macOS, and Linux, supports multiple programming languages and provides various extensions through Marketplace. Its advantages include lightweight, scalability, extensive language support, rich features and version
 What is the main purpose of Linux?
Apr 16, 2025 am 12:19 AM
What is the main purpose of Linux?
Apr 16, 2025 am 12:19 AM
The main uses of Linux include: 1. Server operating system, 2. Embedded system, 3. Desktop operating system, 4. Development and testing environment. Linux excels in these areas, providing stability, security and efficient development tools.
 How to check the warehouse address of git
Apr 17, 2025 pm 01:54 PM
How to check the warehouse address of git
Apr 17, 2025 pm 01:54 PM
To view the Git repository address, perform the following steps: 1. Open the command line and navigate to the repository directory; 2. Run the "git remote -v" command; 3. View the repository name in the output and its corresponding address.
