
 System Tutorial
Windows Series
How to solve the problem that win7 cannot detect the mouse and keyboard driver?
System Tutorial
Windows Series
How to solve the problem that win7 cannot detect the mouse and keyboard driver?
How to solve the problem that win7 cannot detect the mouse and keyboard driver?

php editor Xiaoxin will share with you how to solve the problem that Win7 cannot detect the mouse and keyboard driver. When using Win7 system, sometimes the mouse and keyboard cannot be used normally. This is usually caused by driver problems. There are many solutions, including checking the device manager, updating the driver, reinstalling the driver, etc. The following will introduce in detail how to solve this problem and help you successfully restore the normal use of the mouse and keyboard.
win7 cannot detect the mouse and keyboard driver solution
Method 1:
1. Unplug all USB interface devices and then shut down.
2. Unplug the power cord. If it is a laptop, remove the battery as well.
3. Press the power button 5-6 times to clean the motherboard.
4. Turn on the computer and try to insert the USB device one after another.
Method 2:
1. Large-capacity storage devices, such as large-capacity mobile hard drives, U disks, etc. If it is a desktop computer, it is recommended to connect it to the USB interface behind the host, because the power supply is sufficient and the voltage Stablize.
2. If the large-capacity mobile hard disk is not recognized, it is recommended to use a one-to-two connection method. Usually the USB data cable of the mobile hard disk has two connectors, both of which are connected to the USB interface of the host.
Method 3:
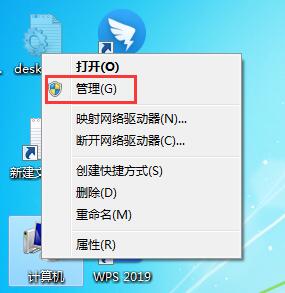
1. Right-click on the computer - Manage.
#2. Click Device Manager-Universal Serial Bus Controller.
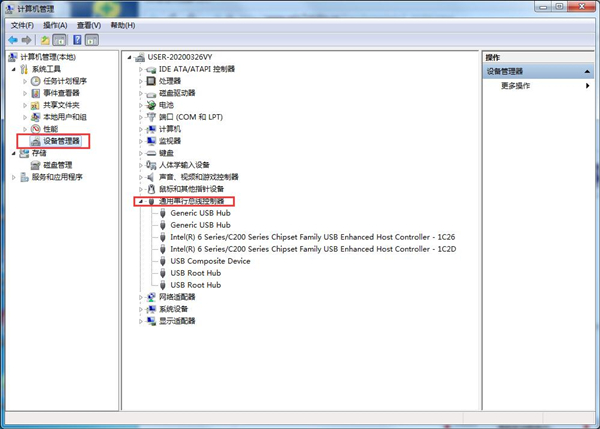
#3. Select Intel (R) - right-click to update the driver.
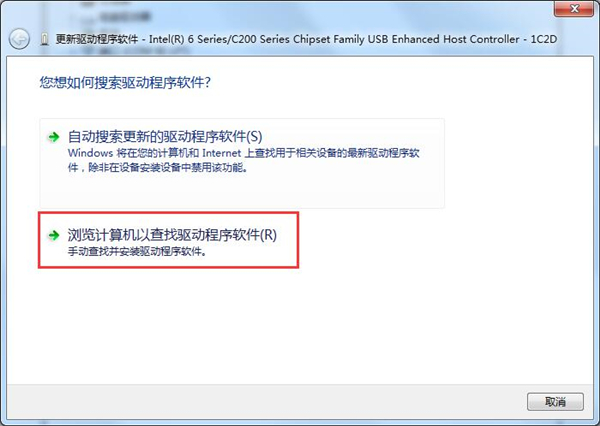
#4. Select Browse my computer to find the driver - select from the computer device driver list.
Other solutions:
If none of the above methods can solve the problem, you can consider reinstalling the system.
Recommended image download
Win7 SP1 official flagship version 64-bit
Win7 x64 pure version (64-bit automatic activation)
Win7 pure version activation-free 64-bit (only for notebooks)
System installation method
This site provides you with two system installation methods, local Hard drive installation is the simplest installation method. It is recommended to make a U disk boot tool before using the hard disk installation. If the hard disk installation fails, or your computer cannot be turned on, is stuck at the welcome interface, cannot enter the desktop, or has a blue screen, etc., then you need to choose the U disk to reinstall the system. .
Warm reminder: When reinstalling the system, the current system disk (usually the C drive) will be formatted. Be sure to back up the data on the C drive and desktop in advance.
The above is the detailed content of How to solve the problem that win7 cannot detect the mouse and keyboard driver?. For more information, please follow other related articles on the PHP Chinese website!

Hot AI Tools

Undresser.AI Undress
AI-powered app for creating realistic nude photos

AI Clothes Remover
Online AI tool for removing clothes from photos.

Undress AI Tool
Undress images for free

Clothoff.io
AI clothes remover

Video Face Swap
Swap faces in any video effortlessly with our completely free AI face swap tool!

Hot Article
Hot Tools

Notepad++7.3.1
Easy-to-use and free code editor

SublimeText3 Chinese version
Chinese version, very easy to use

Zend Studio 13.0.1
Powerful PHP integrated development environment

Dreamweaver CS6
Visual web development tools

SublimeText3 Mac version
God-level code editing software (SublimeText3)
Hot Topics
 1387
1387
 52
52

 What should I do if the Razer mouse driver cannot recognize the mouse?
May 06, 2024 pm 11:36 PM
What should I do if the Razer mouse driver cannot recognize the mouse?
May 06, 2024 pm 11:36 PM
Razer mouse drivers not recognized can be resolved by following these steps: check hardware connections, update drivers, reinstall drivers, check Windows settings, check for third-party software conflicts, run System File Checker (SFC) and reset Razer Snake Synapse. If the problem persists, the mouse hardware may be faulty, please contact Razer Support.
 How to install WinNTSetup into Win11 system_How to install WinNTSetup into Win11 system
May 08, 2024 am 11:19 AM
How to install WinNTSetup into Win11 system_How to install WinNTSetup into Win11 system
May 08, 2024 am 11:19 AM
First download the latest Win11 system ISO image, and then in Win10 system, you can directly right-click on the downloaded ISO image file and select [Load]; if it is under WinPE, WinXP, or Win7 system, you need to use the virtual optical drive tool to load the ISO Image; or you can directly decompress the ISO image file without using a virtual optical drive. Then run WinNTSetup. The software interface is as shown in the figure: First locate the location of the install.wim file. You can find the install.wim file in the sources directory of the Win11 ISO image loaded or decompressed by the virtual optical drive. Then set the location of the boot disk and installation disk. Generally, you are going to put W
 What should I do if the Win7 taskbar does not display the icon? How to solve the problem of the computer taskbar icon disappearing
Jun 09, 2024 pm 01:49 PM
What should I do if the Win7 taskbar does not display the icon? How to solve the problem of the computer taskbar icon disappearing
Jun 09, 2024 pm 01:49 PM
Recently, many users using Win7 system have found that the icons in the taskbar suddenly disappeared, which makes the operation very inconvenient and they do not know how to solve the problem. This article will introduce to you how to solve the problem of disappearing taskbar icons in Win7 system. Bar! Cause Analysis When encountering such a situation, there are generally two situations: one is that the taskbar on the computer does not really disappear, but is just hidden, and the other is that the taskbar does disappear. Method 1: 1. There is a situation that you need to confirm first, that is, when the mouse is placed at the bottom of the screen, the taskbar will be displayed. You can directly click the mouse on the taskbar and select "Properties". 2. In the dialog box that opens, click & on the "Hide taskbar" option.
 How to clear all desktop background images in Win7? Tips for deleting personalized background images in Win7
Jun 02, 2024 am 09:01 AM
How to clear all desktop background images in Win7? Tips for deleting personalized background images in Win7
Jun 02, 2024 am 09:01 AM
In Win7 system, many users want to delete personalized desktop background images, but do not know how to delete them. This article will show you how to delete personalized background images in Win7 system. 1. First, open the control panel interface of the Win7 system and click to enter the "Appearance and Personalization" settings; 2. Then, in the opened interface, click the "Change Desktop Background" setting; 3. Then, click below "Desktop background" option; 4. Then, select Select all, and then click Clear all. Of course, you can also use it under "Customize", right-click the theme you want to delete, and then click &q on the shortcut menu
 How to enter bios after assembling a computer? How to enter bios when assembling a computer?
May 07, 2024 am 09:13 AM
How to enter bios after assembling a computer? How to enter bios when assembling a computer?
May 07, 2024 am 09:13 AM
How to enter bios after assembling a computer? Before entering the BIOS, you need to make sure that the computer is completely shut down and powered off. Here are several common ways to enter the BIOS: 1. Use shortcut keys: Most computer manufacturers will display a prompt message at startup telling you which key to press to enter the BIOS settings. Usually the F2, F10, F12 or Delete key. After pressing the appropriate keys, you should be able to see a screen with information about your computer's hardware and BIOS settings. 2. Use the button on the motherboard: Some computer motherboards have a dedicated button for entering BIOS settings. This button is usually labeled "BIOS" or "UEFI". After pressing the button you should be able to see
 What to do if win11 bluetooth cannot be used_win11 bluetooth cannot be connected how to deal with it
May 08, 2024 am 10:37 AM
What to do if win11 bluetooth cannot be used_win11 bluetooth cannot be connected how to deal with it
May 08, 2024 am 10:37 AM
1. First, we click the search button in the taskbar below, search and enter [Device Manager]. 2. Then find our Bluetooth device in the device manager, right-click to select it, and click [Update Driver]. 3. If the Bluetooth device cannot be found in the device manager, then we can download Master Lu and update the driver in it. Method 2: 1. First, we enter [Settings] through the start menu. 2. Find the [devices] device in the setting interface. 3. Then click the [Bluetooth] option, and then set the switch below to [On].
 How to connect Redmi Note13RPro to the computer?
May 09, 2024 pm 06:52 PM
How to connect Redmi Note13RPro to the computer?
May 09, 2024 pm 06:52 PM
The phone Redmi Note13RPro has been very popular recently. Many consumers have purchased this phone. However, many users are using this phone for the first time, so they don’t know how to connect the Redmi Note13RPro to the computer. In this regard, the editor is here to explain to you Detailed tutorial introduction is provided. How to connect Redmi Note13RPro to the computer? 1. Use a USB data cable to connect the Redmi phone to the USB interface of the computer. 2. Open the phone settings, click Options, and turn on USB debugging. 3. Open the device manager on your computer and find the mobile device option. 4. Right-click the mobile device, select Update Driver, and then select Automatically search for updated drivers. 5. If the computer does not automatically search for the driver,
 What should I do if League of Legends does not support DX9? How to upgrade to DX11 when playing League of Legends on PC
May 06, 2024 pm 12:07 PM
What should I do if League of Legends does not support DX9? How to upgrade to DX11 when playing League of Legends on PC
May 06, 2024 pm 12:07 PM
Recently, "League of Legends" ushered in the 14.9 version update. After the update, "League of Legends" no longer supports DirectX9 in all regions around the world. In other words, if the user's computer graphics card can only support DirectX9, then the graphics card or device must be replaced. If there is no problem with the graphics card, you can update the driver. You can also update and upgrade the system, and the DirectX version will also be updated accordingly. It is understood that DirectX is a series of application development interfaces (APIs for short) developed by Microsoft. This API allows various applications to interact with your computer's hardware (including but not limited to mouse, keyboard, graphics card, etc.). Many applications use DirectX, but Direct
