

In the Win10 operating system, the built-in screenshot tool is very convenient, but for some users, they may prefer to use third-party screenshot tools. If you are one of them, then you may be wondering how to completely delete or uninstall the screenshot tool that comes with Win10. In this article, PHP editor Xigua will introduce you to a simple and effective method to complete this task. Don’t worry, we’ll give you step-by-step answers so you can easily uninstall this built-in tool so you can choose to use another snipping tool to suit your needs.
How to completely delete or uninstall the screenshot tool that comes with win10?
Method 1. The system has its own uninstall function
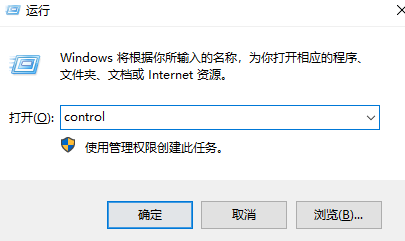
1. First, use the shortcut key combination "Win R" on the keyboard to open the run window.
2. After opening the window, enter the command "control" and click OK to open the control panel.
#3. Find "Programs" and click "Uninstall a program" under the program.
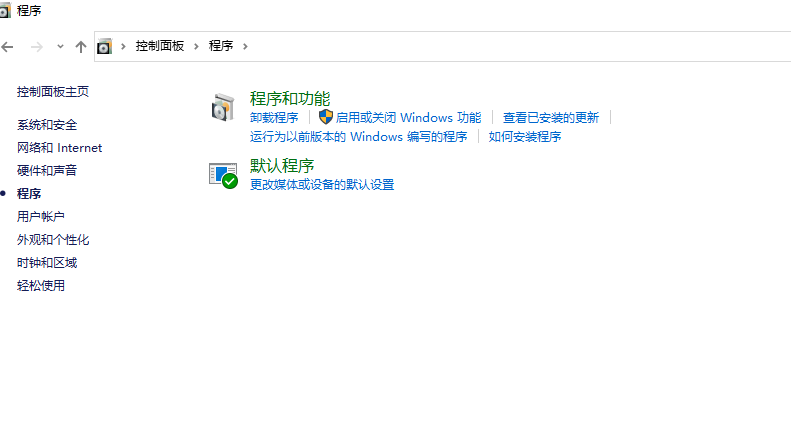
#4. After entering, find the software program you need to uninstall, and right-click "Uninstall/Change".
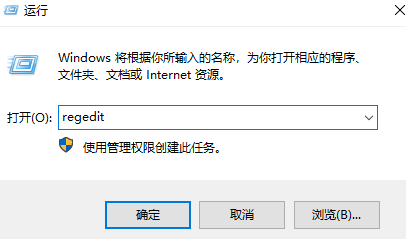
5. Then use the key combination "Win R" to open the run window, enter the command "regedit" and click OK to enter.
#6. Click "Edit" in the upper left corner, click "Search" or directly use the shortcut key "Ctrl F" to open the search function.
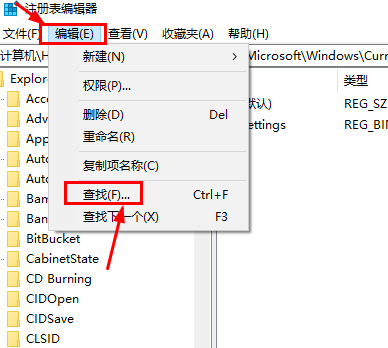
#7. Enter the name of the software you want to uninstall in the input box and click "Find Next".
8. The system will search for a period of time.
9. Right-click the item you found and select "Delete".
10. Then continue to press F3 on the keyboard to find the next item, and delete it in the same way.
Method 2. Uninstall third-party software
1. We can also use the third-party software 360 Security Guard to uninstall the software. First, double-click to open 360 Security Guard.
2. Then find the "Software Manager" above 360 Security Guard and click to enter.
3. After opening, find "Uninstall" at the top and click to enter.
4. Then find the software you want to uninstall and click "One-click Uninstall" to completely and cleanly uninstall the unused software on your win10 computer.
5. Afterwards, we can click the "Computer Cleanup" function to clear the registry information after uninstalling the program to ensure that there is no residue.
The above is the detailed content of How to completely delete or uninstall the screenshot tool that comes with win10?. For more information, please follow other related articles on the PHP Chinese website!
 win10 bluetooth switch is missing
 Why do all the icons in the lower right corner of win10 show up?
 The difference between win10 sleep and hibernation
 Win10 pauses updates
 What to do if the Bluetooth switch is missing in Windows 10
 win10 connect to shared printer
 Clean up junk in win10
 How to share printer in win10


![[Web front-end] Node.js quick start](https://img.php.cn/upload/course/000/000/067/662b5d34ba7c0227.png)


