MSI laptop installed win7 system
php editor Baicao will introduce to you how to install win7 system on MSI notebooks. In this fast-paced era, sometimes we need to go back in time and experience the classic operating system again. As one of Microsoft's classic systems, win7 is very popular among users. This article will introduce you in detail how to install win7 system on MSI notebook, so that you can easily return to the familiar interface and enjoy the old comfort. Next, let’s take a look!
《一》Preparation work
1. U disk of 8GB or above, format it in advance
2. PE system
3. System Image file
《二》How to download and install the PE system (Laomaotaoupan is listed)
1. Download address: http://www.laomaotaoupan.cn/imtpe/
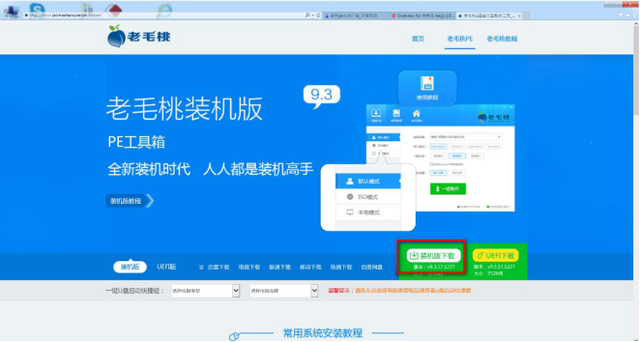
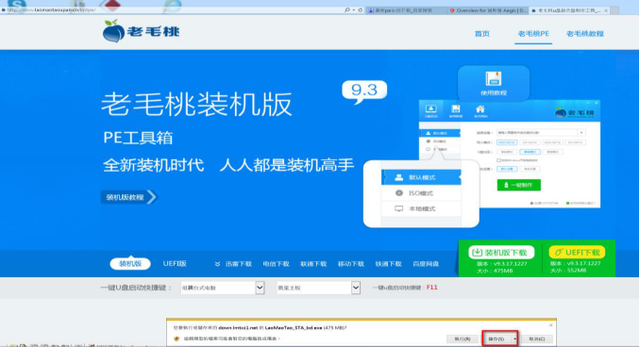
2. Select the installation board to download and click Save Desktop
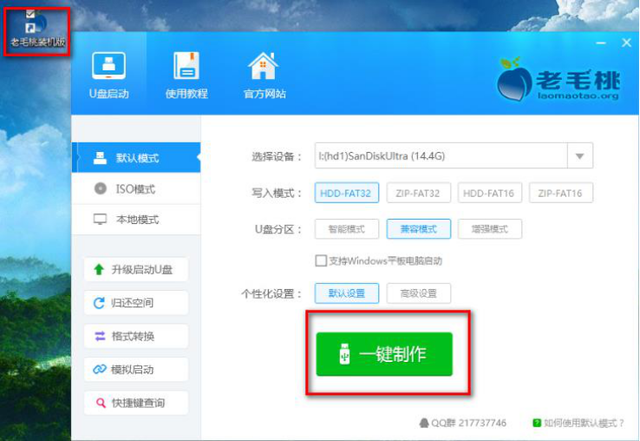
3. Insert the U disk, double-click the Laomaotao software on the desktop, and click One-Click Production
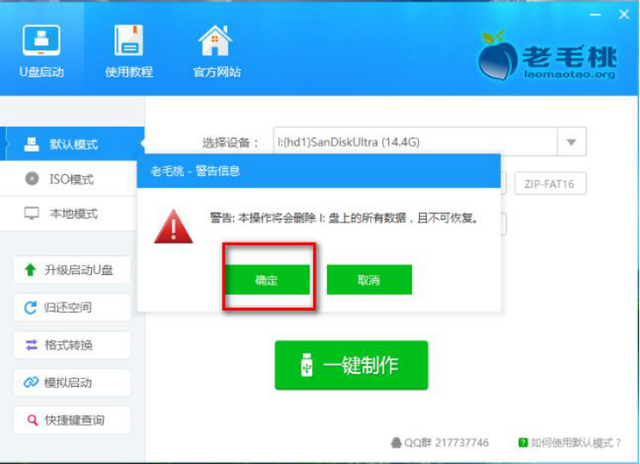
4. When the following screen appears, click OK
5. When the following screen appears, under production
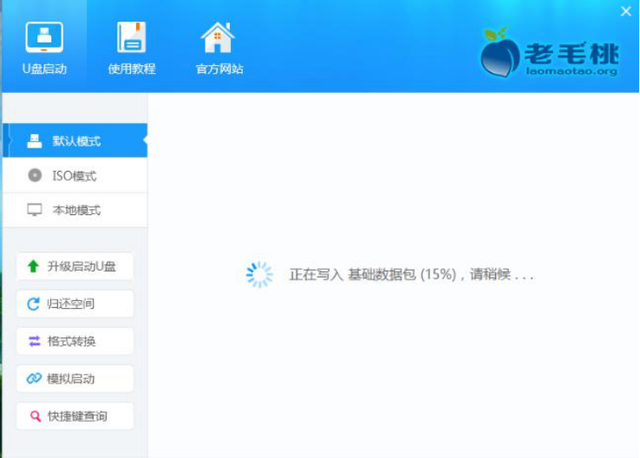
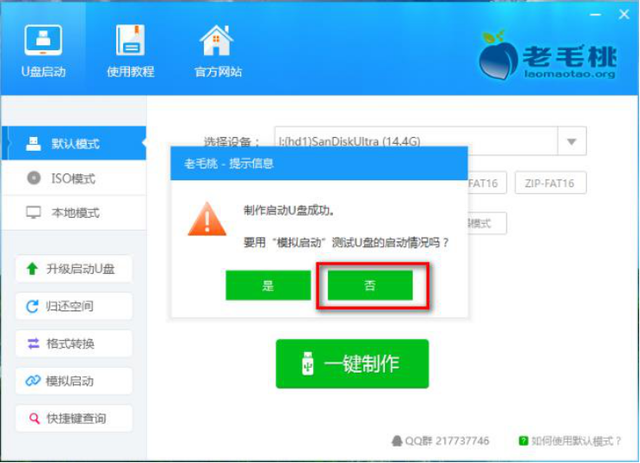
6. When the following screen appears, click No, close the Laomaotao software, and unplug the U disk , the PE system was successfully produced
《二》How to download and install the system image file
1. Download URL: http://www.xitongzhijia.net/
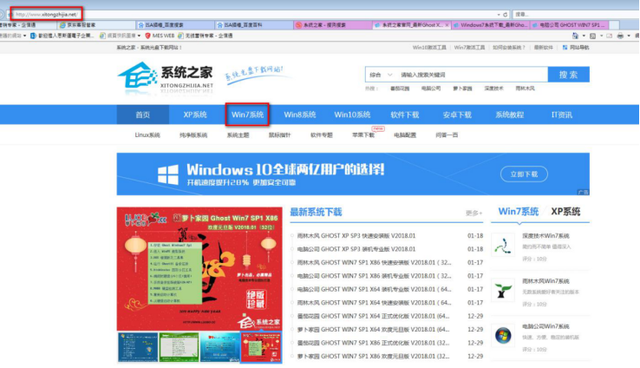
2. Click the link above to select and click the system version you need, click to download
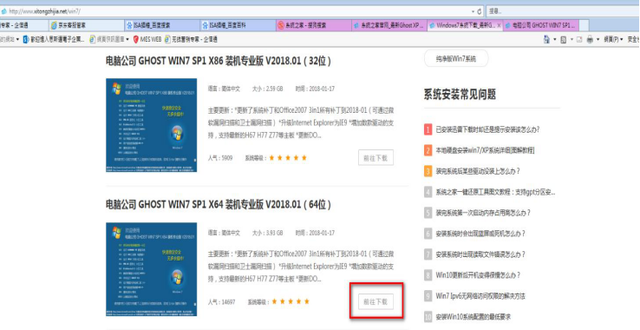
3. Click to download now
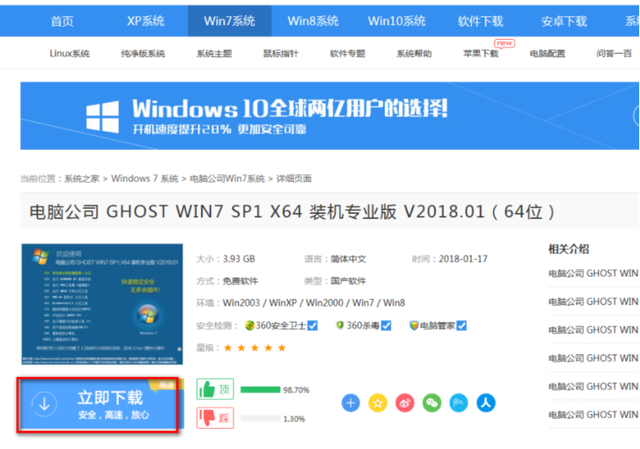
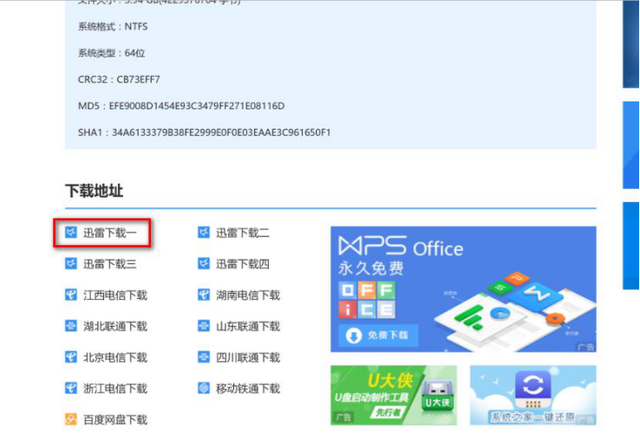
4. Click to download Method
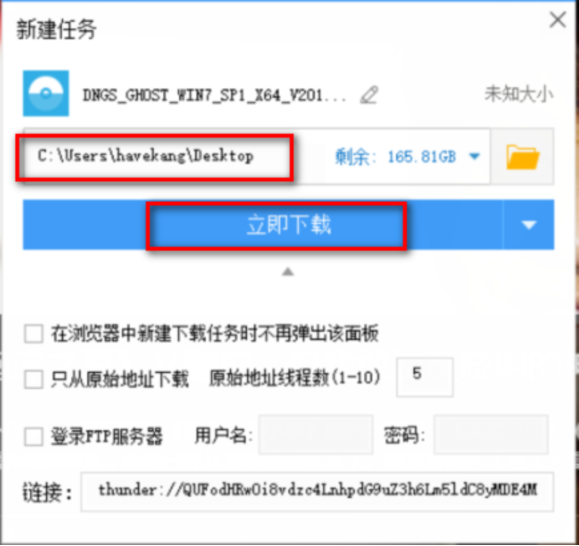
5. When the following screen appears, click 'Download Now' to the desktop
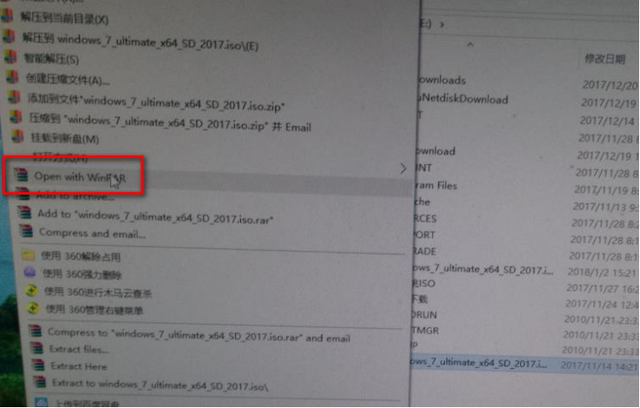
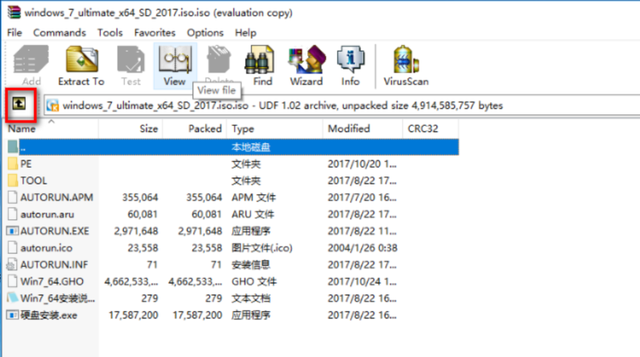
6. Right-click the downloaded image file and click Open with WinRAR
7. Click the return arrow as follows
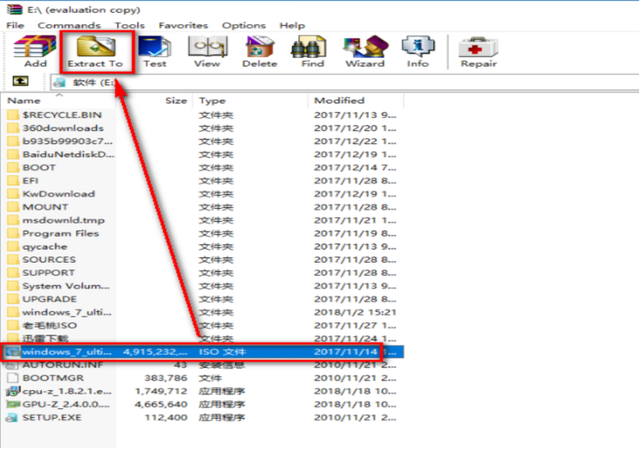
. First click on the image file, then click Extract to
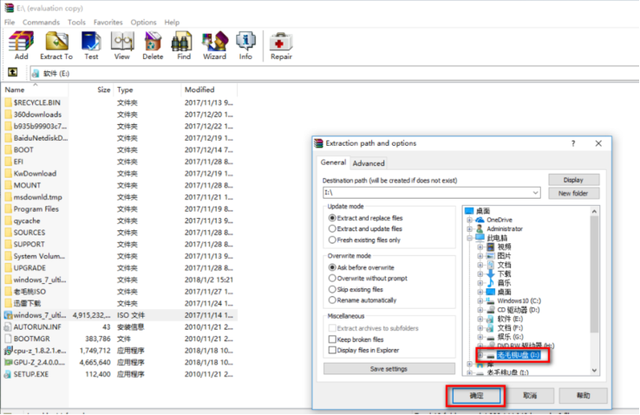
. Select to extract to a USB flash drive and click OK You need to wait for 5-10 minutes. After the decompression is completed, it will automatically close and unplug the U
disk from the USB interface of the computer.
《四》.System installation
1. BIOS settings
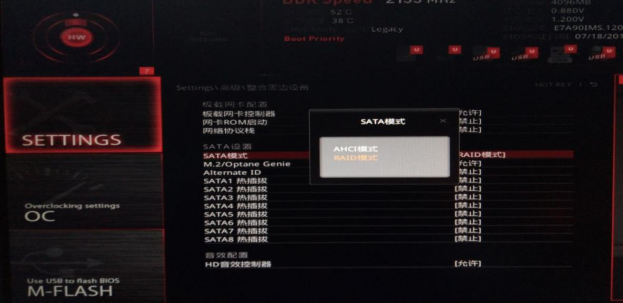
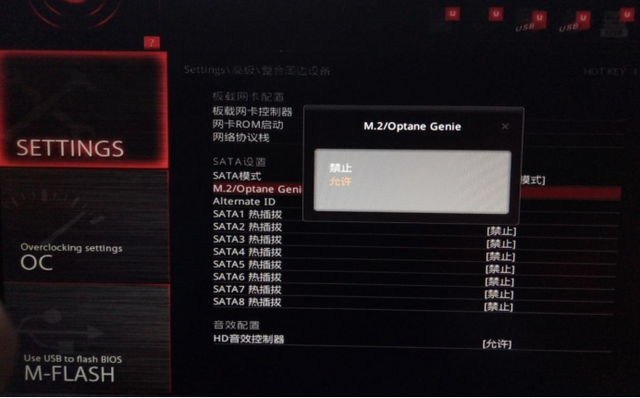
1. After restarting or booting, when the MSI logo appears, click the Delete button on the keyboard to enter the BIOS and set the hard drive mode
A. If your motherboard only has one solid state or no solid state hard drive The mode can be directly set to AHCI.
B. If your motherboard has 2 or more solid states, it is recommended to select Raid mode (the solid states are formed into super disk arrays
columns)
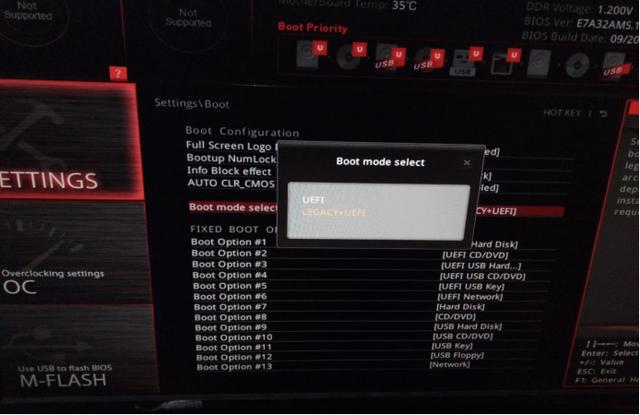
2. The next step is to set the startup mode: install win7 and select LEGACY UEFI
3. After the setting is completed, press F10 to save, confirm to restart the computer, and the MSI logo will appear after booting Here, hit Delete on the keyboard and press the
key to enter bios. An additional option will automatically appear in the advanced options, that’s right! You read it right, this option is the option to set up the disk array. Click this option to enter the Raid setting interface
4. Click to enter the setting RAID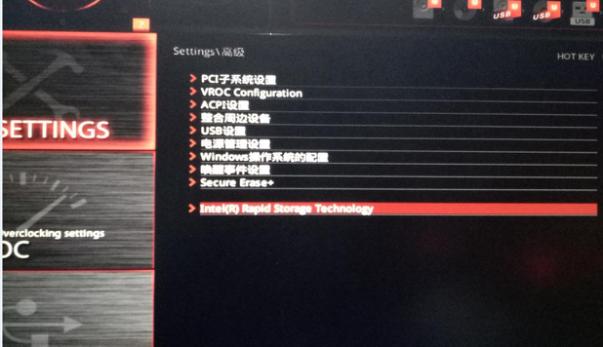 5. You can freely change the following names
 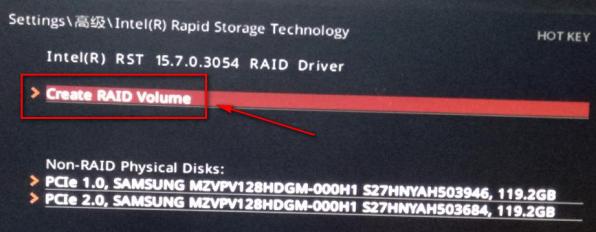 6. Select the RAID mode after RAID Level. For 3 or more solid states, you can select RAID5 mode. The default is
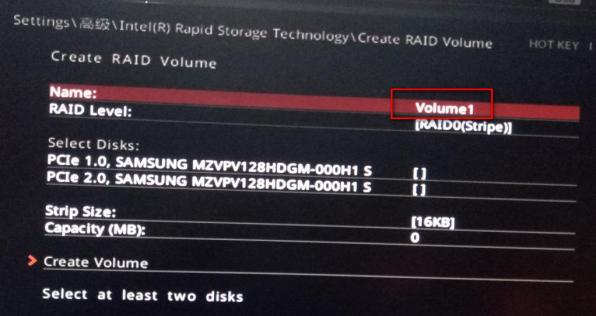
RAID 0
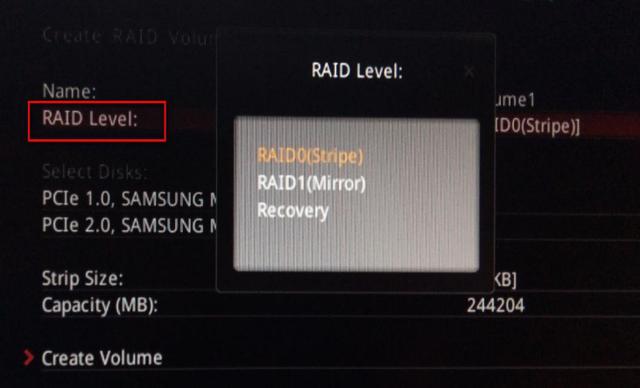
7. Check the solid states you want to group together
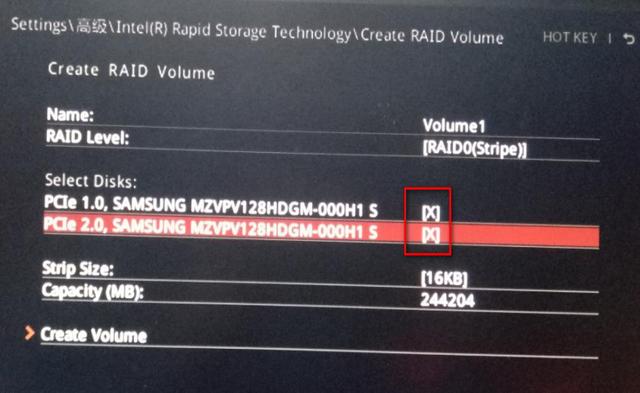
8. In STRIP Size, you can choose the default or other sizes
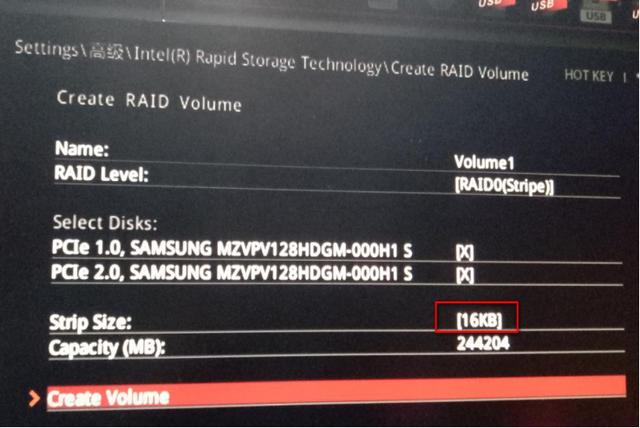
9. After the setting is completed, click the following
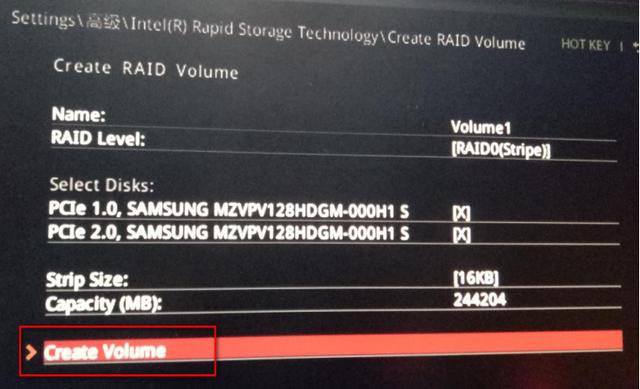
10. The following screen appears to indicate that the RAID is successfully established. The total capacity of the solid state grouped together is
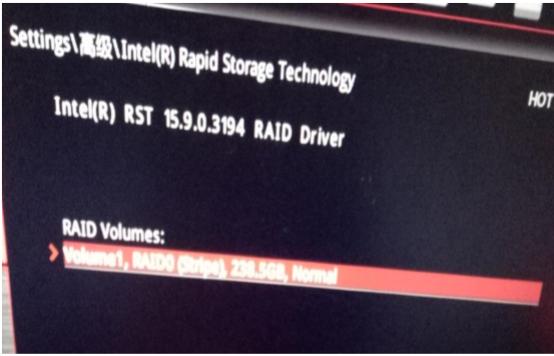
2. Installing the system
1. Everything is ready. Now is the time to start the process of installing the system. The first choice is to insert the USB disk that you have done before to install the system. After the MSI logo appears when booting, hit the F11 key on the keyboard. , the following interface appears and click to enter (select your U
disk, the model and brand of the U disk are different, the displayed name will be different)
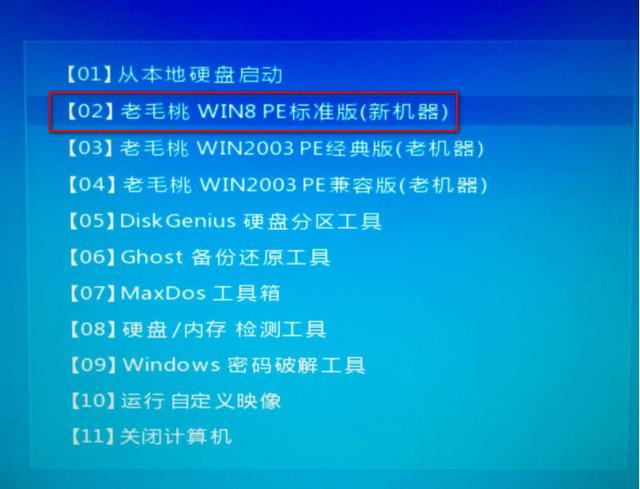
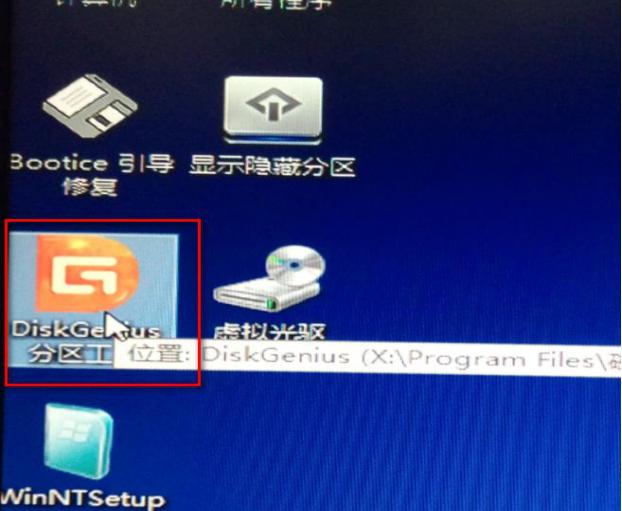
2. Select 'Laomaotao WIN8 PE Standard Edition (new machine)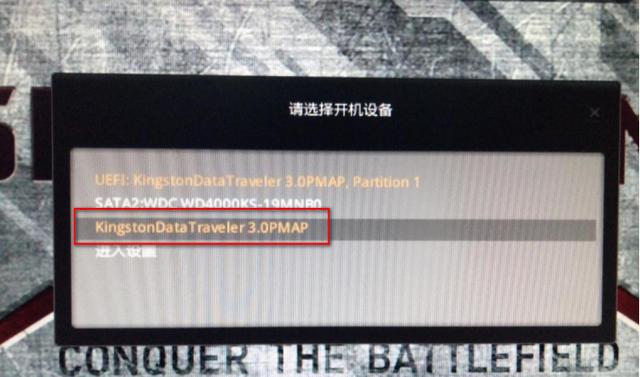 3. Enter the PE system and click 'Partition Tool' on the desktop
 4. Select your hard drive and click 'Quick Partition'
5. Select the number of partitions you need under the number of partitions (three are taken as an example)
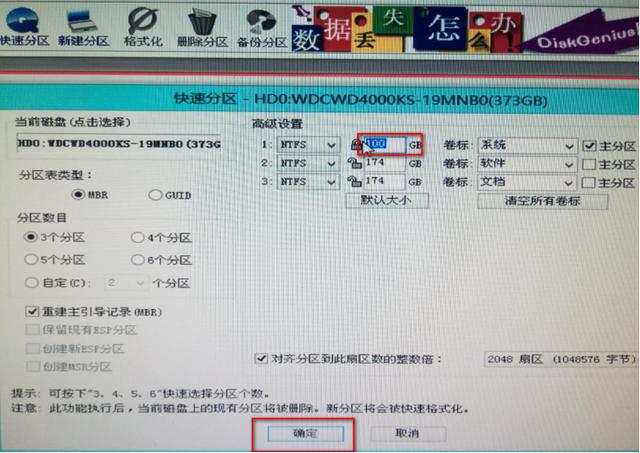
6. Modify the size of the primary partition and click OK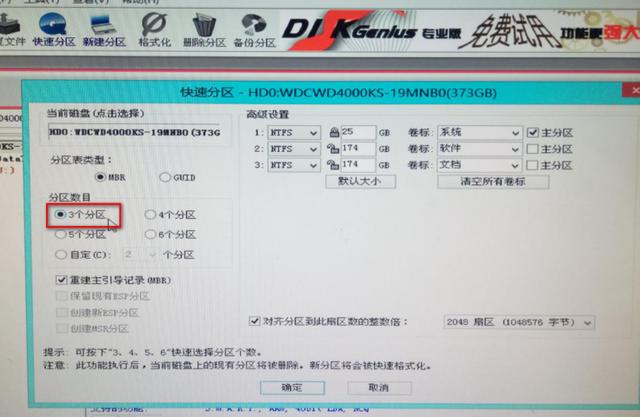
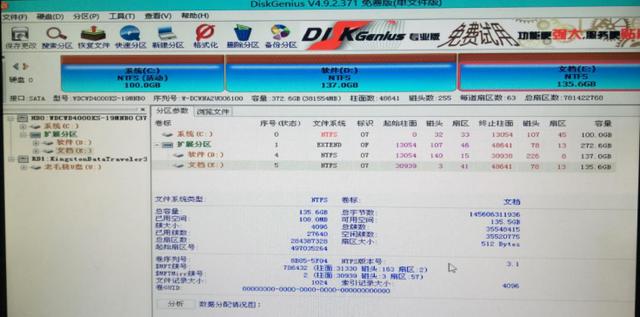
7. The partition is successful as shown below, just close it
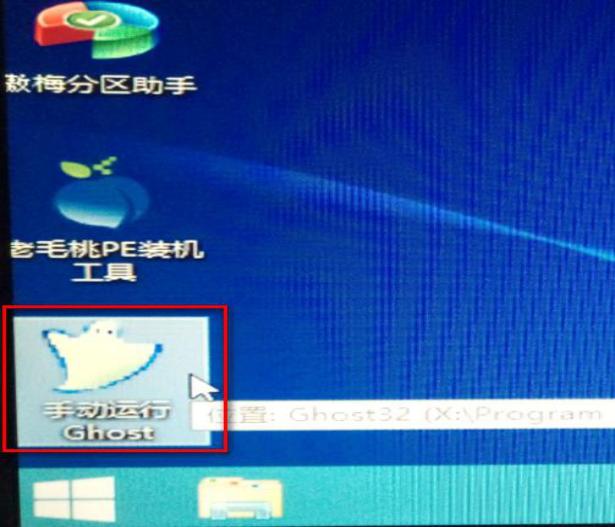
 8. Click 'Manually run GHOST' on the desktop
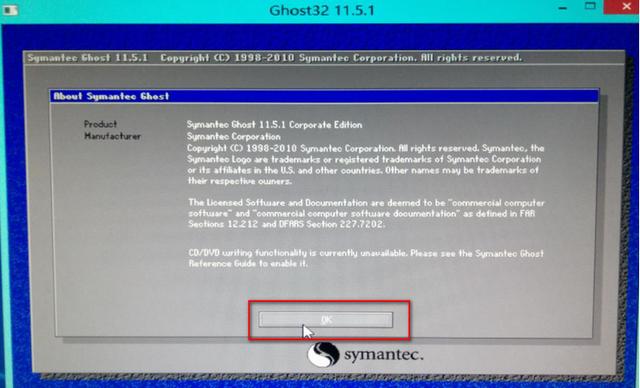
 10. When the following screen appears, click 'OK' '
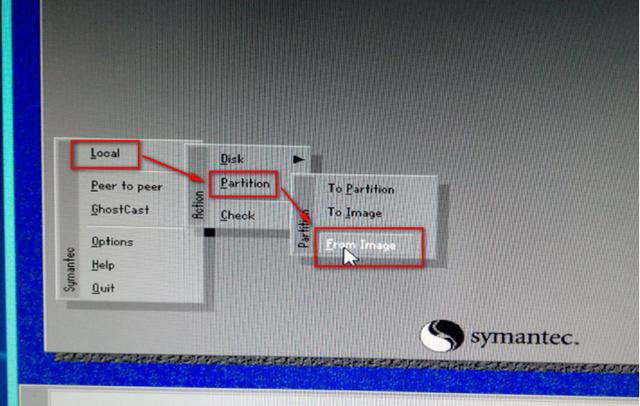
 11.Select as follows
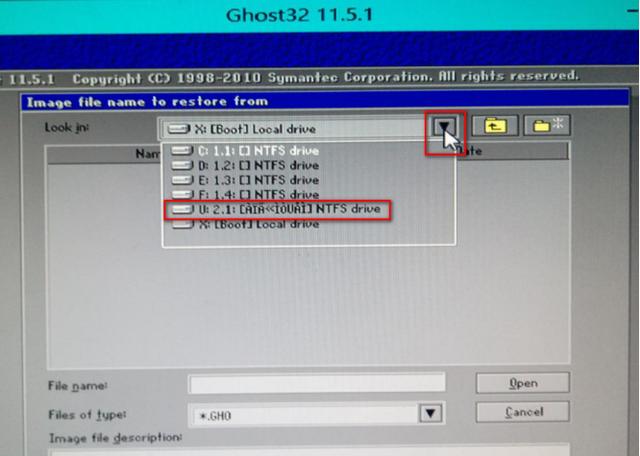
 12.Click '▽' and select your U disk
 13.Click GHOST File
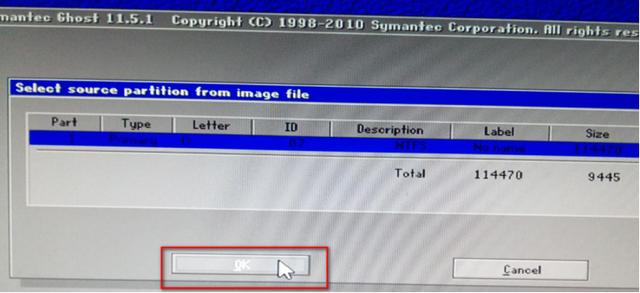
 14.Click 'OK'
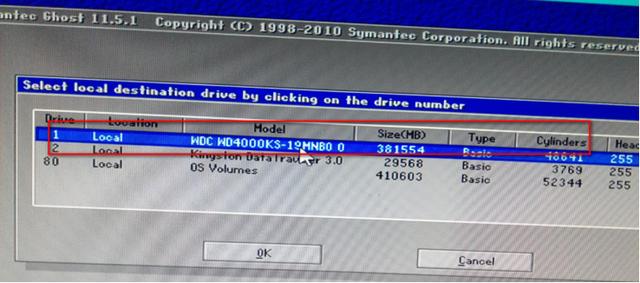
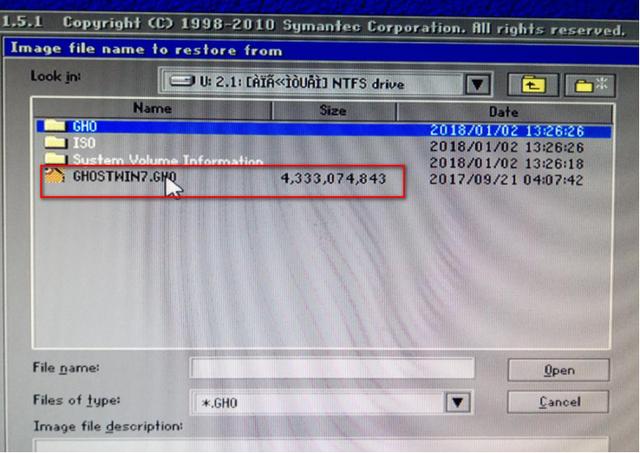 15.Select your hard drive
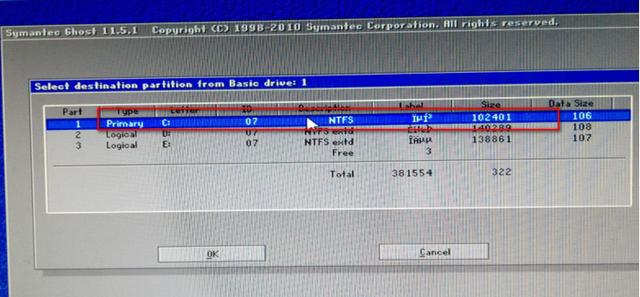
 16.Select the drive letter C you want to install Disk
 17. Click 'YES'
 18. Under production
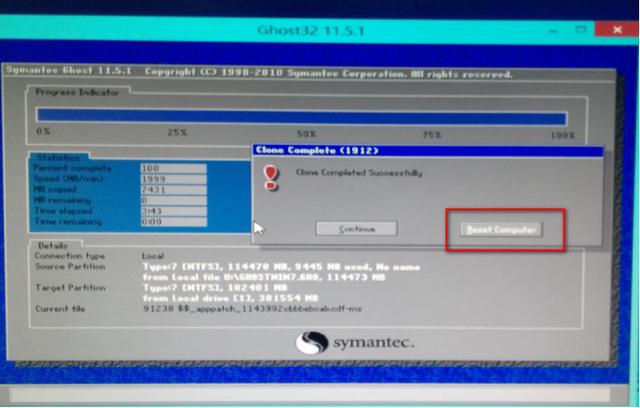
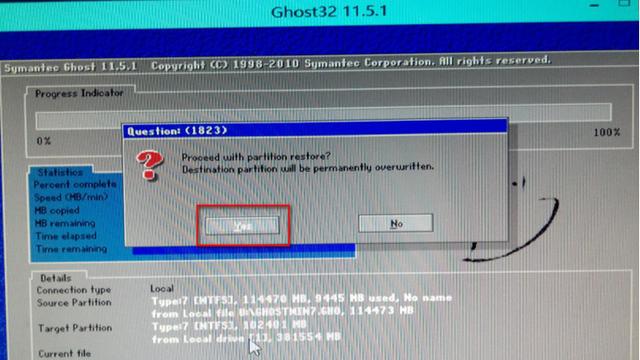 19. The following screen appears to indicate that the production is successful, click' reset
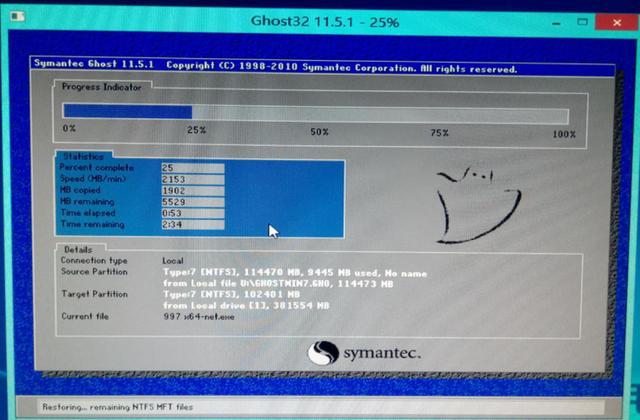 20. After reset, the system automatically enters the installation interface
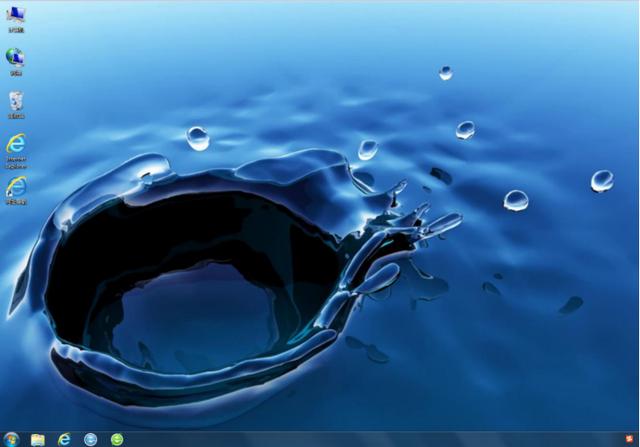
 21. After successful installation, it automatically enters the desktop
 If msi smart is not used tool software, it is recommended that you install the ghost version. If you have a mouse or keyboard with a ps2 jack, you can directly install the genuine Windows 7.
The above is the detailed content of MSI laptop installed win7 system. For more information, please follow other related articles on the PHP Chinese website!

Hot AI Tools

Undresser.AI Undress
AI-powered app for creating realistic nude photos

AI Clothes Remover
Online AI tool for removing clothes from photos.

Undress AI Tool
Undress images for free

Clothoff.io
AI clothes remover

Video Face Swap
Swap faces in any video effortlessly with our completely free AI face swap tool!

Hot Article

Hot Tools

Notepad++7.3.1
Easy-to-use and free code editor

SublimeText3 Chinese version
Chinese version, very easy to use

Zend Studio 13.0.1
Powerful PHP integrated development environment

Dreamweaver CS6
Visual web development tools

SublimeText3 Mac version
God-level code editing software (SublimeText3)

Hot Topics
 MSI motherboard boot logo
May 08, 2024 pm 02:20 PM
How to cancel the MSI motherboard icon when booting 1. Press the DEL key when booting to enter the BIOS. Generally, in the "Advanced Features" item, you can find the words MSI motherboard LOGO screen. Select DISABLED, save and exit. There will no longer be this MSI motherboard LOGO screen when you turn on the computer in the future. MSI motherboard refers to the motherboard brand developed by MSI (MSI Technology Company). 2. The logo displayed when the computer is turned on is basically that of the motherboard manufacturer. You can set QUICKPOST to DISENABLE in the BIOS, so that the logo will generally no longer be displayed. It will display computer configuration-related information and give you more details. 3. First, teach you how to flash the BIOS in Windows environment. First: Go online
 How to enable tpm2.0 in win11_How to enable tpm2.0 in win11
May 08, 2024 pm 06:10 PM
1. Gigabyte motherboard 1. First, we restart the computer and use the keyboard [DEL] to enter the BIOS settings when restarting. 2. Find and enter the [Settings] tab above. 3. Then find and enter [Miscellaneous] under settings. 4. Set [Intel Platform Trust Technology (PTT)] to [Enabled]. 5. After the settings are completed, use the keyboard [F10] to save, and then click [YES] to exit. 2. ASUS motherboard 1. First restart the computer and continuously tap [del] on the keyboard to enter the bios settings when booting. 2. Click [AdvancedMode] or press [F7] to find [A
 How to assemble an acer desktop computer?
May 08, 2024 pm 08:25 PM
How to assemble an acer desktop computer? The assembly method of Acer desktop computer is as follows: open the case, install the power supply into the case, and tighten the screws. Install the CPU onto the motherboard, making sure the pins on the CPU are aligned with the slots on the motherboard, and tighten the screws on the CPU heat sink. Install the memory module onto the motherboard, making sure that the bumps on the memory module are aligned with the slots on the motherboard. Press down hard until you hear a "pop" sound to complete the installation. Install graphics cards, sound cards, network cards and other boards onto the motherboard, making sure the screws on the boards are tightened. Install storage devices such as hard drives and optical drives into the chassis, making sure the screws are tightened. Connect the motherboard to the chassis, including power cables, hard drive cables, optical drive cables, etc. Finally, close the chassis cover and tighten the screws to complete the assembly. exist
 What should I do if my graphics card is blackened by flashing the BIOS?
May 10, 2024 am 12:09 AM
Flashing the BIOS of the graphics card refers to the situation where an error occurs when modifying the BIOS and the graphics card cannot start. Solutions include: 1. Power-off method: release the residual power and then restart; 2. Short-circuit method: short-circuit the short-circuit point on the PCB; 3. Restore the BIOS to default values; 4. Use third-party tools to refresh the BIOS; 5. Contact technology Support seeking help. Be careful to back up the original BIOS, use a compatible version, and proceed with caution to avoid damage.
 Introduction to solutions to Xiaomi Leica camera crashes
May 08, 2024 pm 03:20 PM
Xiaomi’s new photography software Leica Camera is very popular, but this software will crash when taking pictures. Many users don’t know what’s going on and how to solve it. Let’s take a look at the Xiaomi Leica Camera crash solution. Method. What to do if the Xiaomi Leica camera crashes? Solution 1: 1. First turn off the phone, and then restart the phone after 30 seconds. 2. Then download a camera software of the same type and try to see if it can operate normally. 3. Open the phone settings-camera program-clear cache data. 4. If the problem is still not solved, try backing up the phone data and restoring factory settings. 5. If none of the above points are true, it may be a hardware problem with the camera component, and the phone needs to be returned to the factory for repair and testing. Solution two: 1. Back up important data and open the security center
 What to do if Win11 black screen teaches you how to solve Windows_11 black screen problem
May 08, 2024 pm 03:10 PM
Windows 11 is the latest operating system launched by Microsoft, which brings a new interface design and more practical functions. However, some users encountered a black screen problem during the upgrade or use process, resulting in the inability to work properly. This article will introduce in detail several methods to effectively solve the black screen problem in Win11 and help you quickly restore the normal operation of the computer. Tool materials: System version: Windows11 (21H2) Brand model: Lenovo Xiaoxin Pro162022, Dell XPS13Plus, Asus ZenBookS13OLED Software version: NVIDIA GeForceExperience3.26.0.160, Intel Driver & SupportAssist
 What should I do if there is a power surge on the hub port in the lower right corner of win7?
May 10, 2024 am 12:51 AM
Power surge error solution on hub ports: Remove excessive or power-hungry devices. Check if the USB port is damaged, replace the port/cable. Make sure the power supply is stable and replace the socket. Update drivers and run SFC scan. Reset BIOS, update BIOS, contact manufacturer if necessary.
 What harm does flashing the graphics card's bios do to the graphics card?
May 10, 2024 am 12:18 AM
Flashing the graphics card BIOS may cause potential harm to the graphics card, including: 1. Damage to the graphics card chip; 2. Loss of warranty; 3. Reduced performance; 4. Stability issues; 5. Compatibility issues.


