
 System Tutorial
LINUX
Getting Started with SSH Security: 13 Ways to Establish a Secure Connection on Linux
System Tutorial
LINUX
Getting Started with SSH Security: 13 Ways to Establish a Secure Connection on Linux
Getting Started with SSH Security: 13 Ways to Establish a Secure Connection on Linux

SSH is a protocol used to remotely log in and manage Linux servers. It can encrypt data transmission and prevent man-in-the-middle attacks and eavesdropping. However, SSH itself may also face some security threats, such as brute force password cracking, port scanning, session hijacking, etc. Therefore, we need to take some measures to protect our SSH server connection and improve security and reliability. This article will introduce 13 ways to establish a secure SSH connection on Linux, including changing the default port, disabling root login, using key authentication, limiting login attempts, using a firewall, using two-factor authentication, etc.
1. Disable root user login
First, disable SSH access for the root user and create a new user with root privileges. Turning off server access for the root user is a defensive strategy that prevents attackers from gaining access to your system. For example, you can create a user named exampleroot as follows:
useradd -m exampleroot
passwd exampleroot
usermod -aG sudo exampleroot
The following is a brief explanation of the above commands:
The useradd command is used to create a new user. The -m parameter will create a folder for the created user in the home directory.
passwd command is used to assign a password to a new user. Remember, the passwords assigned to users should be complex, hard-to-guess passwords.
usermod -aG sudo adds the newly created user to the Administrators group.
After creating the user, some changes need to be made to the sshd_config file. You can find this file at /etc/ssh/sshd_config. Open the file using any text editor and make the following changes:
# Authentication:

#LoginGraceTime 2m
PermitRootLogin no
AllowUsers exampleroot
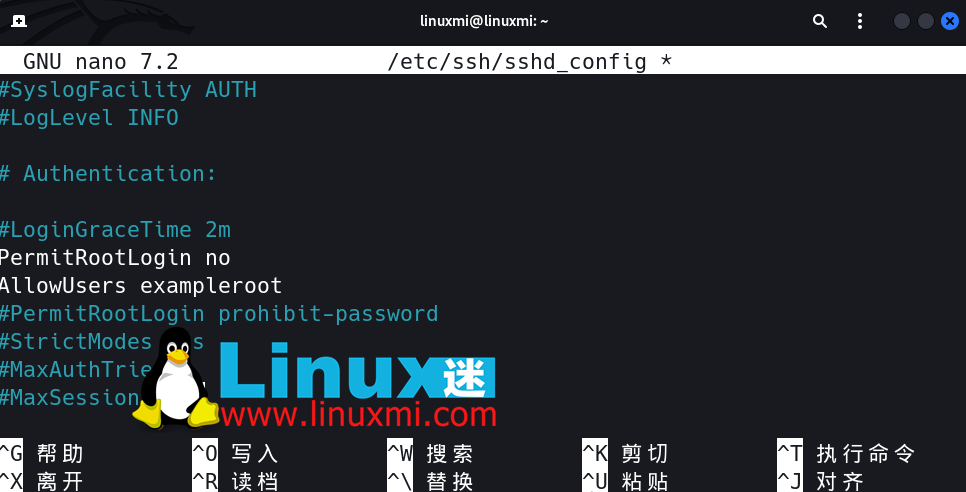
The PermitRootLogin parameter prevents root users from using SSH to gain remote access. Including exampleroot in the AllowUsers list gives the user the necessary permissions.
Finally, restart the SSH service using the following command:
sudo systemctl restart ssh
If it fails and you get an error message, try the command below. This may vary depending on the Linux distribution you are using.
sudo systemctl restart sshd
2. Change the default SSH port
The default SSH connection port is 22. Of course, all attackers know this and therefore need to change the default port number to ensure SSH security. While an attacker can easily find new port numbers using an Nmap scan, the goal here is to make the attacker's job more difficult.
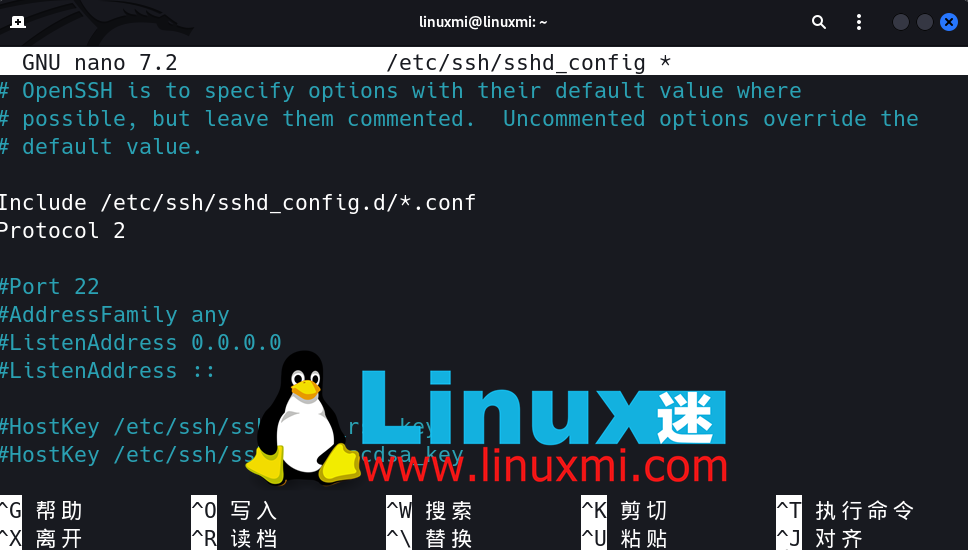
To change the port number, open /etc/ssh/sshd_config and make the following changes to the file:
Include /etc/ssh/sshd_config.d/*.conf

Port 5922
After completing this step, use the sudo systemctl restart ssh command again to restart the SSH service. Now you can access the server using the port you just defined.
If you are using a firewall, you must make the necessary rule changes there. Run the netstat -tlpn command and you can see that the port number for SSH has changed.
3. It is forbidden to log in with an empty password
There may be a user without a password on your system, which you may have created accidentally. To prevent such users from accessing the server, you can set the PermitEmptyPasswords line value in the sshd_config file to no.
PermitEmptyPasswords no
4. Limit the number of login/access attempts
By default, you can use as many password attempts to access the server. However, an attacker could exploit this vulnerability to brute force the server.
You can automatically terminate SSH connections by specifying the number of allowed password attempts in the sshd_config file.
To do this, change the MaxAuthTries value.
MaxAuthTries 3
5、使用SSH Version 2
SSH Version 2 的发布是因为第一版存在许多漏洞。默认情况下,您可以通过将 Protocol 参数添加到您的 sshd_config 文件中来启用使用SSH Version 2。
这样,您所有未来的连接都将使用 SSH2。
Include /etc/ssh/sshd_config.d/*.conf
Protocol 2
6、关闭TCP端口转发和X11转发
攻击者可以通过SSH连接进行端口转发,尝试获取访问您其他系统的权限。为了防止这种情况发生,您可以在sshd_config文件中关闭AllowTcpForwarding和X11Forwarding功能。
X11Forwarding no
AllowTcpForwarding no
7、使用SSH密钥连接
连接到服务器最安全的方法之一是使用SSH密钥。使用SSH密钥,您可以无需密码访问服务器。此外,您可以通过更改sshd_config文件中的与密码相关的参数来完全关闭服务器的密码访问。
创建SSH密钥时,有两个密钥:公钥和私钥。公钥上传到您要连接的服务器,私钥存储在使用该密钥进行连接的计算机上。
在计算机上使用ssh-keygen命令创建SSH密钥。不要留空Passphrase字段,并记住您在此输入的密码。
如果您留空该字段,则只能通过SSH密钥文件进行访问。但是,如果设置了密码,您可以防止拥有密钥文件的攻击者访问它。
例如,您可以使用以下命令创建SSH密钥:
ssh-keygen
8、SSH连接的IP限制
大多数情况下,防火墙使用其标准框架阻止访问并旨在保护服务器。但是,这并不总是足够的,您需要增加此安全性潜力。
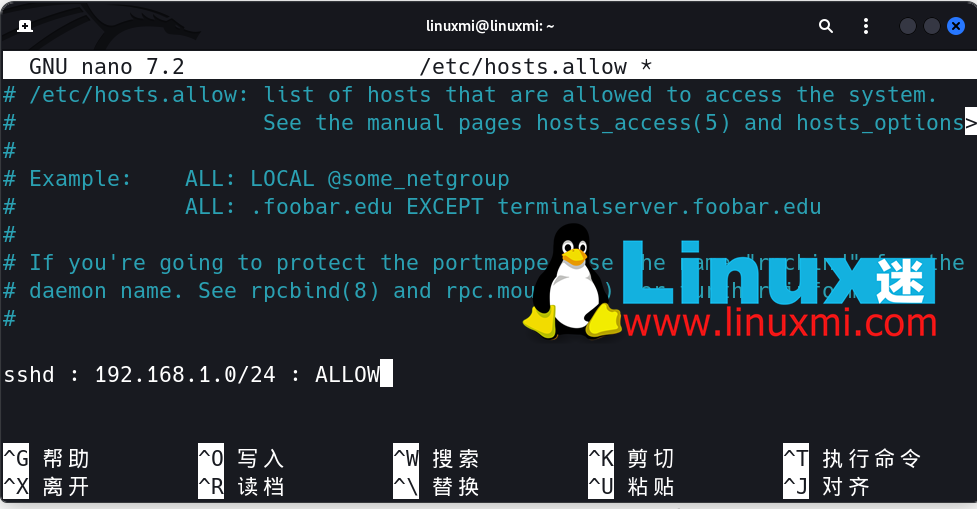
要做到这一点,请打开/etc/hosts.allow文件。通过在此文件中进行添加,您可以限制SSH权限,允许特定IP块或输入单个IP并使用拒绝命令阻止所有其余IP地址。
下面是一些示例设置。完成这些操作后,像往常一样重新启动SSH服务以保存更改。
IP-Restriction-for-SSH-Connection-1
9、有选择地允许用户和组访问
您可以配置sshd配置文件以有选择地允许或禁止用户和组从SSH登录到您的服务器。默认情况下,所有用户和组都允许访问。当您管理不应由除那些具有适当权限的人以外的任何人访问的生产服务器时,这是一种安全风险。
以下是您需要添加以允许/拒绝用户和组访问SSH的行:
AllowUsers: username sshuser@ip:port
AllowGroups: groupname
DenyUsers: username1 username2 sshuser@ip:port
DenyGroups: groupname
10、设置空闲超时时间间隔
如果一个受信任的用户离开他们的桌面未经注销,那么拥有他们电脑访问权限的对手可以利用这一点,在缺席或不活动的受信任用户的情况下对服务器进行恶意操作。
抵御这种情况的最简单方法是设置一个空闲超时时间间隔。在定义的一段不活动时间后,服务器将终止与用户的SSH连接,以防止在缺席或不活动的情况下未经授权的访问。
以下是您需要添加到ssh配置文件中以开启此设置的行:
ClientAliveInterval 120
根据配置文件中发出的命令,经过120秒的不活动时间后,连接将被终止。您可以更改数字以适应自己的喜好。
12、添加 Banner 警告语言
虽然这不是一种主动的安全措施,但添加 Banner 警告语言可以是一种有用的心理策略,用于防止不受欢迎的访客,并在他们试图以恶意意图连接到您的服务器时使对手处于不利位置。
要添加自定义 Banner 警告语言,请首先仔细准备横幅的文本或从互联网上抓取一个通用的文本文件,然后将以下行添加到您的配置文件中:
Banner /path/to/banner/banner.txt
12、强制使用强大的MAC算法
在SSH的上下文中,MAC代表消息认证码。MAC是一种加密算法,用于验证和确认客户端与服务器之间的数据传输。
设置强大的MAC算法非常重要,以确保数据的完整性和保密性,这是网络安全的两个关键支柱。以下是您需要在配置文件中添加的行:
Banner /path/to/banner/banner.txt
13、将LogLevel设置为监视SSH活动
您可以监视SSH活动的不同详细程度。默认情况下,此功能可能已关闭。建议您打开此功能,并将其设置为基本日志记录级别 – INFO,该级别仅记录用户的错误、消息、密钥验证、登录和注销活动。
如果您愿意,可以将其更改为更详细的级别,例如VERBOSE或DEBUG。以下是您需要在sshd配置文件中添加的行:
LogLevel INFO
现在,您的SSH服务器将生成基本日志数据,您可以通过导航到并读取基于Debian / Ubuntu的机器上的/var/log/auth.log*文件和基于RHEL / CentOS / Fedora的机器上的/var/log/secure文件来阅读此日志数据。
您可以查看整个日志文件并导航到带有sshd的部分,或者使用grep命令过滤内容并仅阅读sshd日志。
Linux 服务器安全的重要性
通过本文的介绍,我们学习了在Linux上建立SSH安全连接的13种方法,它们可以帮助我们防止一些常见的SSH攻击和漏洞,提高我们的服务器安全性和可信度。当然,这些方法并不是全部,还有一些其他的技巧和工具可以用来增强SSH的安全性,比如使用SSH代理、隧道、跳板等。我们建议你根据自己的实际情况和需求,选择合适的方法来保护你的SSH服务器连接。希望你喜欢这篇文章,并享受你的SSH体验。
The above is the detailed content of Getting Started with SSH Security: 13 Ways to Establish a Secure Connection on Linux. For more information, please follow other related articles on the PHP Chinese website!

Hot AI Tools

Undresser.AI Undress
AI-powered app for creating realistic nude photos

AI Clothes Remover
Online AI tool for removing clothes from photos.

Undress AI Tool
Undress images for free

Clothoff.io
AI clothes remover

AI Hentai Generator
Generate AI Hentai for free.

Hot Article
Hot Tools

Notepad++7.3.1
Easy-to-use and free code editor

SublimeText3 Chinese version
Chinese version, very easy to use

Zend Studio 13.0.1
Powerful PHP integrated development environment

Dreamweaver CS6
Visual web development tools

SublimeText3 Mac version
God-level code editing software (SublimeText3)
Hot Topics
 1386
1386
 52
52

 Difference between centos and ubuntu
Apr 14, 2025 pm 09:09 PM
Difference between centos and ubuntu
Apr 14, 2025 pm 09:09 PM
The key differences between CentOS and Ubuntu are: origin (CentOS originates from Red Hat, for enterprises; Ubuntu originates from Debian, for individuals), package management (CentOS uses yum, focusing on stability; Ubuntu uses apt, for high update frequency), support cycle (CentOS provides 10 years of support, Ubuntu provides 5 years of LTS support), community support (CentOS focuses on stability, Ubuntu provides a wide range of tutorials and documents), uses (CentOS is biased towards servers, Ubuntu is suitable for servers and desktops), other differences include installation simplicity (CentOS is thin)
 How to use docker desktop
Apr 15, 2025 am 11:45 AM
How to use docker desktop
Apr 15, 2025 am 11:45 AM
How to use Docker Desktop? Docker Desktop is a tool for running Docker containers on local machines. The steps to use include: 1. Install Docker Desktop; 2. Start Docker Desktop; 3. Create Docker image (using Dockerfile); 4. Build Docker image (using docker build); 5. Run Docker container (using docker run).
 How to install centos
Apr 14, 2025 pm 09:03 PM
How to install centos
Apr 14, 2025 pm 09:03 PM
CentOS installation steps: Download the ISO image and burn bootable media; boot and select the installation source; select the language and keyboard layout; configure the network; partition the hard disk; set the system clock; create the root user; select the software package; start the installation; restart and boot from the hard disk after the installation is completed.
 What to do if the docker image fails
Apr 15, 2025 am 11:21 AM
What to do if the docker image fails
Apr 15, 2025 am 11:21 AM
Troubleshooting steps for failed Docker image build: Check Dockerfile syntax and dependency version. Check if the build context contains the required source code and dependencies. View the build log for error details. Use the --target option to build a hierarchical phase to identify failure points. Make sure to use the latest version of Docker engine. Build the image with --t [image-name]:debug mode to debug the problem. Check disk space and make sure it is sufficient. Disable SELinux to prevent interference with the build process. Ask community platforms for help, provide Dockerfiles and build log descriptions for more specific suggestions.
 Centos options after stopping maintenance
Apr 14, 2025 pm 08:51 PM
Centos options after stopping maintenance
Apr 14, 2025 pm 08:51 PM
CentOS has been discontinued, alternatives include: 1. Rocky Linux (best compatibility); 2. AlmaLinux (compatible with CentOS); 3. Ubuntu Server (configuration required); 4. Red Hat Enterprise Linux (commercial version, paid license); 5. Oracle Linux (compatible with CentOS and RHEL). When migrating, considerations are: compatibility, availability, support, cost, and community support.
 How to view the docker process
Apr 15, 2025 am 11:48 AM
How to view the docker process
Apr 15, 2025 am 11:48 AM
Docker process viewing method: 1. Docker CLI command: docker ps; 2. Systemd CLI command: systemctl status docker; 3. Docker Compose CLI command: docker-compose ps; 4. Process Explorer (Windows); 5. /proc directory (Linux).
 Detailed explanation of docker principle
Apr 14, 2025 pm 11:57 PM
Detailed explanation of docker principle
Apr 14, 2025 pm 11:57 PM
Docker uses Linux kernel features to provide an efficient and isolated application running environment. Its working principle is as follows: 1. The mirror is used as a read-only template, which contains everything you need to run the application; 2. The Union File System (UnionFS) stacks multiple file systems, only storing the differences, saving space and speeding up; 3. The daemon manages the mirrors and containers, and the client uses them for interaction; 4. Namespaces and cgroups implement container isolation and resource limitations; 5. Multiple network modes support container interconnection. Only by understanding these core concepts can you better utilize Docker.
 What computer configuration is required for vscode
Apr 15, 2025 pm 09:48 PM
What computer configuration is required for vscode
Apr 15, 2025 pm 09:48 PM
VS Code system requirements: Operating system: Windows 10 and above, macOS 10.12 and above, Linux distribution processor: minimum 1.6 GHz, recommended 2.0 GHz and above memory: minimum 512 MB, recommended 4 GB and above storage space: minimum 250 MB, recommended 1 GB and above other requirements: stable network connection, Xorg/Wayland (Linux)
