
 Software Tutorial
Computer Software
How to accurately preset CorelDRAW bleed line setting method tutorial
Software Tutorial
Computer Software
How to accurately preset CorelDRAW bleed line setting method tutorial
How to accurately preset CorelDRAW bleed line setting method tutorial

CorelDRAW is a powerful graphic design software. When designing printed matter, setting the bleed line is a very important step. The setting of the bleed line determines the effect and quality of the final print. So, how to accurately preset and set the bleed line of CorelDRAW? In this tutorial, PHP editor Banana will introduce you to the precise preset and setting methods of CorelDRAW bleed lines in detail to help you master this technique easily. Whether you are a newbie or an experienced designer, you can benefit from this tutorial. Let’s learn together!
The specific operations are as follows:
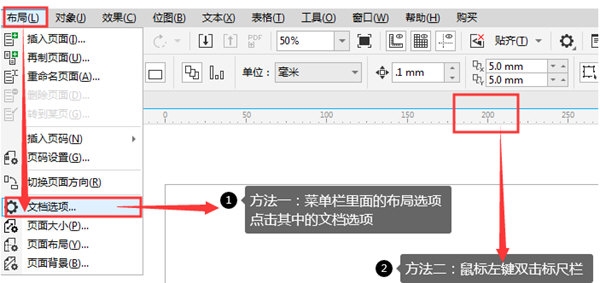
1. Open the CorelDRAW software, click [Layout] - [Document Options] - [Auxiliary Lines] above to open the auxiliary line options window, or double-click the [Ruler Bar] Open
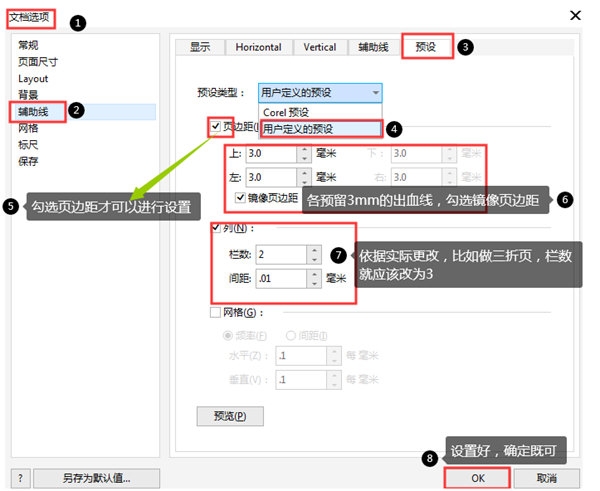
2. In the pop-up window, set the user-defined options and set the basic parameters. Generally, a distance of 3mm is reserved as the bleeding line
3. After setting, click OK to see the bleed line on the drawing board
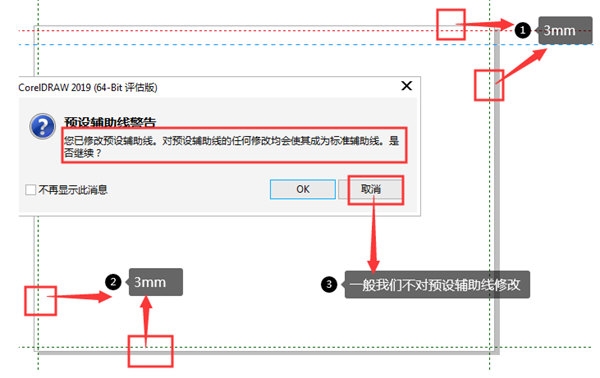
After setting the bleed line, its position It will change as the artboard changes, always maintaining the set distance, and a window will pop up to warn when it is moved. The above is the CorelDRAW related tutorial brought by the editor, I hope it can help everyone!
The above is the detailed content of How to accurately preset CorelDRAW bleed line setting method tutorial. For more information, please follow other related articles on the PHP Chinese website!

Hot AI Tools

Undresser.AI Undress
AI-powered app for creating realistic nude photos

AI Clothes Remover
Online AI tool for removing clothes from photos.

Undress AI Tool
Undress images for free

Clothoff.io
AI clothes remover

AI Hentai Generator
Generate AI Hentai for free.

Hot Article
Hot Tools

Notepad++7.3.1
Easy-to-use and free code editor

SublimeText3 Chinese version
Chinese version, very easy to use

Zend Studio 13.0.1
Powerful PHP integrated development environment

Dreamweaver CS6
Visual web development tools

SublimeText3 Mac version
God-level code editing software (SublimeText3)
Hot Topics
 1378
1378
 52
52

![[PROVEN] Steam Error e87 Fix: Get Gaming Again in Minutes!](https://img.php.cn/upload/article/202503/18/2025031817560457401.jpg?x-oss-process=image/resize,m_fill,h_207,w_330) [PROVEN] Steam Error e87 Fix: Get Gaming Again in Minutes!
Mar 18, 2025 pm 05:56 PM
[PROVEN] Steam Error e87 Fix: Get Gaming Again in Minutes!
Mar 18, 2025 pm 05:56 PM
Article discusses causes of Steam Error e87, including network issues, security software, server problems, outdated clients, and corrupted files. Offers prevention and solution strategies.[159 characters]
 Steam Error e87: What It Is & How to Fix It
Mar 18, 2025 pm 05:51 PM
Steam Error e87: What It Is & How to Fix It
Mar 18, 2025 pm 05:51 PM
Steam Error e87 occurs during Steam client updates or launches due to connection issues. Fix it by restarting devices, checking server status, changing DNS, disabling security software, clearing cache, or reinstalling Steam.
 Easy Fix: Steam Error e87 Explained & Solved
Mar 18, 2025 pm 05:53 PM
Easy Fix: Steam Error e87 Explained & Solved
Mar 18, 2025 pm 05:53 PM
Steam Error e87, caused by connectivity issues, can be fixed without reinstalling by restarting, checking internet, and clearing cache. Adjusting Steam settings helps prevent future occurrences.
 How to Fix Steam Error Code e87: The ULTIMATE Guide
Mar 18, 2025 pm 05:51 PM
How to Fix Steam Error Code e87: The ULTIMATE Guide
Mar 18, 2025 pm 05:51 PM
Article discusses fixing Steam Error Code e87, caused by network issues, corrupt files, or client problems. Provides troubleshooting steps and prevention tips.
 Steam Error e87: Why It Happens & 5 Ways to Fix It
Mar 18, 2025 pm 05:55 PM
Steam Error e87: Why It Happens & 5 Ways to Fix It
Mar 18, 2025 pm 05:55 PM
Steam Error e87 disrupts gaming on Steam due to connectivity issues. The article discusses causes like unstable internet and server overload, and offers fixes like restarting Steam and checking for updates.
 Steam Error Code e87: Get Back to Gaming FAST!
Mar 18, 2025 pm 05:52 PM
Steam Error Code e87: Get Back to Gaming FAST!
Mar 18, 2025 pm 05:52 PM
The article discusses Steam Error Code e87, its causes like network issues, server problems, and corrupted files, and provides fixes and preventive measures to avoid it.Character count: 159
 How to fix: err_response_headers_multiple_access_control_allow_origin error in Google Chrome
Mar 21, 2025 pm 06:19 PM
How to fix: err_response_headers_multiple_access_control_allow_origin error in Google Chrome
Mar 21, 2025 pm 06:19 PM
Article discusses fixing "err_response_headers_multiple_access_control_allow_origin" error in Chrome by addressing multiple Access-Control-Allow-Origin headers.
 Steam Error e87 SOLVED! Quick Fix Guide for 2024
Mar 18, 2025 pm 05:49 PM
Steam Error e87 SOLVED! Quick Fix Guide for 2024
Mar 18, 2025 pm 05:49 PM
Article discusses Steam Error e87, offering solutions like restarting Steam, clearing cache, and updating. Preventive measures and community solutions are also covered.
