 System Tutorial
 Windows Series
 How to optimize win11 game performance? 7 Ways to Optimize Win11 Gaming Performance
How to optimize win11 game performance? 7 Ways to Optimize Win11 Gaming Performance
php editor Xinyi brings you 7 ways to optimize Win11 game performance. With the release of Win11, many players can't wait to play games on the new operating system. However, sometimes you may encounter some lags, delays or unstable frame rates. Don't worry! We have compiled some simple and practical methods to help you optimize Win11 game performance and make your gaming experience smoother. Next, let’s take a look at these methods!
7 ways to optimize Win11 game performance
Method 1: Cancel the function of increasing pointer precision
If you are using a portable computer (notebook), please enable it in Win11 "Improve pointer precision" feature to make the trackpad easier to use. If you are using a desktop computer, it is recommended that you disable this feature in Win11 to ensure a better gaming experience.
Step 1. Press Win S to open the search box, enter "Mouse Settings" and open it.
Step 2. Click "Other Mouse Options" in the related settings section on the right panel.
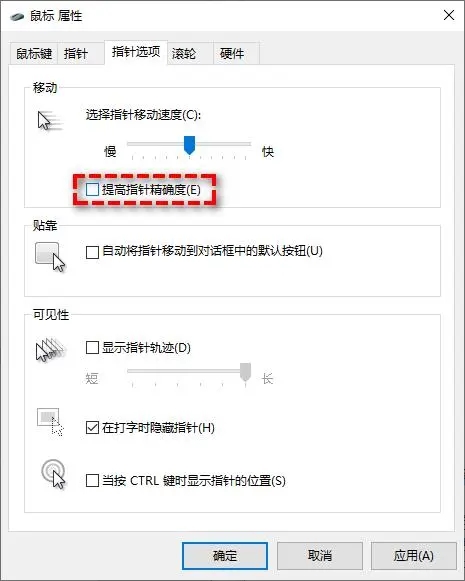
Step 3. Go to the "Pointer Options" tab in the mouse properties window, and then uncheck the "Increase pointer accuracy" option in the movement section.
Method 2: Turn on Game Mode
For a long time, Windows Game Mode has been a feature that was not very helpful and may cause problems for your computer. to have negative impacts such as input lag. However, in the past few months, Microsoft has started to pay attention to this feature and made some targeted developments, and it has become better in Windows 11. Without affecting game performance, we recommend that you turn this feature on to maintain a better gaming experience.
Note: Game mode is enabled by default, but you may have this disabled due to previous poor performance, so you need to check if this is enabled.
Step 1. Press Win S to open the search box, enter "Game Mode" and open it.
Step 2. Make sure the game mode is turned on normally in the game mode window. If not, please turn it on.
Method 3: Turn off the Record Gameplay option
Nvidia or AMD graphics cards can record exciting activities that occur in the game, so you need to disable similar features built into Win11 to prevent conflicts and Reduce gaming performance loss.
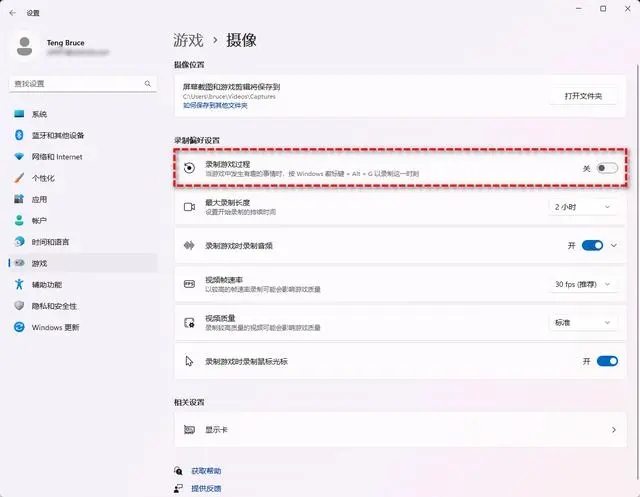
Step 1. Press Win I to open Windows Settings, then select "Game" - "Camera".
Step 2. Set the Record Game Process option to off in the recording preference area.
Method 4: Disable irrelevant startup items
After using a Windows computer for a period of time, various applications will continue to be added to the system and start quietly. It will consume the computer's gaming performance and thus affect the actual gaming experience. Therefore, you need to disable some irrelevant applications in the startup items.
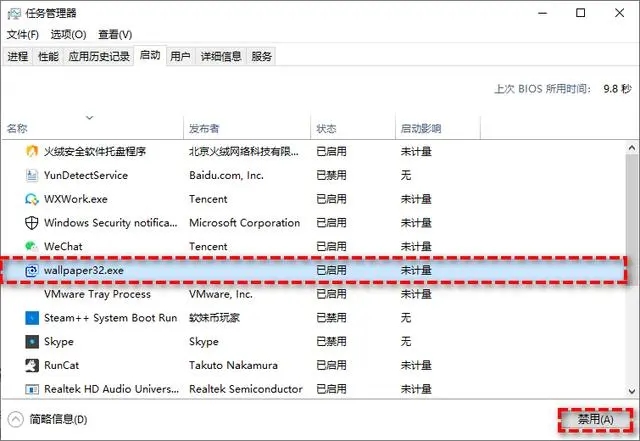
Step 1. Press Ctrl Shift Esc to open the Task Manager and go to the "Startup" tab.
Step 2. Find some irrelevant applications, then click the "Disable" button in the lower right corner, and then restart the computer.
Method Five: Change Power Plan
If you are using a laptop, be sure to change the power plan, this will work when not connected to a power source Optimize your gaming performance.
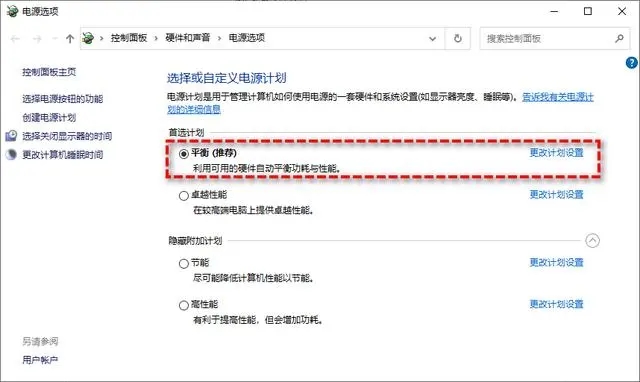
Step 1. Press Win S to open the search box, enter "Power Plan" and open it.
Step 2. Select "Balanced" mode in the power plan area.
Method Six: Change Application GPU Priority
Desktop computers usually only have one graphics card, so adjusting GPU priority is not very meaningful. However, most laptops have two graphics cards (integrated and discrete), and the different graphics cards have a significant impact on gaming performance. Therefore, you need to change the GPU priority of specific applications in Windows 11 to ensure a good gaming experience.
Step 1. Press Win I to open Windows Settings, then click "System" - "Display" - "Graphics".
Step 2. In the graphics window list, select the application that needs to change the GPU options, and then click the "Options" button.
Step 3. In the graphics preferences window, switch to High Performance, and then click the "Save" button.
Method 7: Disable cloud disk backup
Virtualization-based security (VBS) is a new feature in Win10 that strengthens system security by virtualizing hardware and software to create an isolated subsystem that can effectively prevent malware from damaging the computer. However, this feature is not gamer-friendly and will severely impact your gaming performance, lowering the average frame rate of the game by up to 28%.
To ensure a good gaming experience, it is recommended that you disable the VBS function, but before doing so, you need to check whether VBS is disabled on Win11.
Step 1. Press Win S to open the search box, enter "System Information" and then open it.
Step 2. Find the "Virtualization-based Security" option in the system information and check whether it is enabled.
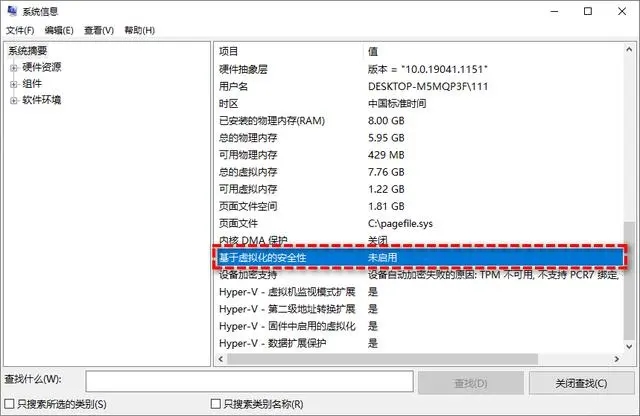
Step 3. If it shows that it is not enabled, there is no need to disable it. If it shows enabled, then follow the two methods below to disable it.
Disable VBS from Windows Settings
Step 1. Click the Start menu, select "Settings", and then click "Privacy and Security" in the left panel.
Step 2. Click the "Windows Security" option at the top of the right panel, and then select "Device Security" in the new window that pops up.
Step 3. In the device security window, click the "Core Isolation Details" button under "Core Isolation".
Step 4. In the new window that pops up, find the "Memory Integrity" section. You need to turn off this feature and restart the computer.
Disable VBS from the Registry Editor
Step 1. Press Win R, enter regedit and press Enter to open the Registry Editor.
Step 2. Navigate to: HKEY_LOCAL_MACHINE\SYSTEM\CurrentControlSet\Control\DeviceGuard
Step 3. Find EnableVirtualizationBasedSecurity in the right panel and double-click it to open it, and then change its numerical data is 0, click "OK" and restart the computer.
The above is the detailed content of How to optimize win11 game performance? 7 Ways to Optimize Win11 Gaming Performance. For more information, please follow other related articles on the PHP Chinese website!

Hot AI Tools

Undresser.AI Undress
AI-powered app for creating realistic nude photos

AI Clothes Remover
Online AI tool for removing clothes from photos.

Undress AI Tool
Undress images for free

Clothoff.io
AI clothes remover

AI Hentai Generator
Generate AI Hentai for free.

Hot Article

Hot Tools

Notepad++7.3.1
Easy-to-use and free code editor

SublimeText3 Chinese version
Chinese version, very easy to use

Zend Studio 13.0.1
Powerful PHP integrated development environment

Dreamweaver CS6
Visual web development tools

SublimeText3 Mac version
God-level code editing software (SublimeText3)

Hot Topics
 Is Win11 LTSC not suitable for individual users at all? Analysis of the advantages and disadvantages of the LTSC version
Jun 25, 2024 pm 10:35 PM
Microsoft provides multiple versions of Windows systems, each targeting different usage scenarios. In addition to the Home, Professional, Education and Enterprise editions, there is also a special LTSC edition designed for the specific needs of large businesses and organizations. Although Windows 11 LTSC has become quite popular recently, it lacks commonly used functions and is not suitable for individual users. And this version has not yet been officially launched, and is expected to be released around September in the second half of 2024. Interesting thing: From Windows 1.0 to 11, the evolution of Windows versions. What is Windows 11 LTSC? Windows11LTSC is a feature of Windows11 operating system
 Win11 24H2 will adjust security rules and NAS user access may fail
Jun 25, 2024 pm 05:23 PM
Digital enthusiasts all know that Microsoft has released a preview version of Windows 1124H2, and the official version of Windows 1124H2 will be coming soon. This is a very important version update, and many friends are paying close attention to it. Of course, the most noteworthy thing about Windows 1124H2 is the new features and improvements in AI. It is said that Microsoft will deeply integrate Copliot. However, AI is not the subject of this article. The subject of this article is to introduce readers to two new security rule changes in the Windows 1124H2 version, which may affect some NAS users. Specifically, in the Windows 1124H2 version, Microsoft will make changes to two important network access rules:
 What should I do if the win11 dual-screen calendar does not exist on the second monitor?
Jun 12, 2024 pm 05:47 PM
An important tool for organizing your daily work and routine in Windows 11 is the display of time and date in the taskbar. This feature is usually located in the lower right corner of the screen and gives you instant access to the time and date. By clicking this area, you can bring up your calendar, making it easier to check upcoming appointments and dates without having to open a separate app. However, if you use multiple monitors, you may run into issues with this feature. Specifically, while the clock and date appear on the taskbar on all connected monitors, the ability to click the date and time on a second monitor to display the calendar is unavailable. As of now, this feature only works on the main display - it's unlike Windows 10, where clicking on any
 System Restore prompts that you must enable system protection on this drive
Jun 19, 2024 pm 12:23 PM
The computer has a restore point, and when the system is restored, it prompts "You must enable system protection on this drive." This usually means that the system protection function is not turned on. System protection is a feature provided by the Windows operating system that can create system restore points to back up system files and settings. That way, if something goes wrong, you can revert to a previous state. When the system fails and you cannot enter the desktop to start it, you can only try the following method: Troubleshooting-Advanced Options-Command Prompt Command 1 netstartvssrstrui.exe/offline:C:\windows=active Command 2 cd%windir%\system32 \configrenSYSTEMsy
 What should I do if win10 does not switch users? Win10 login interface does not have the option to switch users. Solution
Jun 25, 2024 pm 05:21 PM
A problem that Windows 10 users may encounter is that they cannot find the switch user option on the login interface. So what should I do if there is no switch user option on the win10 login interface? Let this site give users a detailed explanation of the problem of not switching user options in the win10 login interface. Detailed solution to the problem of switching user options on the Win10 login interface: Check user account settings: First, make sure you have multiple user accounts on your computer and that these accounts are enabled. You can check and enable the account by following these steps: a. Press Win+I keys to open Settings and select "Accounts". b. Select "Family & Others" or &ld in the left navigation bar
 Is win11 24h2 worth installing? Comparison of the differences between Win11 24H2 and 23H2
Jun 11, 2024 pm 03:17 PM
The win1124h2 version is a version that many users are looking forward to. Now that the small update of Win1124H2 has been completed, it will welcome a larger Moment update. However, many users are asking whether win1124h2 is easy to use? What is the difference between Win1124H2 and 23H2? Let this site carefully introduce to users the differences between Win1124H2 and 23H2. What is the difference between Win1124H2 and 23H2? The Windows 1124H2 update brings many adjustments and new features to the Settings application, and accelerates the migration of Control Panel-related functions/features. Improved accessibility Windows 1124H2 includes several accessibility improvements: including color filters
 What should I do if my win11 wallpaper is locked and cannot be changed? What to do if my computer wallpaper is locked and cannot be changed?
Jun 09, 2024 pm 08:58 PM
What should I do if my win11 wallpaper is locked and cannot be changed? Users can directly click on this computer, then click on the search box and directly enter %ProgramData%MicrosoftWindows to perform the operation. Now, let this website give users a detailed introduction to the detailed explanation of Win11 wallpaper being locked and unable to be changed. The win11 wallpaper is locked and cannot be changed. Detailed explanation method one: 1. Double-click the mouse to enter [This PC]. 2. After entering, enter a string of codes like [%ProgramData%MicrosoftWindows] in the search box at the top of the page, and then click Enter. 3. Then find [systemdata] in the folder below and click in
 MHz is history! Microsoft Windows 11 memory speed unit switches to MT/s
Jun 25, 2024 pm 05:10 PM
Digital hardware enthusiasts all know that in recent years there have been two memory parameter marking units, namely "MHz" and "MT/s", which may be confusing to digital novices. "MHz" and "MT/s" are both measures of memory transfer performance, but they still have significant differences. MHz represents how many millions of cycles a memory module can perform per second, and each cycle is an operation performed on the memory module, such as storing and retrieving data. But due to the rapid development of current technology, new technology allows DDR memory to increase data transfer rate without increasing clock speed, and the old memory measurement method has also


