

Lightweight music player under Linux

The terminal is usually used to complete management tasks on Linux systems, such as installing software packages, configuring services, updating and upgrading software packages, etc.
But did you also know that you can play your favorite audio files directly from the terminal? Yes, you can, thanks to some cool and innovative console-based music players.
In this guide, we will focus on the best command line music players for Linux.
1. CMUS – Console Music Player
Written in the C programming language, CMUS is a lightweight yet powerful console-based music player designed specifically for Unix/Linux systems. It supports a variety of audio formats and is easy to navigate once you master a few basic commands.
Let’s take a brief look at some of its main features:
Supports a variety of popular music formats, including mp3, aac, wave and flac, etc.
Output sounds in ALSA and JACK formats.
Ability to organize music in playlists and create queues for songs. Using CMUS, you can also create custom music libraries.
There are tons of keyboard shortcuts you can use to make the user experience fun.
Supports seamless playback, allowing you to play music without interruption.
You can find extensions and other handy scripts from the CMUS wiki.
start up
cmus
Set output
:set output_plugin=pulse
Import local music
:add /home/www.linuxmi.com/Music
View description
man cmus

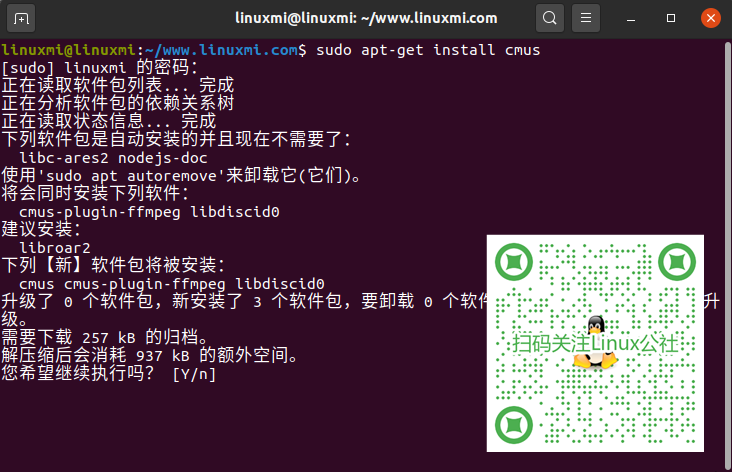
Installing CMUS on Linux
$ sudo apt-get install cmus [在Debian,Ubuntu和Miny上]
$ sudo dnf install cmus [在CentOS,RHEL和Fedora上]
$ sudo pacman -S cmus [在Arch Linux和Manjaro上]
2. MOC –
on the consolemusic player
MOC is the abbreviation of Music On Console, which is a simple and easy-to-use command line music player. MOC allows you to select a directory and play the audio files contained in the directory, starting with the first one in the list.

Let’s look at some of the main features:
- Supports seamless playback.
- Supports audio files such as wav, mp3, mp4, flac, oog, aac and MIDI.
- User-defined keys or keyboard shortcuts.
- ALSA, JACK and OSS audio output.
- A collection of customizable color themes.
Install MOC on Linux
$ sudo apt-get install moc [在Debian,Ubuntu和Miny上]

$ sudo dnf install moc [在CentOS,RHEL和Fedora上]

$ sudo pacman -S moc [在Arch Linux和Manjaro上]

3、Musikcube
Musikcube is another free and open source terminal-based music player that utilizes a series of plug-ins written in C to provide functions such as data streaming, digital signal processing, output processing, etc.
Musikcube is a cross-platform music player that even runs on a Raspberry Pi. It uses a SQLite database to store playlists and tracking metadata. It only runs on text-based UIs built with ncurses.
Let’s look at some of the main features:
- 可以轻松提供24bit/192k音频输出。
- 音乐播放器同时提供播放列表和播放队列管理。
- 可以充当无头服务器上的流音频客户端。
- 支持超过100000个曲目的库。
- 它提供无间隙播放,具有交叉淡入淡出效果以及索引标记。
要进行安装,请转至发行页面并获取您的Linux版本的.deb或.rpm,然后使用安装指南进行安装并运行。

4、mpg123 – 音频播放器和解码器
该mpg123的播放器是一个基于控制台的自由和开源的快速的音频播放器和解码用C语言编写。它是为Windows和Unix/Linux系统量身定制的。

让我们看一些主要功能:
- mp3音频文件的无缝播放。
- 内置的终端快捷方式。
- 支持许多平台(Windows,Linux,BSD和macOS)。
- 多个音频选项。
- 支持多种音频输出,包括ALSA,JACK和OSS。
在Linux上安装mpg123
$ sudo apt-get install mpg123 [在Debian,Ubuntu和Miny上]

$ sudo dnf install mpg123 [在CentOS,RHEL和Fedora上]

$ sudo pacman -S mpg123 [在Arch Linux和Manjaro上]

5、Mp3blaster – 控制台音频播放器
Mp3blaster从1997年就出现了。遗憾的是,自2017年以来就没有积极开发。尽管如此,它仍然是一款不错的基于终端的音频播放器,可让你享受你的音频曲目。您可以找到托管在GitHub上的官方仓库。

让我们看一些主要功能:
- 支持快捷键,使用起来相对容易。
- 出色的播放列表支持。
- 出色的音质。
在Linux上安装Mp3blaster
$ sudo apt-get install mp3blaster [在Debian,Ubuntu和Miny上]

$ sudo dnf install mp3blaster [在CentOS,RHEL和Fedora上]

$ sudo pacman -S mp3blaster [在Arch Linux和Manjaro上]

这是对Linux甚至Windows可用的一些最流行的命令行播放器的总结。你有觉得我们遗漏了什么吗?请告诉我们,谢谢。
The above is the detailed content of Lightweight music player under Linux. For more information, please follow other related articles on the PHP Chinese website!

Hot AI Tools

Undresser.AI Undress
AI-powered app for creating realistic nude photos

AI Clothes Remover
Online AI tool for removing clothes from photos.

Undress AI Tool
Undress images for free

Clothoff.io
AI clothes remover

Video Face Swap
Swap faces in any video effortlessly with our completely free AI face swap tool!

Hot Article
Hot Tools

Notepad++7.3.1
Easy-to-use and free code editor

SublimeText3 Chinese version
Chinese version, very easy to use

Zend Studio 13.0.1
Powerful PHP integrated development environment

Dreamweaver CS6
Visual web development tools

SublimeText3 Mac version
God-level code editing software (SublimeText3)
Hot Topics
 1386
1386
 52
52

 How to use docker desktop
Apr 15, 2025 am 11:45 AM
How to use docker desktop
Apr 15, 2025 am 11:45 AM
How to use Docker Desktop? Docker Desktop is a tool for running Docker containers on local machines. The steps to use include: 1. Install Docker Desktop; 2. Start Docker Desktop; 3. Create Docker image (using Dockerfile); 4. Build Docker image (using docker build); 5. Run Docker container (using docker run).
 Difference between centos and ubuntu
Apr 14, 2025 pm 09:09 PM
Difference between centos and ubuntu
Apr 14, 2025 pm 09:09 PM
The key differences between CentOS and Ubuntu are: origin (CentOS originates from Red Hat, for enterprises; Ubuntu originates from Debian, for individuals), package management (CentOS uses yum, focusing on stability; Ubuntu uses apt, for high update frequency), support cycle (CentOS provides 10 years of support, Ubuntu provides 5 years of LTS support), community support (CentOS focuses on stability, Ubuntu provides a wide range of tutorials and documents), uses (CentOS is biased towards servers, Ubuntu is suitable for servers and desktops), other differences include installation simplicity (CentOS is thin)
 What to do if the docker image fails
Apr 15, 2025 am 11:21 AM
What to do if the docker image fails
Apr 15, 2025 am 11:21 AM
Troubleshooting steps for failed Docker image build: Check Dockerfile syntax and dependency version. Check if the build context contains the required source code and dependencies. View the build log for error details. Use the --target option to build a hierarchical phase to identify failure points. Make sure to use the latest version of Docker engine. Build the image with --t [image-name]:debug mode to debug the problem. Check disk space and make sure it is sufficient. Disable SELinux to prevent interference with the build process. Ask community platforms for help, provide Dockerfiles and build log descriptions for more specific suggestions.
 How to view the docker process
Apr 15, 2025 am 11:48 AM
How to view the docker process
Apr 15, 2025 am 11:48 AM
Docker process viewing method: 1. Docker CLI command: docker ps; 2. Systemd CLI command: systemctl status docker; 3. Docker Compose CLI command: docker-compose ps; 4. Process Explorer (Windows); 5. /proc directory (Linux).
 What computer configuration is required for vscode
Apr 15, 2025 pm 09:48 PM
What computer configuration is required for vscode
Apr 15, 2025 pm 09:48 PM
VS Code system requirements: Operating system: Windows 10 and above, macOS 10.12 and above, Linux distribution processor: minimum 1.6 GHz, recommended 2.0 GHz and above memory: minimum 512 MB, recommended 4 GB and above storage space: minimum 250 MB, recommended 1 GB and above other requirements: stable network connection, Xorg/Wayland (Linux)
 Detailed explanation of docker principle
Apr 14, 2025 pm 11:57 PM
Detailed explanation of docker principle
Apr 14, 2025 pm 11:57 PM
Docker uses Linux kernel features to provide an efficient and isolated application running environment. Its working principle is as follows: 1. The mirror is used as a read-only template, which contains everything you need to run the application; 2. The Union File System (UnionFS) stacks multiple file systems, only storing the differences, saving space and speeding up; 3. The daemon manages the mirrors and containers, and the client uses them for interaction; 4. Namespaces and cgroups implement container isolation and resource limitations; 5. Multiple network modes support container interconnection. Only by understanding these core concepts can you better utilize Docker.
 What is vscode What is vscode for?
Apr 15, 2025 pm 06:45 PM
What is vscode What is vscode for?
Apr 15, 2025 pm 06:45 PM
VS Code is the full name Visual Studio Code, which is a free and open source cross-platform code editor and development environment developed by Microsoft. It supports a wide range of programming languages and provides syntax highlighting, code automatic completion, code snippets and smart prompts to improve development efficiency. Through a rich extension ecosystem, users can add extensions to specific needs and languages, such as debuggers, code formatting tools, and Git integrations. VS Code also includes an intuitive debugger that helps quickly find and resolve bugs in your code.
 How to switch Chinese mode with vscode
Apr 15, 2025 pm 11:39 PM
How to switch Chinese mode with vscode
Apr 15, 2025 pm 11:39 PM
VS Code To switch Chinese mode: Open the settings interface (Windows/Linux: Ctrl, macOS: Cmd,) Search for "Editor: Language" settings Select "Chinese" in the drop-down menu Save settings and restart VS Code
