
 System Tutorial
LINUX
Linux device driver platform: a simple way to describe and manage embedded devices
System Tutorial
LINUX
Linux device driver platform: a simple way to describe and manage embedded devices
Linux device driver platform: a simple way to describe and manage embedded devices

Have you ever wondered how to write drivers for your embedded devices in Linux? Have you ever wondered how to adapt your driver to different hardware platforms and architectures in Linux? Have you ever thought about how to enable your driver to implement some advanced functions in Linux systems, such as hot-plugging, power management, device sharing, etc.? If you are interested in these issues, then this article will introduce you to an effective method to achieve these goals - the Linux device driver platform. Platform is a data structure used to describe embedded devices. It allows you to pass the information and attributes of embedded devices to the kernel in a simple and unified way, thereby realizing device identification and driver. Platform is also a mechanism for achieving hardware independence. It allows you to separate the configuration and management of embedded devices from driver code in a flexible and portable way, thereby achieving multi-platform support. Platform is also a framework for implementing advanced functions. It allows you to define and use the interfaces and protocols of various embedded devices in a standard and universal way, thereby realizing hot plugging, power management, device sharing, etc. Function. This article will introduce the application and role of platform in Linux device drivers in detail from the basic concepts of platform, grammatical rules, writing methods, registration process, matching methods, etc., and help you master this useful and powerful method.
According to the Linux device model, a real Linux device and driver usually need to be connected to a bus. For devices that are attached to PCI, USB, etc., this is naturally not a problem, but in embedded systems Inside, the independent peripheral controllers integrated in the SoC system and the peripherals mounted in the SoC memory space are not attached to this type of bus. Based on this background, Linux designed a virtual bus called the platform bus, the corresponding device is called platform_device, and the driver is called platform_driver.
aim of design
-
Compatible device models
使得设备被挂接在一个总线上,因此,符合 Linux 2.6 的设备模型。其结果是,配套的

sysfs结点、设备电源管理都成为可能。
Copy after login -
BSP and driver isolation
在BSP中定义platform设备和设备使用的资源、设备的具体配置信息。而在驱动中,只需要通

过通用API去获取资源和数据,做到了板相关代码和驱动代码的分离,使得驱动具有更好的可

扩展性和跨平台性。
Copy after login
Software Architecture
The implementation of the Platform device in the kernel is located in the two files include/linux/platform_device.h and drivers/base/platform.c. Its software architecture is as follows: 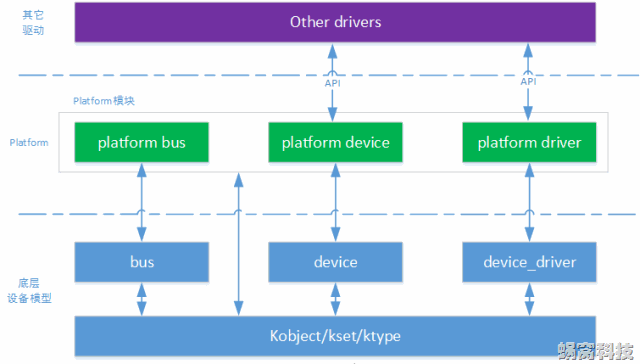
As can be seen from the picture, the implementation of Platform devices in the kernel mainly includes three parts:
- Platform Bus, based on the underlying bus module, abstracts a virtual Platform bus for mounting Platform devices;
- Platform Device, based on the underlying device module, abstracts Platform Device and is used to represent Platform devices;
- Platform Driver, based on the underlying device_driver module, abstracts the Platform Driver and is used to drive Platform devices.
platform_device
Note that the so-called platform_device is not a concept alongside character devices, block devices and network devices, but an additional means provided by the Linux system. For example, in the S3C2440 processor, the internally integrated I2C, RTC, SPI, LCD, watchdog and other controllers are all summarized as platform_device, and they themselves are character devices.
/* defined in  */
struct platform_device {
    const char * name; / * 设备名 */
    u32 id; /* 用于标识该设备的ID */
    struct device dev; /* 真正的设备(Platform设备只是一个特殊的设备,
因此其核心逻辑还是由底层的模块实现)*/
    u32 num_resources; / * 设备所使用各类资源数量 */
    struct resource * resource; / * 资源 */
};

/* defined in  */
struct resource {
    resource_size_t start; /* 资源起始 */
    resource_size_t end; /* 结束 */
    const char *name;
    unsigned long flags; /* 类型 */
    struct resource *parent, *sibling, *child;
};
/* 设备驱动获取BSP定义的resource */
struct resource *platform_get_resource(struct platform_device *, unsigned int flags,
unsigned int num);

#include
int platform_device_register(struct platform_device *);
void platform_device_unregister(struct platform_device *);
Tip: Resource descriptions closely related to the board level are placed in dev.paltform_data.
paltform_driver
platform_driver这个结构体中包含probe()、remove()、shutdown()、suspend()、resume()函数,通常也需要由驱动实现:
struct platform_driver {
    int (*probe)(struct platform_device *);
    int (*remove)(struct platform_device *);
    void (*shutdown)(struct platform_device *);
    int (*suspend)(struct platform_device *, pm_message_t state);
    int (*suspend_late)(struct platform_device *, pm_message_t state);
    int (*resume_early)(struct platform_device *);
    int (*resume)(struct platform_device *);
    struct device_driver driver;
};

#include
int platform_driver_register(struct platform_driver *);
void platform_driver_unregister(struct platform_driver *);
platform_bus
系统中为platform总线定义了一个bus_type的实例platform_bus_type:
struct bus_type platform_bus_type = {
    .name = "platform",
    .dev_attrs = platform_dev_attrs,
    .match = platform_match,
    .uevent = platform_uevent,
    .pm = PLATFORM_PM_OPS_PTR,
};
EXPORT_SYMBOL_GPL(platform_bus_type);
这里要重点关注其 match()成员函数,正是此成员函数确定了 platform_device 和 platform_driver之间如何匹配:
static int platform_match(struct device *dev, struct device_driver *drv)
{
    struct platform_device *pdev;
    pdev = container_of(dev, struct platform_device, dev);
    return (strncmp(pdev->name, drv->name, BUS_ID_SIZE) == 0);
}
通过本文,我们了解了platform在Linux设备驱动中的应用和作用,学习了如何编写、注册、匹配、修改和调试platform。我们发现,platform是一种非常适合嵌入式系统开发的方法,它可以让我们方便地描述和管理嵌入式设备,实现硬件无关性和高级功能。当然,platform也有一些注意事项和限制,比如需要遵循语法规范、需要注意兼容性问题、需要注意内存占用和性能影响等。因此,在使用platform时,我们需要有一定的硬件知识和经验,以及良好的编程习惯和调试技巧。希望本文能够为你提供一个入门级的指导,让你对platform有一个初步的认识和理解。如果你想深入学习platform,建议你参考更多的资料和示例,以及自己动手实践和探索。
The above is the detailed content of Linux device driver platform: a simple way to describe and manage embedded devices. For more information, please follow other related articles on the PHP Chinese website!

Hot AI Tools

Undresser.AI Undress
AI-powered app for creating realistic nude photos

AI Clothes Remover
Online AI tool for removing clothes from photos.

Undress AI Tool
Undress images for free

Clothoff.io
AI clothes remover

Video Face Swap
Swap faces in any video effortlessly with our completely free AI face swap tool!

Hot Article
Hot Tools

Notepad++7.3.1
Easy-to-use and free code editor

SublimeText3 Chinese version
Chinese version, very easy to use

Zend Studio 13.0.1
Powerful PHP integrated development environment

Dreamweaver CS6
Visual web development tools

SublimeText3 Mac version
God-level code editing software (SublimeText3)
Hot Topics
 1386
1386
 52
52

 How to use docker desktop
Apr 15, 2025 am 11:45 AM
How to use docker desktop
Apr 15, 2025 am 11:45 AM
How to use Docker Desktop? Docker Desktop is a tool for running Docker containers on local machines. The steps to use include: 1. Install Docker Desktop; 2. Start Docker Desktop; 3. Create Docker image (using Dockerfile); 4. Build Docker image (using docker build); 5. Run Docker container (using docker run).
 Difference between centos and ubuntu
Apr 14, 2025 pm 09:09 PM
Difference between centos and ubuntu
Apr 14, 2025 pm 09:09 PM
The key differences between CentOS and Ubuntu are: origin (CentOS originates from Red Hat, for enterprises; Ubuntu originates from Debian, for individuals), package management (CentOS uses yum, focusing on stability; Ubuntu uses apt, for high update frequency), support cycle (CentOS provides 10 years of support, Ubuntu provides 5 years of LTS support), community support (CentOS focuses on stability, Ubuntu provides a wide range of tutorials and documents), uses (CentOS is biased towards servers, Ubuntu is suitable for servers and desktops), other differences include installation simplicity (CentOS is thin)
 What to do if the docker image fails
Apr 15, 2025 am 11:21 AM
What to do if the docker image fails
Apr 15, 2025 am 11:21 AM
Troubleshooting steps for failed Docker image build: Check Dockerfile syntax and dependency version. Check if the build context contains the required source code and dependencies. View the build log for error details. Use the --target option to build a hierarchical phase to identify failure points. Make sure to use the latest version of Docker engine. Build the image with --t [image-name]:debug mode to debug the problem. Check disk space and make sure it is sufficient. Disable SELinux to prevent interference with the build process. Ask community platforms for help, provide Dockerfiles and build log descriptions for more specific suggestions.
 How to view the docker process
Apr 15, 2025 am 11:48 AM
How to view the docker process
Apr 15, 2025 am 11:48 AM
Docker process viewing method: 1. Docker CLI command: docker ps; 2. Systemd CLI command: systemctl status docker; 3. Docker Compose CLI command: docker-compose ps; 4. Process Explorer (Windows); 5. /proc directory (Linux).
 What computer configuration is required for vscode
Apr 15, 2025 pm 09:48 PM
What computer configuration is required for vscode
Apr 15, 2025 pm 09:48 PM
VS Code system requirements: Operating system: Windows 10 and above, macOS 10.12 and above, Linux distribution processor: minimum 1.6 GHz, recommended 2.0 GHz and above memory: minimum 512 MB, recommended 4 GB and above storage space: minimum 250 MB, recommended 1 GB and above other requirements: stable network connection, Xorg/Wayland (Linux)
 Detailed explanation of docker principle
Apr 14, 2025 pm 11:57 PM
Detailed explanation of docker principle
Apr 14, 2025 pm 11:57 PM
Docker uses Linux kernel features to provide an efficient and isolated application running environment. Its working principle is as follows: 1. The mirror is used as a read-only template, which contains everything you need to run the application; 2. The Union File System (UnionFS) stacks multiple file systems, only storing the differences, saving space and speeding up; 3. The daemon manages the mirrors and containers, and the client uses them for interaction; 4. Namespaces and cgroups implement container isolation and resource limitations; 5. Multiple network modes support container interconnection. Only by understanding these core concepts can you better utilize Docker.
 What is vscode What is vscode for?
Apr 15, 2025 pm 06:45 PM
What is vscode What is vscode for?
Apr 15, 2025 pm 06:45 PM
VS Code is the full name Visual Studio Code, which is a free and open source cross-platform code editor and development environment developed by Microsoft. It supports a wide range of programming languages and provides syntax highlighting, code automatic completion, code snippets and smart prompts to improve development efficiency. Through a rich extension ecosystem, users can add extensions to specific needs and languages, such as debuggers, code formatting tools, and Git integrations. VS Code also includes an intuitive debugger that helps quickly find and resolve bugs in your code.
 vscode cannot install extension
Apr 15, 2025 pm 07:18 PM
vscode cannot install extension
Apr 15, 2025 pm 07:18 PM
The reasons for the installation of VS Code extensions may be: network instability, insufficient permissions, system compatibility issues, VS Code version is too old, antivirus software or firewall interference. By checking network connections, permissions, log files, updating VS Code, disabling security software, and restarting VS Code or computers, you can gradually troubleshoot and resolve issues.
