 System Tutorial
 Windows Series
 How to create a restore point in win7 system? Introduction to how to create restore points in Windows 7
How to create a restore point in win7 system? Introduction to how to create restore points in Windows 7
php editor Yuzai introduces you to the method of creating a restore point in Win7 system. Restore point is a system backup function that can restore the system to its previous state when a problem occurs. The method to create a restore point is very simple, just follow the steps below: First, click the "Start" menu, select "Control Panel", then select "System and Security", find the "System" option, and click to enter. In the system window, find the "System Protection" option on the left and click to enter. In the system protection window that pops up, select the disk where the system is located and click the "Configure" button. In the Configure System Protection window, click the "Create" button, enter a description of the restore point, and then click the "Create" button to complete the creation of the restore point. In this way, when subsequent system problems occur, you can use the restore point to restore the system to the state when the restore point was created to solve the problem. Creating restore points is an important step to ensure system security, and it is recommended to create them regularly.
Introduction to how to create a restore point in win7
1. First, right-click the computer icon, select [Properties], and click the [System Protection] option in the upper right corner of the opened interface.

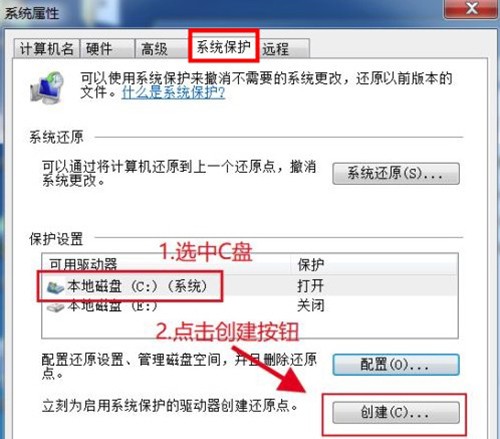
#2. Select [Local Disk (C:)] in the system protection interface that opens, and then click the [Create] button in the lower right corner.

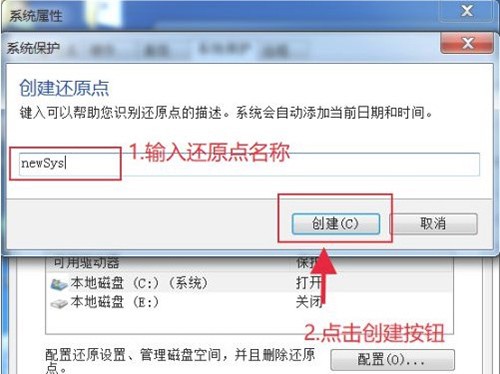
#3. Then enter the restore point name in the opened interface, and then click [Create].

#4. Finally, wait for the restore point to be created. After the creation is successful, the system will prompt you, just click [Close].

The above is the detailed content of How to create a restore point in win7 system? Introduction to how to create restore points in Windows 7. For more information, please follow other related articles on the PHP Chinese website!

Hot AI Tools

Undresser.AI Undress
AI-powered app for creating realistic nude photos

AI Clothes Remover
Online AI tool for removing clothes from photos.

Undress AI Tool
Undress images for free

Clothoff.io
AI clothes remover

AI Hentai Generator
Generate AI Hentai for free.

Hot Article

Hot Tools

Notepad++7.3.1
Easy-to-use and free code editor

SublimeText3 Chinese version
Chinese version, very easy to use

Zend Studio 13.0.1
Powerful PHP integrated development environment

Dreamweaver CS6
Visual web development tools

SublimeText3 Mac version
God-level code editing software (SublimeText3)

Hot Topics
 How to install WinNTSetup into Win11 system_How to install WinNTSetup into Win11 system
May 08, 2024 am 11:19 AM
First download the latest Win11 system ISO image, and then in Win10 system, you can directly right-click on the downloaded ISO image file and select [Load]; if it is under WinPE, WinXP, or Win7 system, you need to use the virtual optical drive tool to load the ISO Image; or you can directly decompress the ISO image file without using a virtual optical drive. Then run WinNTSetup. The software interface is as shown in the figure: First locate the location of the install.wim file. You can find the install.wim file in the sources directory of the Win11 ISO image loaded or decompressed by the virtual optical drive. Then set the location of the boot disk and installation disk. Generally, you are going to put W
 When I turn on the computer, it always stops at the motherboard logo screen. Nothing happens when I press anything, and I can't enter the bios?
Apr 23, 2024 am 09:13 AM
When I turn on the computer, it always stops at the motherboard logo screen. Nothing happens when I press anything, and I can't enter the bios? This is usually because the BIOS battery voltage is too low, and the system time has returned to the BIOS preset time, such as 2000.1.1, 00:00. You can use it after pressing F1 to enter the bios and set the time. Do not turn off the AC power after shutting down at night. Generally, the system time will not be lost when you turn on the computer the next day, and you can still enter the system normally. If the AC power is cut off, the battery voltage cannot sustain the power consumption of the bios, and the computer will be in the same state again the next day when it is turned on. Replacing the bios battery is the ultimate solution. Win11 is stuck on the motherboard logo interface when booting? 1. It is a problem with bios settings. We only need to find the corresponding setting items.
 How to connect to mobile phone hotspot network in win7 system
Apr 13, 2024 pm 11:48 PM
To connect Windows 7 to a Cellular Hotspot, follow these steps: Open the Wireless Network Connections panel and find the Cellular Hotspot network. Right-click on the hotspot network and select Connect. Verify connection.
 What memory does the z270 motherboard support?
Apr 04, 2024 am 09:04 AM
How many msiz270-apro graphics cards can the z270 graphics card support up to 3070TI? According to the relevant information, msi MSI z270 is a laptop with DOS operating system and a screen size of 16 inches 1366x768. Due to its good CPU performance, msiz270-apro has a graphics card of up to 3070TI. The choice of graphics card depends mainly on the CPU, not the motherboard. The z270 supports 7th generation Core by default. If you have an i7-7700k, it will be no problem with this graphics card. If u is too low, there will be a bottleneck and the graphics card performance will be wasted. The 2060s is a high level among dessert-level graphics cards. It can only be said that it can be plugged in and used, but its performance will be seriously affected. Since 4090 is a piece
 Win7 network adapter is missing, how to restore it (methods and steps to solve the problem of Win7 network adapter disappearing)
Apr 23, 2024 pm 06:19 PM
But sometimes users may encounter the problem that the network adapter suddenly disappears. Win7 operating system is a widely used operating system, which brings great troubles to network connection and use. To help users quickly solve network connection problems, this article will introduce the methods and steps on how to restore the Win7 network adapter. 1. Check the network adapter in the device manager 2. Uninstall and reinstall the network adapter driver. Select, right-click the network adapter and "Uninstall Device" and then restart the computer and install the driver automatically, or go to the official website to download the latest driver and install it manually. . 3. Check whether the device is disabled. Search for "Network Connections" in the start menu, open it, right-click the wireless connection or Ethernet connection, and select "Enable" to ensure that the device has not been disabled.
 Should I install win7 or win10 on my old computer?
May 06, 2024 am 09:13 AM
Should old computers be installed with win7 or win10 in terms of security and user experience? Generally speaking, if your computer is more than 5 years old, then Win7 may be more suitable for you. If you pay attention to new technologies, security, and have higher hardware configuration, then Win10 may be more suitable for you. Win10 can actually be regarded as a fusion and upgraded version of Win7 and Win8. Win10 solves the embarrassment of Win8 not having a start menu. The returned start menu is very similar to Win7, and has been improved and upgraded, adding a patch function. For older computers, it is recommended to install the win10 system, which is safer and more worry-free. If you need to use some old software that does not officially support win10, it is better to install win7 system. Computer performance mainly depends on hardware. but
 How to connect a bluetooth mouse in win7 system
Apr 13, 2024 pm 11:45 PM
How to connect a Bluetooth mouse to a Windows 7 system: Make sure Bluetooth is turned on and the mouse is charged; click "Start" → "Devices and Printers"; click "Add Device"; find the Bluetooth mouse and enter the pairing code (if any); Click Next to complete the connection; move the mouse to verify the connection.
 Graphic designer computer configuration
May 05, 2024 pm 04:01 PM
What computer should I use for graphic design? 1. - If you know how to use an Apple computer, it is best to use an Apple computer. The system is smooth and can well meet the design requirements. 2. It is recommended to use Nvidia GeForce or AMD Radeon series graphics cards. Storage device: For graphic designers, fast storage devices are very important to speed up the reading and writing of files. It is recommended to use SSD (Solid State Drive) to store operating system, application and project files. 3. The following are some common graphic design computer configurations: Processor: requires a processor with high performance, such as Intel i5 or i7, or AMD Ryzen5 or 7, etc. These processors provide enough computing power to quickly process complex image and video files. Electricians who want to design


