 System Tutorial
 Windows Series
 How to close the account control pop-up window in win10? Detailed tutorial on closing the win10 account control pop-up window
How to close the account control pop-up window in win10? Detailed tutorial on closing the win10 account control pop-up window
php editor Xiaoxin brings you a detailed tutorial on how to close the Win10 account control pop-up window. Account control pop-ups in the Win10 operating system may pop up frequently when users perform certain operations, causing trouble to users. Closing the account control pop-up window can improve operational efficiency and user experience. In this tutorial, we will introduce in detail how to close the Win10 Account Control pop-up window to make your operation smoother. Let’s take a look!
Detailed tutorial on closing the win10 account control pop-up window
Method 1:
1. Use the shortcut key "win i" to open settings and search for "Control Panel" in the search box and click Open.
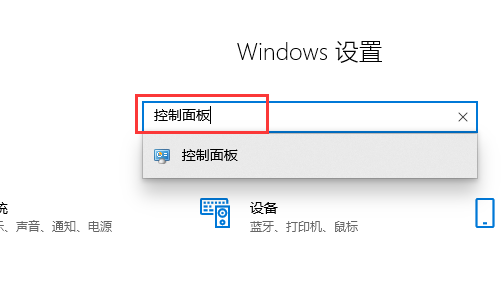
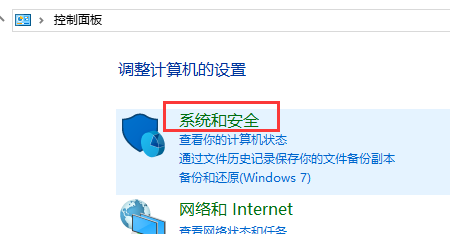
#2. Click "System and Security" in the control panel.
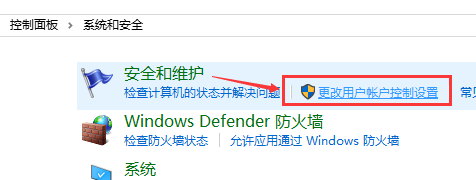
3. In the System and Security window, find "Change User Account Control Settings" under "Security and Maintenance" and click to enter.
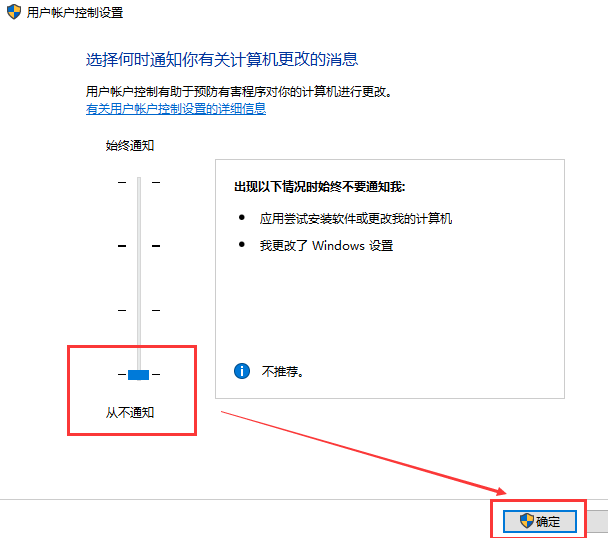
4. In the opened "User Account Control Settings" window,
Pull the slider on the left to the bottom of Never notify. , click OK, and the pop-up window is closed
Method 2:
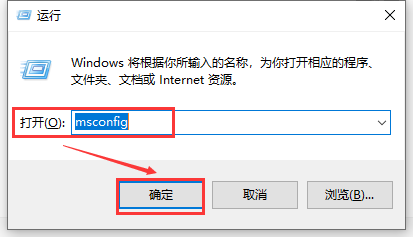
1. Use the shortcut key "win r" to open the run and enter in the input box Code: msconfig Click OK to enter "System Configuration".
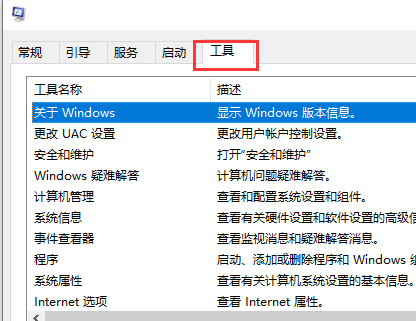
#2. After opening the system configuration, select "Tools".
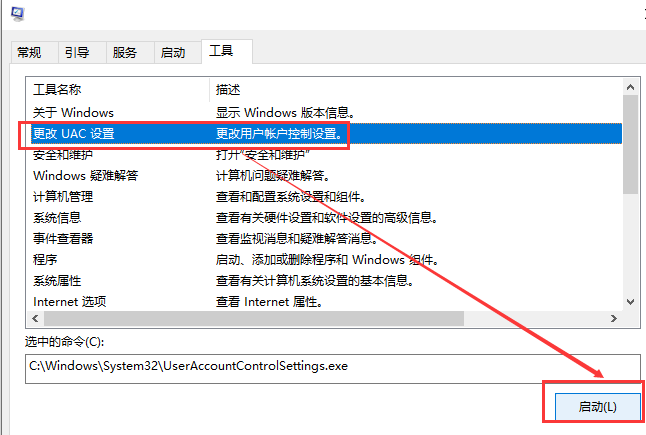
#3. Click "Change UAC Settings" in the tool and click "Start".
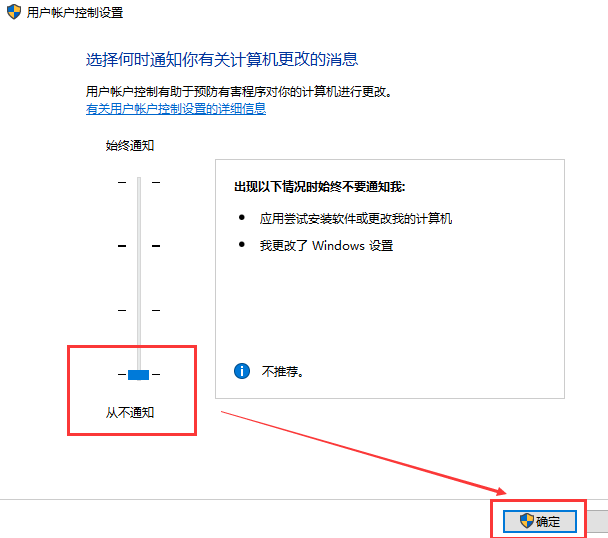
4. In the pop-up "User Account Control Settings" window, pull the slider on the left to the bottom of Never Notify, click OK, and a pop-up window will appear. Close completed.
The above is the detailed content of How to close the account control pop-up window in win10? Detailed tutorial on closing the win10 account control pop-up window. For more information, please follow other related articles on the PHP Chinese website!

Hot AI Tools

Undresser.AI Undress
AI-powered app for creating realistic nude photos

AI Clothes Remover
Online AI tool for removing clothes from photos.

Undress AI Tool
Undress images for free

Clothoff.io
AI clothes remover

Video Face Swap
Swap faces in any video effortlessly with our completely free AI face swap tool!

Hot Article

Hot Tools

Notepad++7.3.1
Easy-to-use and free code editor

SublimeText3 Chinese version
Chinese version, very easy to use

Zend Studio 13.0.1
Powerful PHP integrated development environment

Dreamweaver CS6
Visual web development tools

SublimeText3 Mac version
God-level code editing software (SublimeText3)

Hot Topics
 1386
1386
 52
52
 System Restore prompts that you must enable system protection on this drive
Jun 19, 2024 pm 12:23 PM
The computer has a restore point, and when the system is restored, it prompts "You must enable system protection on this drive." This usually means that the system protection function is not turned on. System protection is a feature provided by the Windows operating system that can create system restore points to back up system files and settings. That way, if something goes wrong, you can revert to a previous state. When the system fails and you cannot enter the desktop to start it, you can only try the following method: Troubleshooting-Advanced Options-Command Prompt Command 1 netstartvssrstrui.exe/offline:C:\windows=active Command 2 cd%windir%\system32 \configrenSYSTEMsy
 What should I do if win10 does not switch users? Win10 login interface does not have the option to switch users. Solution
Jun 25, 2024 pm 05:21 PM
A problem that Windows 10 users may encounter is that they cannot find the switch user option on the login interface. So what should I do if there is no switch user option on the win10 login interface? Let this site give users a detailed explanation of the problem of not switching user options in the win10 login interface. Detailed solution to the problem of switching user options on the Win10 login interface: Check user account settings: First, make sure you have multiple user accounts on your computer and that these accounts are enabled. You can check and enable the account by following these steps: a. Press Win+I keys to open Settings and select "Accounts". b. Select "Family & Others" or &ld in the left navigation bar
 How to permanently turn off real-time protection in win10? How to disable real-time protection function in win10 computer 0
Jun 05, 2024 pm 09:46 PM
Although the comprehensive anti-virus software that comes with Windows 10 system can continuously protect the security of your personal computer, sometimes it may also affect certain downloaded files. For some users, it may be more appropriate to temporarily turn off the real-time protection function. But many users don’t know how to permanently turn off the real-time protection feature on win10 system. 1. First, press the "Win+R" keys to open the run window, enter the "gpedit.msc" command to open the local Group Policy Editor interface; 2. Then, in the opened interface, click "Computer Configuration/Administrative Templates/ Windows Components/MicrosoftDef
 How to restore the default wallpaper in win10? One trick to quickly restore the default wallpaper in Windows 10 system
Jun 02, 2024 pm 02:07 PM
In Windows 10 system, if you want to return to the system default wallpaper, you can follow the following steps: 1. Right-click a blank space on the desktop and select Personalize in the pop-up menu. 2. This will open the Personalization window in Settings. In the left menu, click Background. 3. Under the "Background" settings, find and click the drop-down menu next to "Choosepicture", and then select Windows Default (Windows Default) or directly select a picture that looks like the default wallpaper in the picture preview below ( if there are multiple options). 4. If your system has multiple versions
 Windows cannot start the Windows Audio service Error 0x80070005
Jun 19, 2024 pm 01:08 PM
The guy's computer appears: Windows cannot start the WindowsAudio service (located on the local computer). Error 0x8007005: Access denied. This situation is usually caused by user permissions. You can try the following methods to fix it. Method 1: Modify the registry to add permissions through batch processing, create a new text document on the desktop, save it as .bat, and right-click the administrator to go far. Echo==========================EchoProcessingRegistryPermission.Pleasewait...Echo================== ========subinacl/subkey
 What should I do if Win10 takes a screenshot and crashes? How to solve the problem of Win10 flashing and then disappearing after taking a screenshot?
Jun 02, 2024 pm 12:48 PM
There are many reasons why the screenshot disappears after taking a screenshot in Win10. Users can first check the screenshot save location or adjust the screenshot settings, or check the animation effect to check it. If it really doesn't work, you can also choose to update the driver and operating system to perform the operation. Let this website carefully introduce to users the analysis of the problem of Win10 disappearing after taking a screenshot. Analysis of the problem after win10 takes a picture and it flashes and disappears 1. Check where the screenshot is saved: When you use the Win+PrtSc (PrintScreen) key combination to take a screenshot, the screenshot is usually saved in the C:\Users\YourUsername\Pictures\Screenshots folder. please
 What to do if the Win10 Task Manager crashes? How to fix the Win10 Task Manager crash?
Jun 25, 2024 pm 04:31 PM
Hello everyone, have you ever encountered the situation where the Windows 10 Task Manager keeps crashing? This function helps us a lot, allowing us to quickly see all running tasks, which is very convenient to use, right? However, some friends said that they encountered this problem and didn’t know how to solve it, so let me share with you the specific solution! Solution to Win10 Task Manager crash 1. First, press and hold the "Win" + "R" keys on the keyboard to open Run, enter "regedit" and press the Enter key. 2. Expand the folders and find "HKEY_CURRENT_USERSoftwareMicros
 How to turn off popular searches in Windows 10 system? List of methods to close popular searches in Windows 10 system
Jun 03, 2024 pm 08:46 PM
In win10 system, hot search is one of the more practical methods, but sometimes it can cause certain troubles. So how to turn off hot search? Let’s take a look below! Step 1: Open the Settings app First, click on the Windows icon in the lower left corner of the screen and select the Settings app. Step 2: Enter "Personalization" settings In the "Settings" app, click the "Personalization" option. Step 3: Select the “Search” option In the “Personalization” settings, select the “Search” option. Step 4: Turn off popular searches. In the "Search" option, find the option "Show popular searches in search" and turn it off. Professional Tool Recommendation 1. Xiaozhi Soso Xiaozhi Soso—Quick Search and One-Click Positioning—Professional Computer Search Tool


