

How to boot Lenovo from USB disk

php editor Xiaoxin will introduce to you how to boot a Lenovo computer from a USB disk. In some cases, we may need to install or repair the system through a USB flash drive. First, make sure the USB flash drive is plugged into the computer. Then, press the power button to turn on the computer, and simultaneously press the F12 or Fn F12 keys to enter the BIOS setup interface. In the boot options, select the USB flash drive as the preferred boot device, save the settings and exit. After restarting the computer, the system will boot from the USB flash drive. In this way, we can easily perform various operations, such as installing the operating system or reinstalling the system.
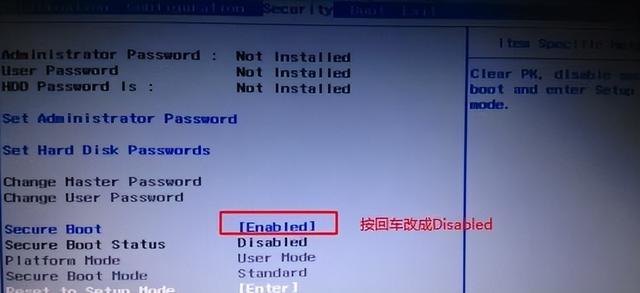
First, after inserting the prepared boot disk, restart the computer and continue to press the corresponding BIOS shortcut key (such as F2, suitable for Lenovo motherboards) to enter the BIOS interface. Then, select the Security option and press Enter to enter the Secure Boot settings.
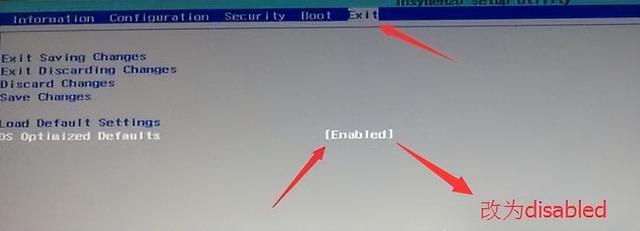
Then we move the cursor to the Exit option and set OS Optimized Defaults to Disabled mode to ensure that the motherboard supports USB boot.
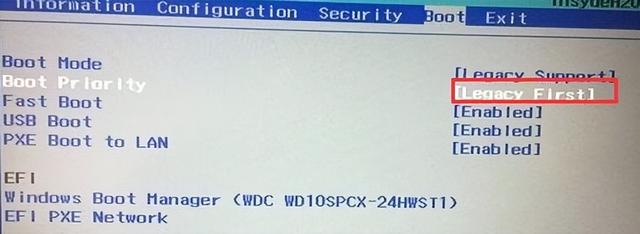
3. Then switch to the boot option and change the Boot Mode from UEF to Legacy Support to allow the motherboard to support the traditional boot mode, and then you can use the USB flash drive to reinstall the system.

4. At this step, we set the Boot Priority to the Legacy First option. After the setting is completed, press f10, and then select yes.
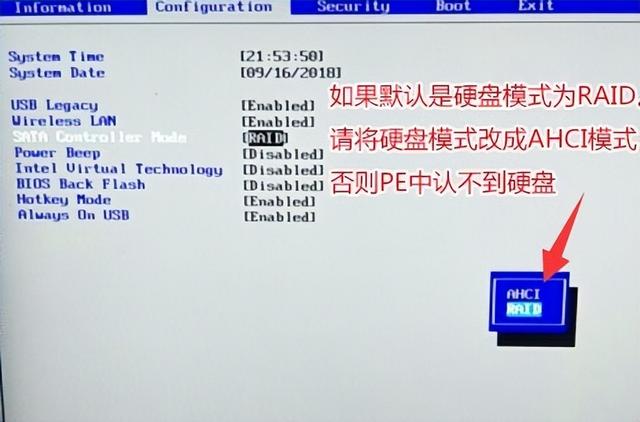
5. Then return to the configuration and check the sata controller mode option. If the default hard disk mode is RAID, you must change it to AHCI mode. After changing, press f10.
6. Finally, plug in the boot disk, press Enter in the bios interface and select the recognized USB disk to enter the boot disk.

The above is the detailed content of How to boot Lenovo from USB disk. For more information, please follow other related articles on the PHP Chinese website!

Hot AI Tools

Undresser.AI Undress
AI-powered app for creating realistic nude photos

AI Clothes Remover
Online AI tool for removing clothes from photos.

Undress AI Tool
Undress images for free

Clothoff.io
AI clothes remover

AI Hentai Generator
Generate AI Hentai for free.

Hot Article
Hot Tools

Notepad++7.3.1
Easy-to-use and free code editor

SublimeText3 Chinese version
Chinese version, very easy to use

Zend Studio 13.0.1
Powerful PHP integrated development environment

Dreamweaver CS6
Visual web development tools

SublimeText3 Mac version
God-level code editing software (SublimeText3)
Hot Topics
 1376
1376
 52
52

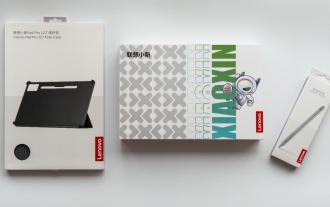 The all-round center for learning and entertainment - new Lenovo Xiaoxin Pad Pro 12.7 Comfort Edition hands-on experience
Aug 05, 2024 pm 04:28 PM
The all-round center for learning and entertainment - new Lenovo Xiaoxin Pad Pro 12.7 Comfort Edition hands-on experience
Aug 05, 2024 pm 04:28 PM
Thanks to netizen Nobilta for submitting the clue! Today, with the rapid development of smart hardware, when we think about prioritizing productivity, notebooks must be a topic that cannot be avoided. However, as the performance of the Arm architecture becomes more and more powerful, tablets between mobile phones and notebooks have gradually become one of the productivity choices for more people. As an old giant, Lenovo undoubtedly firmly occupies a dominant position in the PC field. Can the just-launched Lenovo tablet Xiaoxin PadPro 2025 shoulder the "glory of the big brother" and become an important part of Lenovo's ecology and serve as the "student party"? ”, a productivity tool for “beating workers”? Let’s experience it together. Unboxing & Appearance: This time I received Lenovo Xiaoxin PadPro 12.7 (second generation) Comfort Edition +
 How to enter bios after assembling a computer? How to enter bios when assembling a computer?
May 07, 2024 am 09:13 AM
How to enter bios after assembling a computer? How to enter bios when assembling a computer?
May 07, 2024 am 09:13 AM
How to enter bios after assembling a computer? Before entering the BIOS, you need to make sure that the computer is completely shut down and powered off. Here are several common ways to enter the BIOS: 1. Use shortcut keys: Most computer manufacturers will display a prompt message at startup telling you which key to press to enter the BIOS settings. Usually the F2, F10, F12 or Delete key. After pressing the appropriate keys, you should be able to see a screen with information about your computer's hardware and BIOS settings. 2. Use the button on the motherboard: Some computer motherboards have a dedicated button for entering BIOS settings. This button is usually labeled "BIOS" or "UEFI". After pressing the button you should be able to see
 Huawei mobile phone USB sharing network to computer
May 08, 2024 am 08:25 AM
Huawei mobile phone USB sharing network to computer
May 08, 2024 am 08:25 AM
How to connect a Huawei phone to a computer via USB to access the Internet. First, we open the phone settings and search for "HDB". Then we click to open "Mobile Network Sharing" in More. Then we can click to open "USB Sharing Network" in the pop-up window. Summary First, connect the Huawei mobile phone to the computer through the data cable. Open "Settings" on your phone and enter the settings interface. Click "Personal Hotspot", select "USB tethering" and click the switch button at the back to turn it on. First click "Settings About Phone", then click "Version Number" 7 times in succession. You will be prompted to enter developer mode. Then return to the "Settings" list, "Developer Options" will appear, then click to enter "Developer Options", turn on the "USB Debugging" switch, and click
 MSI motherboard boot logo
May 08, 2024 pm 02:20 PM
MSI motherboard boot logo
May 08, 2024 pm 02:20 PM
How to cancel the MSI motherboard icon when booting 1. Press the DEL key when booting to enter the BIOS. Generally, in the "Advanced Features" item, you can find the words MSI motherboard LOGO screen. Select DISABLED, save and exit. There will no longer be this MSI motherboard LOGO screen when you turn on the computer in the future. MSI motherboard refers to the motherboard brand developed by MSI (MSI Technology Company). 2. The logo displayed when the computer is turned on is basically that of the motherboard manufacturer. You can set QUICKPOST to DISENABLE in the BIOS, so that the logo will generally no longer be displayed. It will display computer configuration-related information and give you more details. 3. First, teach you how to flash the BIOS in Windows environment. First: Go online
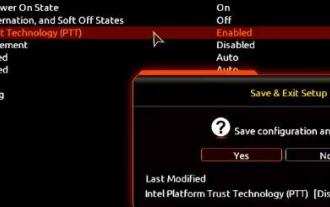 How to enable tpm2.0 in win11_How to enable tpm2.0 in win11
May 08, 2024 pm 06:10 PM
How to enable tpm2.0 in win11_How to enable tpm2.0 in win11
May 08, 2024 pm 06:10 PM
1. Gigabyte motherboard 1. First, we restart the computer and use the keyboard [DEL] to enter the BIOS settings when restarting. 2. Find and enter the [Settings] tab above. 3. Then find and enter [Miscellaneous] under settings. 4. Set [Intel Platform Trust Technology (PTT)] to [Enabled]. 5. After the settings are completed, use the keyboard [F10] to save, and then click [YES] to exit. 2. ASUS motherboard 1. First restart the computer and continuously tap [del] on the keyboard to enter the bios settings when booting. 2. Click [AdvancedMode] or press [F7] to find [A
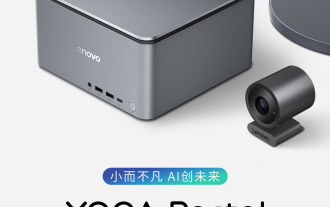 Lenovo YOGA Portal mini host officially announced on July 27, released by ChinaJoy, with built-in 350W power supply
Jul 23, 2024 pm 01:47 PM
Lenovo YOGA Portal mini host officially announced on July 27, released by ChinaJoy, with built-in 350W power supply
Jul 23, 2024 pm 01:47 PM
According to news from this site on July 23, Lenovo’s YOGA Portal high-performance desktop computer, which has been exposed for a long time, is now confirmed to be officially released at ChinaJoy in Shanghai on July 27. It is claimed to be a mini host designed for professional AI creation. It is a performance master and an expert in AI creation of 3D digital people. The AI virtual background is based on the on-site pictures provided by our friend @yuP in Shanghai. The volume of this small host is only 3.7L. It is made of anodized aluminum and is equipped with Intel Core. i7-14700 processor, equipped with 32GBDDR5 memory and 1TB solid state drive. YOGA Portal is both a host and an all-in-one AI creation machine. The high-performance host is combined with an algorithm-optimized camera to form an integrated solution. Just stand in front of the camera i.e.
 What should I do if my graphics card is blackened by flashing the BIOS?
May 10, 2024 am 12:09 AM
What should I do if my graphics card is blackened by flashing the BIOS?
May 10, 2024 am 12:09 AM
Flashing the BIOS of the graphics card refers to the situation where an error occurs when modifying the BIOS and the graphics card cannot start. Solutions include: 1. Power-off method: release the residual power and then restart; 2. Short-circuit method: short-circuit the short-circuit point on the PCB; 3. Restore the BIOS to default values; 4. Use third-party tools to refresh the BIOS; 5. Contact technology Support seeking help. Be careful to back up the original BIOS, use a compatible version, and proceed with caution to avoid damage.
 How often should the battery on a computer motherboard be replaced?
May 08, 2024 am 09:19 AM
How often should the battery on a computer motherboard be replaced?
May 08, 2024 am 09:19 AM
Usually the lifespan of a computer motherboard battery is four years. Under normal circumstances, we replace the battery every three years. After the computer is used for four or five years, it will easily cause the battery to age, resulting in inaccurate time, invalid motherboard bios settings, etc. The solution is to replace the battery. , of course, it is also possible to keep the computer plugged in to an external power source, but it is generally more convenient to replace the battery. The method to replace the motherboard battery is as follows: Turn off the power of the computer. Open the case cover and there will be a round battery on the motherboard. Then press the clip on the battery slot and the battery will pop out. Since the battery holder on each motherboard is different, the method of removing the battery is also different. Usually it is an external button battery holder. To remove the battery, just push down the buckle next to the battery holder, and then push the battery out.
