How to set up booting from USB disk
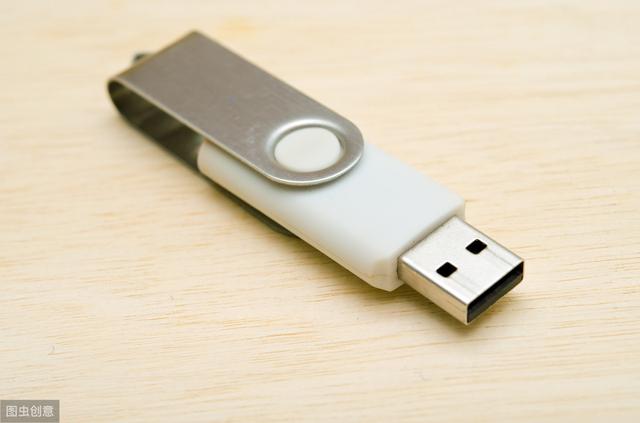
U disk is a small thing, but it contains a big world. To be honest, Dr. Han has never really understood its inner world. He only knows that it is used to store files on a daily basis. In fact, U disk is not limited to this, it can also be made into a U disk boot disk to reinstall the computer system. Compared with any reinstallation method, U disk reinstallation is slightly better. As long as it is made into a USB boot disk, it can be reinstalled anytime and anywhere. Problems such as computer blue screens are not a problem. It can be completely held and is not a problem at all! As long as the USB flash drive activates its ultimate move, no monsters or monsters can stop it.

First of all, Dr. Han will give you some popular science on how to make a USB boot disk.
Preparation before production:
1. Close all anti-virus software before opening Dr. Han to avoid system reinstallation failure
2. Back up the USB disk in advance important files in the USB flash drive to avoid formatting the USB flash drive when making a USB boot disk, resulting in file loss.
The production work begins:
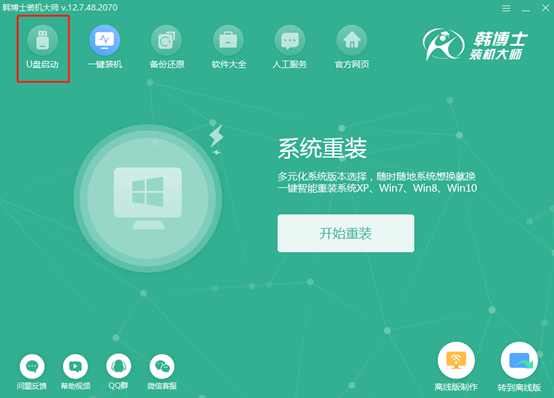
1. First prepare a U disk of 8G or more (recommended), ensure that the computer can recognize the U disk, and then select "U disk boot" on the Dr. Han interface to enter .
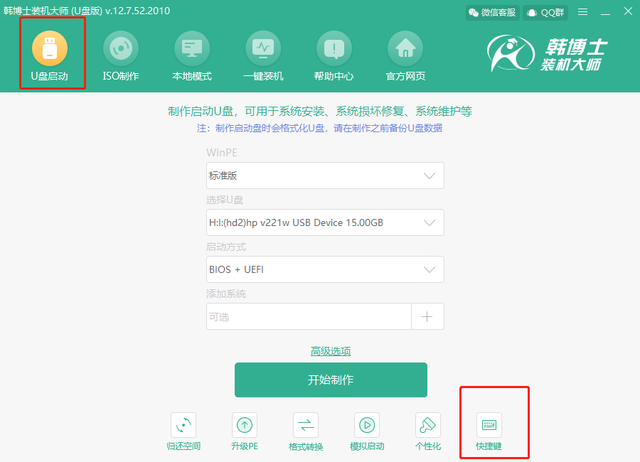
Choose the appropriate system to download according to your personal needs, and follow the prompts step by step to complete the creation of a USB boot disk. Next, let us learn about the three ways to set up the computer to boot from a USB disk (only by setting the computer to boot from a USB disk can you enter the PE system for reinstallation).
Method 1: Startup shortcut keys
The startup shortcut keys for different computers may be different. But if you use Dr. Han to create a USB boot disk, you can directly click the "Shortcut Key" option on the "U Disk Boot" interface to query.
If it is produced through other channels, we can refer to the following table for enquiry.
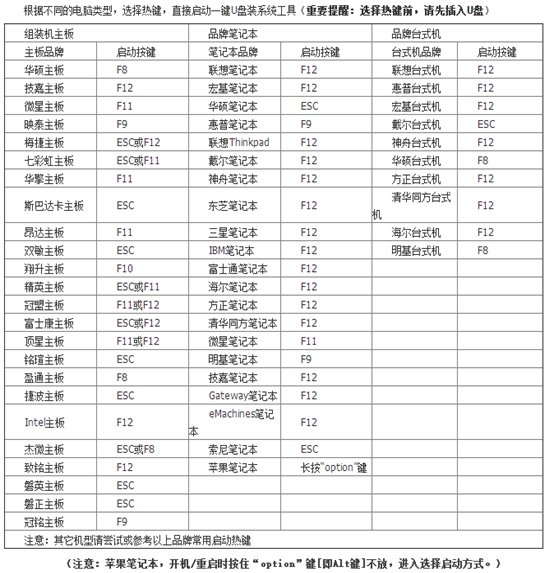
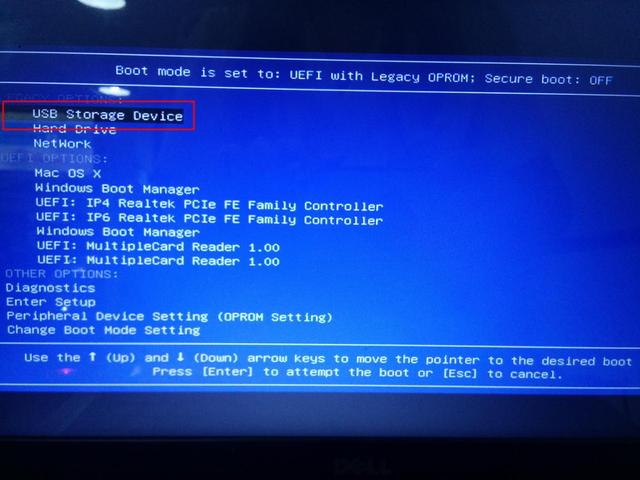
At this time we need to restart the computer. When the startup interface appears, press the shortcut key found above to enter the setting interface. Select the option with the word "usb". At this time, directly set the computer to The USB disk started, it was very easy.
Method 2: Bios startup
Also restart the computer after making the boot disk. Since different computers have different startup shortcut keys, we need to query it ourselves. If you really can’t find it, you can ask the customer service of the computer brand.
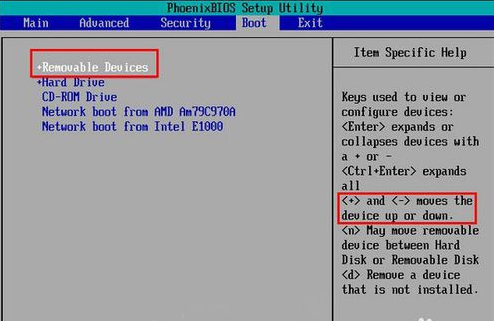
1. After learning the startup shortcut key, when the computer startup interface appears, press the shortcut key to enter the BIOS interface, then move the mouse to the "Boot" option and find the U disk option (display of different computers) may be different), Dr. Han shows "removeble device" (removable device), hold down "shift" and " " on the keyboard to move this item to the top, as shown in the following figure:
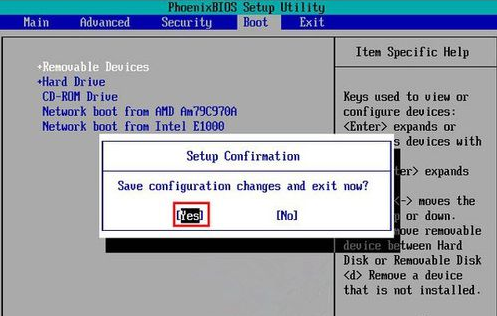
2. Move this item to the top and press the "F10" button. Click "yes" in the pop-up window to set the U disk as the first startup item.
Method three: UEFI startup settings
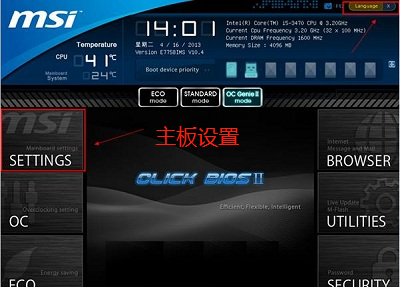
The same is true after restarting the computer and pressing the shortcut key on the boot interface to enter the uefi bios setting interface. Some friends may not understand the specific English. Meaning, you can click "Language Bar" in the upper right corner to set the computer to display in Chinese, and then select "SETTINGS" (motherboard settings), as shown below:
After entering the motherboard settings interface , we need to use the up and down movement keys "↑" and "↓" on the keyboard to move to the "Startup" item, as shown in the figure below:
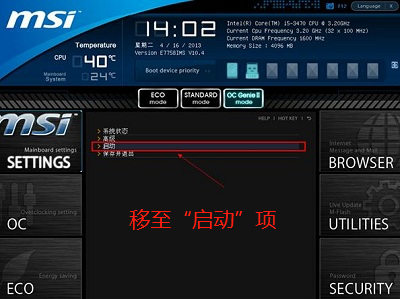
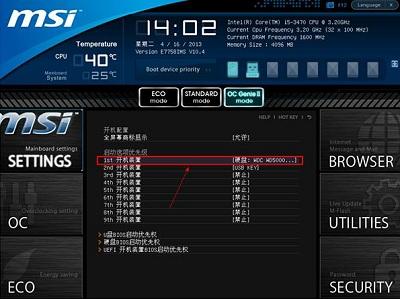
Move the mouse to "1st Boot" in the boot configuration interface "Device" (first startup item), at this time the computer sets the hard disk as the first startup item.
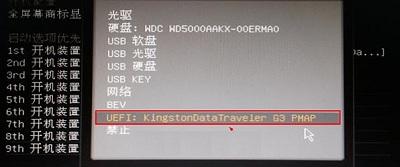
We can see hard disk, U disk and other methods in the boot item list. We only need to select the U disk option with the word "UEFI" and finally click the "enter" key to confirm.
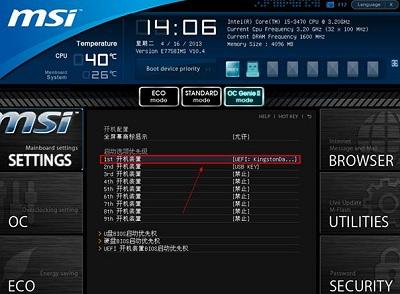
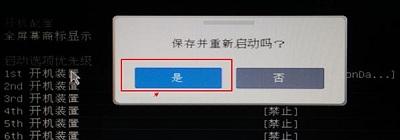
We also need to hold down the "F10" button on the keyboard. The computer will pop up a window asking us to confirm this setting. Just click "Yes" to save. Finally, restart the computer to enter the corresponding interface.
It turns out that there are three different ways to set up a USB flash drive to start. Today Dr. Han also knows the knowledge inside. It seems that the USB flash drive should not be underestimated. In the future, after you make a USB boot disk, you can use any of the above methods to set it up. I believe everyone can learn to reinstall the system. If you still have any questions, you can discuss them in the message area below. Dr. Han welcomes everyone~

The above is the detailed content of How to set up booting from USB disk. For more information, please follow other related articles on the PHP Chinese website!

Hot AI Tools

Undresser.AI Undress
AI-powered app for creating realistic nude photos

AI Clothes Remover
Online AI tool for removing clothes from photos.

Undress AI Tool
Undress images for free

Clothoff.io
AI clothes remover

Video Face Swap
Swap faces in any video effortlessly with our completely free AI face swap tool!

Hot Article

Hot Tools

Notepad++7.3.1
Easy-to-use and free code editor

SublimeText3 Chinese version
Chinese version, very easy to use

Zend Studio 13.0.1
Powerful PHP integrated development environment

Dreamweaver CS6
Visual web development tools

SublimeText3 Mac version
God-level code editing software (SublimeText3)

Hot Topics
 1386
1386
 52
52
 When I turn on the computer, it always stops at the motherboard logo screen. Nothing happens when I press anything, and I can't enter the bios?
Apr 23, 2024 am 09:13 AM
When I turn on the computer, it always stops at the motherboard logo screen. Nothing happens when I press anything, and I can't enter the bios? This is usually because the BIOS battery voltage is too low, and the system time has returned to the BIOS preset time, such as 2000.1.1, 00:00. You can use it after pressing F1 to enter the bios and set the time. Do not turn off the AC power after shutting down at night. Generally, the system time will not be lost when you turn on the computer the next day, and you can still enter the system normally. If the AC power is cut off, the battery voltage cannot sustain the power consumption of the bios, and the computer will be in the same state again the next day when it is turned on. Replacing the bios battery is the ultimate solution. Win11 is stuck on the motherboard logo interface when booting? 1. It is a problem with bios settings. We only need to find the corresponding setting items.
 How to enter bios on hp motherboard
May 04, 2024 pm 09:01 PM
How to set up the U disk boot in the HP notebook bios (how to enter the HP computer bios) and then insert the U disk to be booted first into the USB port of the notebook. If you want to install the system, the system program must have been prepared in the U disk. First, open the laptop. Make sure the laptop is turned off. Setting the bios must be done with the computer turned off. Then insert the U disk that you want to boot first into the USB port of the notebook. If you want to install the system, the prerequisite is that the system program has been prepared in the U disk. Take the HP ProDesk400G5SFF desktop computer as an example. Set the BIOS disk startup method: First, restart the computer and wait for the startup screen to appear. There are two ways to set up USB disk startup on HP notebooks. One is to directly press the shortcut key to select
 How to install Windows system on tablet computer
May 03, 2024 pm 01:04 PM
How to flash the Windows system on BBK tablet? The first way is to install the system on the hard disk. As long as the computer system does not crash, you can enter the system and download things, you can use the computer hard drive to install the system. The method is as follows: Depending on your computer configuration, you can install the WIN7 operating system. We choose to download Xiaobai's one-click reinstallation system in vivopad to install it. First, select the system version suitable for your computer, and click "Install this system" to next step. Then we wait patiently for the installation resources to be downloaded, and then wait for the environment to be deployed and restarted. The steps to install win11 on vivopad are: first use the software to check whether win11 can be installed. After passing the system detection, enter the system settings. Select the Update & Security option there. Click
 Tutorial on assembling a computer and installing a system? How to install win11 system when assembling a computer?
Apr 27, 2024 pm 03:38 PM
Tutorial on assembling a computer and installing a system? Nowadays, the system installation for assembling computers is very simple and convenient, and only requires a CD. First enter the bios settings, set the computer to boot first with the CD-ROM drive, then restart the computer and load the system CD into the CD-ROM drive. The CD will automatically enter the installation state. At this time, you only need to manually repartition the partitions, and the rest will be completed automatically. How to install win11 system when assembling a computer? 1. First, we need to download a win11 image file from this site before installing it. 2. The win11 image file has undergone a large number of professional tests to ensure stable installation and smooth operation. 3. After the download is completed, load the folder in the download path and run the "windowssetup" process in it.
 MSI motherboard boot logo
May 08, 2024 pm 02:20 PM
How to cancel the MSI motherboard icon when booting 1. Press the DEL key when booting to enter the BIOS. Generally, in the "Advanced Features" item, you can find the words MSI motherboard LOGO screen. Select DISABLED, save and exit. There will no longer be this MSI motherboard LOGO screen when you turn on the computer in the future. MSI motherboard refers to the motherboard brand developed by MSI (MSI Technology Company). 2. The logo displayed when the computer is turned on is basically that of the motherboard manufacturer. You can set QUICKPOST to DISENABLE in the BIOS, so that the logo will generally no longer be displayed. It will display computer configuration-related information and give you more details. 3. First, teach you how to flash the BIOS in Windows environment. First: Go online
 How to enter bios after assembling a computer? How to enter bios when assembling a computer?
May 07, 2024 am 09:13 AM
How to enter bios after assembling a computer? Before entering the BIOS, you need to make sure that the computer is completely shut down and powered off. Here are several common ways to enter the BIOS: 1. Use shortcut keys: Most computer manufacturers will display a prompt message at startup telling you which key to press to enter the BIOS settings. Usually the F2, F10, F12 or Delete key. After pressing the appropriate keys, you should be able to see a screen with information about your computer's hardware and BIOS settings. 2. Use the button on the motherboard: Some computer motherboards have a dedicated button for entering BIOS settings. This button is usually labeled "BIOS" or "UEFI". After pressing the button you should be able to see
 5000 computer assembly host configuration? The best assembly for a 5,000 yuan budget computer?
Apr 24, 2024 am 08:22 AM
5000 computer assembly host configuration? A budget of 5,000 yuan. According to the current computer market, the configuration of an assembled computer with a budget of 5,000 yuan is already quite good. It can basically meet the needs of games and graphics. I think the following configurations are not disappointing: CPU: Ryzen R7- 3700X eight-core 16-thread radiator: Tianji Fengbingmo 120 all-in-one water-cooled RGB motherboard: MSI B550MPRO-VDHWIFI (4 memory slots) memory module: Kingston 16G\DDR4\2666 Solid state drive: Samsung 970EVOplus-500GM.2-nvme2280 graphics card: MSI GTX16504GD5VENTUSXSOC Ventus Power Supply: Antec BP500 rated 50
 How to upgrade Gigabyte motherboard to Win11_How to upgrade Gigabyte motherboard to Win11
May 06, 2024 pm 12:04 PM
1. Win11 does not have very high requirements for the motherboard. You can first download healthcheck or whynotwin11 to check whether your other hardware devices support it (you can download it from this site). 2. If other conditions are met and only tpm does not meet the requirements, you can enable tpm in the bios settings. 3. Restart the system, and then press [DEL] on the keyboard to enter the BIOS settings when the logo pops up. 4. Enter the [Settings] option and [Miscellaneous] option in sequence. 5. Find [Intel Platform Trust Technology (PTT)] below and set it to [Start]. 6. If it is an AMD platform, then


