How to install the latest Linux kernel on CentOS 7
The Linux kernel is the core of the operating system. It is responsible for managing hardware resources, providing system services, executing user programs, etc. The Linux kernel is frequently updated to fix vulnerabilities, add new features, and improve performance and compatibility. If you want to enjoy the latest Linux kernel on CentOS 7, you need to install it manually since CentOS 7 uses older stable versions by default. This article will teach you how to install the latest Linux kernel on CentOS 7 and how to switch between different kernel versions.
Step 1: Check the installed kernel version
Let's install a distribution that contains a specific version of the kernel. To display the versions currently installed on the system, we can:
# uname -sr
The following picture shows the output information on a CentOS 7 server:
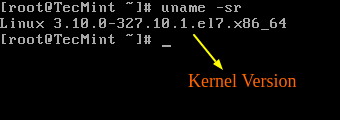
If we now go to https://www.kernel.org/, at the time of writing, we see that the latest kernel version is 4.10.1 (other versions are available from the same website).
An important thing to also consider is the lifecycle of kernel versions - if the version you are currently using is nearing the end of its lifecycle, no further bug fixes will be provided after that date. For more information, see the kernel releases page.
Step 2: Upgrade the kernel in CentOS 7
Most modern distributions provide a way to upgrade the kernel using a package management system such as yum and an officially supported repository.
However, this will only upgrade the kernel to the latest version available in the repository - not the latest version available at https://www.kernel.org/. Unfortunately, Red Hat only allows kernel upgrades using the former.
Unlike Red Hat, CentOS allows the use of ELRepo, a third-party repository that can upgrade the kernel to the latest version.
To enable the ELRepo repository on CentOS 7, run:
# rpm --import https://www.elrepo.org/RPM-GPG-KEY-elrepo.org
# rpm -Uvh http://www.elrepo.org/elrepo-release-7.0-2.el7.elrepo.noarch.rpm

After the repository is enabled, you can use the following command to list the available kernel-related packages:
# yum --disablerepo="*" --enablerepo="elrepo-kernel" list available
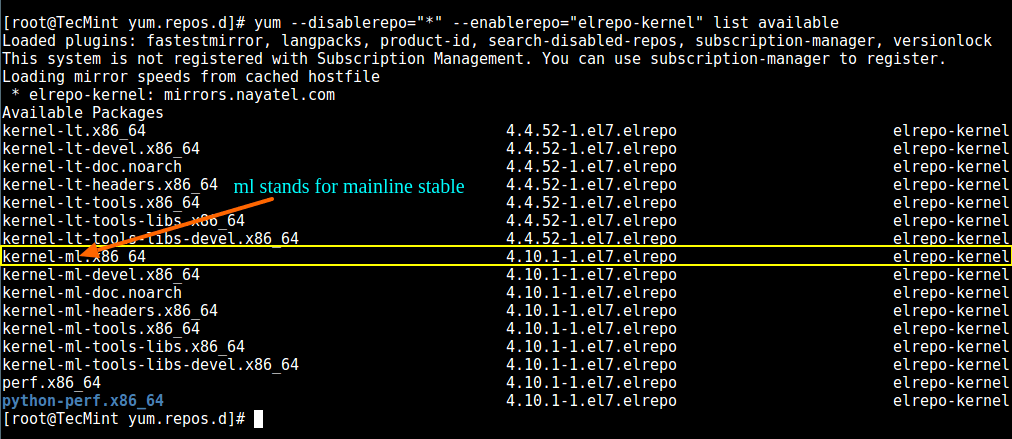
Next, install the latest mainline stable kernel:
# yum --enablerepo=elrepo-kernel install kernel-ml
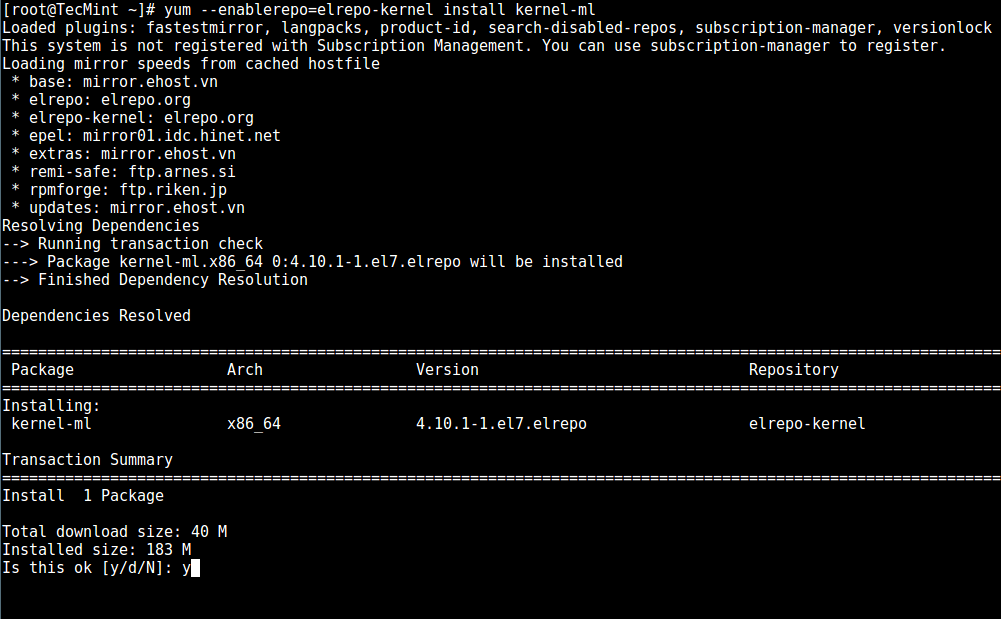
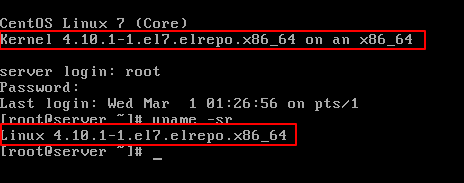
Finally, restart the machine and apply the latest kernel, then run the following command to check the latest kernel version:
uname -sr
Step 3: Set GRUB default kernel version
In order to make the newly installed kernel the default boot option, you need to modify the GRUB configuration as follows:
Open and edit /etc/default/grub and set it
GRUB_DEFAULT=0. This means that the first kernel in the GRUB initialization page will be the default kernel.
GRUB_TIMEOUT=5
GRUB_DEFAULT=0
GRUB_DISABLE_SUBMENU=true
GRUB_TERMINAL_OUTPUT="console"
GRUB_CMDLINE_LINUX="rd.lvm.lv=centos/root rd.lvm.lv=centos/swap crashkernel=auto rhgb quiet"
GRUB_DISABLE_RECOVERY="true"
Next run the following command to recreate the kernel configuration.
# grub2-mkconfig -o /boot/grub2/grub.cfg
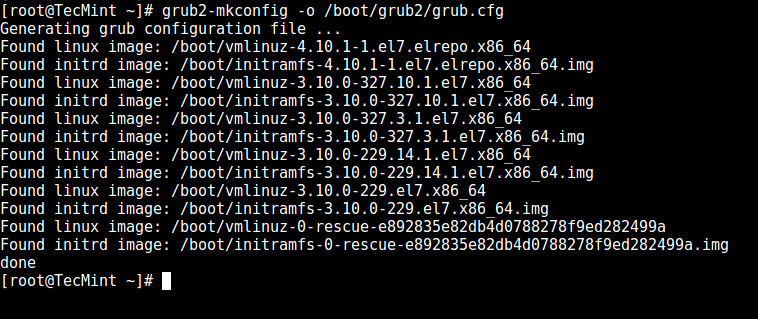
Reboot and verify that the latest kernel has been used as the default kernel.
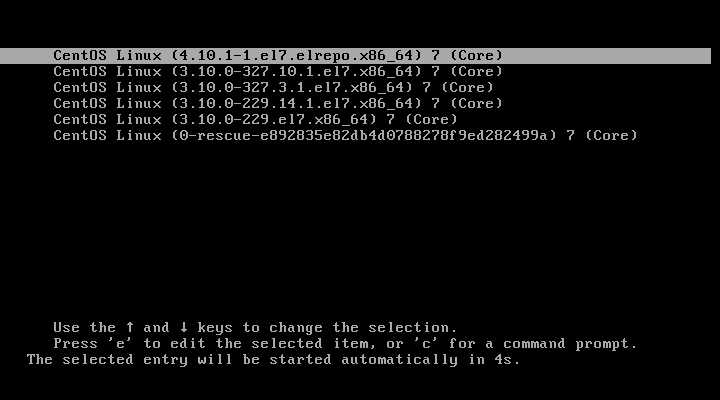
congratulations! You have upgraded the kernel in CentOS 7!
Summarize
This article describes how to install the latest Linux kernel on CentOS 7, and how to switch between different kernel versions. Through these steps, you can enjoy the latest Linux kernel on CentOS 7 and improve system security and performance. Of course, you can also choose the appropriate kernel version according to your needs, or continue to use the default stable version. No matter what, you should update your system regularly to keep it running optimally.
The above is the detailed content of How to install the latest Linux kernel on CentOS 7. For more information, please follow other related articles on the PHP Chinese website!

Hot AI Tools

Undresser.AI Undress
AI-powered app for creating realistic nude photos

AI Clothes Remover
Online AI tool for removing clothes from photos.

Undress AI Tool
Undress images for free

Clothoff.io
AI clothes remover

Video Face Swap
Swap faces in any video effortlessly with our completely free AI face swap tool!

Hot Article

Hot Tools

Notepad++7.3.1
Easy-to-use and free code editor

SublimeText3 Chinese version
Chinese version, very easy to use

Zend Studio 13.0.1
Powerful PHP integrated development environment

Dreamweaver CS6
Visual web development tools

SublimeText3 Mac version
God-level code editing software (SublimeText3)

Hot Topics
 1664
1664
 14
14
 1422
1422
 52
52
 1317
1317
 25
25
 1268
1268
 29
29
 1242
1242
 24
24
 Linux Architecture: Unveiling the 5 Basic Components
Apr 20, 2025 am 12:04 AM
The five basic components of the Linux system are: 1. Kernel, 2. System library, 3. System utilities, 4. Graphical user interface, 5. Applications. The kernel manages hardware resources, the system library provides precompiled functions, system utilities are used for system management, the GUI provides visual interaction, and applications use these components to implement functions.
 How to check the warehouse address of git
Apr 17, 2025 pm 01:54 PM
To view the Git repository address, perform the following steps: 1. Open the command line and navigate to the repository directory; 2. Run the "git remote -v" command; 3. View the repository name in the output and its corresponding address.
 How to run java code in notepad
Apr 16, 2025 pm 07:39 PM
Although Notepad cannot run Java code directly, it can be achieved by using other tools: using the command line compiler (javac) to generate a bytecode file (filename.class). Use the Java interpreter (java) to interpret bytecode, execute the code, and output the result.
 What is the main purpose of Linux?
Apr 16, 2025 am 12:19 AM
The main uses of Linux include: 1. Server operating system, 2. Embedded system, 3. Desktop operating system, 4. Development and testing environment. Linux excels in these areas, providing stability, security and efficient development tools.
 How to run sublime after writing the code
Apr 16, 2025 am 08:51 AM
There are six ways to run code in Sublime: through hotkeys, menus, build systems, command lines, set default build systems, and custom build commands, and run individual files/projects by right-clicking on projects/files. The build system availability depends on the installation of Sublime Text.
 laravel installation code
Apr 18, 2025 pm 12:30 PM
To install Laravel, follow these steps in sequence: Install Composer (for macOS/Linux and Windows) Install Laravel Installer Create a new project Start Service Access Application (URL: http://127.0.0.1:8000) Set up the database connection (if required)
 git software installation
Apr 17, 2025 am 11:57 AM
Installing Git software includes the following steps: Download the installation package and run the installation package to verify the installation configuration Git installation Git Bash (Windows only)
 How to use VSCode
Apr 15, 2025 pm 11:21 PM
Visual Studio Code (VSCode) is a cross-platform, open source and free code editor developed by Microsoft. It is known for its lightweight, scalability and support for a wide range of programming languages. To install VSCode, please visit the official website to download and run the installer. When using VSCode, you can create new projects, edit code, debug code, navigate projects, expand VSCode, and manage settings. VSCode is available for Windows, macOS, and Linux, supports multiple programming languages and provides various extensions through Marketplace. Its advantages include lightweight, scalability, extensive language support, rich features and version


