
 System Tutorial
LINUX
Ubuntu system disk partition scheme design and practical experience sharing
System Tutorial
LINUX
Ubuntu system disk partition scheme design and practical experience sharing
Ubuntu system disk partition scheme design and practical experience sharing

As an open source operating system, Ubuntu is very popular on both servers and personal computers. Disk partitioning is a very important step when installing Ubuntu. A reasonable disk partitioning scheme can improve the performance and stability of the system. At the same time, you can better manage data and files. This article will share some experience in the design and practice of Ubuntu system disk partitioning scheme, and how to partition the disk on Ubuntu 20.04.
Ubuntu 20.04 Disk Partitioning
Ubuntu 20.04 is the latest long-term support version, it introduces many new features and improvements, before doing disk partitioning, we First you need to understand some basic concepts.
1. Primary partition and extended partition:
The primary partition is the partition used to install the operating system. Each disk can have up to 4 primary partitions. The extended partition is a special primary partition. , which can be divided into multiple logical partitions.
2. File system:
The file system refers to a way that the operating system uses to organize and manage files. In Ubuntu, commonly used file systems include EXT4, NTFS and FAT32, etc.
3. Mount point:
Mount point refers to the process of associating a disk partition with a specific directory in the file system. Common mount points include / (root directory), /home (user's home directory) and /swap (swap partition), etc.
When partitioning Ubuntu 20.04 disks, the following are some commonly used solutions and practical experiences:
1. Partition scheme design:
According to actual needs and hardware configuration, you can Design different partition schemes. It is generally recommended to separate the root partition and /home partition to preserve user data when the system crashes or is reinstalled. You can also consider creating a swap partition for temporary storage when the system memory is insufficient.
2. Partition size setting:
The size of the root partition should be reasonably estimated based on the software and data required by the system, and at least 20GB of space is required. The size of the /home partition depends on the user's needs and can be adjusted according to the actual situation. The size of the swap partition should be set according to the system's memory size. It is generally recommended to set it to 1.5 times the memory size.
3. File system selection:
EXT4 is Ubuntu’s default file system, with better performance and stability. If you need to share data with Windows systems, you can choose NTFS or FAT32 files. system.
4. Mount point setting:
When installing Ubuntu, you can choose different mount points. The mount point of the root partition should be set to /, the mount point of the /home partition. It should be set to /home and the mount point of the swap partition should be set to /swap.
A reasonable disk partition scheme can improve the performance and stability of the Ubuntu system, and can also better manage data and files. On Ubuntu 20.04, we can design the disk partition according to actual needs and hardware configuration. , by setting the partition size appropriately and choosing the appropriate file system and mount point, we can create an efficient and reliable Ubuntu system.
Share a little LINUX knowledge with you:
In the Linux system, we can use the "df" command to check the disk space usage. Through the "df -h" command, we can Display the size of the disk space in a human-readable way. This command can help us understand the disk usage of the system in time for timely adjustment and optimization.
The above is the detailed content of Ubuntu system disk partition scheme design and practical experience sharing. For more information, please follow other related articles on the PHP Chinese website!

Hot AI Tools

Undresser.AI Undress
AI-powered app for creating realistic nude photos

AI Clothes Remover
Online AI tool for removing clothes from photos.

Undress AI Tool
Undress images for free

Clothoff.io
AI clothes remover

AI Hentai Generator
Generate AI Hentai for free.

Hot Article
Hot Tools

Notepad++7.3.1
Easy-to-use and free code editor

SublimeText3 Chinese version
Chinese version, very easy to use

Zend Studio 13.0.1
Powerful PHP integrated development environment

Dreamweaver CS6
Visual web development tools

SublimeText3 Mac version
God-level code editing software (SublimeText3)
Hot Topics
 1376
1376
 52
52

 win11 disk partition tutorial
Jan 10, 2024 am 08:57 AM
win11 disk partition tutorial
Jan 10, 2024 am 08:57 AM
Sometimes the system's default partition cannot meet our needs. At this time, we need to manually partition the win11 disk. We only need to open the disk manager to easily modify the partition. How to partition a win11 disk: 1. First, right-click "This Computer" and open Computer "Management" 2. Then enter "Disk Management" under the storage option on the left 3. Then check the disk status on the right to see if there is available space. (If there is free space, skip to step 6) 4. If there is no free space, right-click the disk with space and select "Compress Volume" 5. Then select the amount of space that needs to be freed and click "Compress" 6. When the compression is completed The available space will appear. Right-click it and select "New Simple Volume" 7. Then enter the desired simple volume size and click "Next Page" 8.
 Ubuntu system disk partition scheme design and practical experience sharing
Feb 12, 2024 pm 02:54 PM
Ubuntu system disk partition scheme design and practical experience sharing
Feb 12, 2024 pm 02:54 PM
As an open source operating system, Ubuntu is very popular on both servers and personal computers. Disk partitioning is a very important step when installing Ubuntu. A reasonable disk partitioning scheme can improve the performance and stability of the system, and at the same time To better manage data and files, this article will share some experience in the design and practice of Ubuntu system disk partitioning scheme, and how to partition the disk on Ubuntu20.04. Ubuntu20.04 disk partition Ubuntu20.04 is the latest long-term support version, which introduces many new features and improvements. Before doing disk partitioning, we first need to understand some basic concepts. 1. Primary partition and extended partition: The primary partition is used to install
 C++ development experience sharing: practical experience in C++ physics simulation programming
Nov 22, 2023 am 09:36 AM
C++ development experience sharing: practical experience in C++ physics simulation programming
Nov 22, 2023 am 09:36 AM
C++ development experience sharing: Practical experience in C++ physics simulation programming Summary: C++ is a powerful programming language, especially widely used in the field of physics simulation. This article will share some practical experience in C++ physics simulation programming, including experience in using C++ to write physics engines, optimize algorithms, and handle collisions, as well as some suggestions and precautions. 1. Introduction C++ is a programming language widely used in high-performance, system-level programming and embedded system development. In the field of physical simulation, C++’s own speed and efficiency
 How to partition a disk with the partition tool diskgenius - How to partition a disk with the partition tool diskgenius
Mar 06, 2024 am 10:16 AM
How to partition a disk with the partition tool diskgenius - How to partition a disk with the partition tool diskgenius
Mar 06, 2024 am 10:16 AM
I believe that all the users here are familiar with the partitioning tool diskgenius, but do you know how to partition the disk with the partitioning tool diskgenius? The following article will bring you the method of partitioning the disk with the partitioning tool diskgenius. Let us take a look below. Insert the USB boot disk into the USB interface of the computer, restart the computer, and then continue to press the corresponding computer startup shortcut key (the startup shortcut keys of different computers may be different, you can check according to the keys prompted by the computer's normal startup or the official website) . Then select the USB boot disk in the startup options and press the Enter key to confirm the selection. The steps are as above. 2. Select [02] on the u start main menu interface to run u start win8pe defense.
 How to partition on Debian 12
Mar 21, 2024 pm 10:01 PM
How to partition on Debian 12
Mar 21, 2024 pm 10:01 PM
In Debian12, there are various graphical and command line tools available for partitioning disks. This article will introduce some common tools that you can use to partition storage devices (such as hard drives/SSDs) on Debian12. These tools provide flexibility and control, allowing you to easily manage disk space according to your needs. With these tools, you can effectively divide disk space, create partitions for different purposes, and ensure the security and reliability of your data. Whether you prefer graphical interface or command line operation, Debian12 provides suitable tools to allow you to perform disk partitioning operations according to your preferences and needs. Content topic: Debian12’s common disk partitioning program uses GNOME Disk
 6 Ways to Turn on Disk Management on Windows 11
May 02, 2023 pm 04:25 PM
6 Ways to Turn on Disk Management on Windows 11
May 02, 2023 pm 04:25 PM
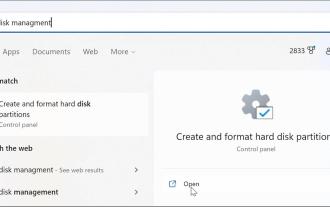
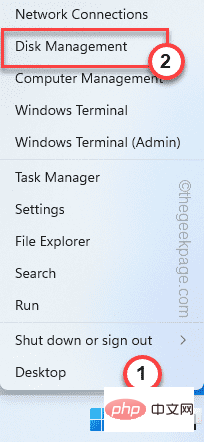
Need to quickly partition a new drive or change a drive letter on Windows 11? You need to use disk management. Here's how to launch it on a Windows 11 PC. If you want to create and resize partitions, initialize hard drives, change drive letters, etc. on Windows 11, you need to use the Disk Management tool. You can use this tool in a variety of ways, as well as open it. If you want to speed up your workflow, here are six different ways to turn on Disk Management in Windows 11. 1. Search for Disk Management To avoid clicking through menus, you can search for Disk Management and open it directly. To open Disk Management using the search bar in the Start menu, use the following steps: Click Start
![System Reserved Partition Not Showing in Disk Management [Quick Recovery]](https://img.php.cn/upload/article/000/465/014/168376632735495.jpg?x-oss-process=image/resize,m_fill,h_207,w_330) System Reserved Partition Not Showing in Disk Management [Quick Recovery]
May 11, 2023 am 08:52 AM
System Reserved Partition Not Showing in Disk Management [Quick Recovery]
May 11, 2023 am 08:52 AM
Is the system reserved partition not showing up in Disk Management on Windows 10/11 devices? The System Reserved Partition, or SRP, is a small partition on your hard drive that stores Windows startup information. If the files are deleted in some way, operating system startup problems may occur. Usually, this problem occurs if the partition size is less than 600MB. The system reserved partition is available in Disk Management because Windows does not assign a drive letter to it. Therefore, unlike other drives, it will not be visible in File Explorer. Things can get serious if you delete the system reserved partition from Disk Management. If this happens, users may be unable to update Windows to
 Fix: New SSD not showing up in Windows 11, 10
Apr 14, 2023 pm 02:52 PM
Fix: New SSD not showing up in Windows 11, 10
Apr 14, 2023 pm 02:52 PM
SSDs have revolutionized the world of technology. These data storage solutions, with their ultra-fast and unparalleled read/write speeds, make every user eager to install their system operating system in them. But what if your new SSD doesn’t show up on your Windows device? This is a typical issue you might face with a brand new SSD plugged into your system. Don't worry. We just got the right solution, all you have to do is follow these steps and your SSD will be back in your File Explorer in no time. Solution - 1. Check the SSD connection. If you are using a USB hub, connect the SSD directly to your system. Check the SSD's connectors for any physical defects.
