Fast and easy file transfer – learn about Linux TFTP
In Linux systems, we often need to transfer files. However, although file transfer can be achieved using the traditional FTP protocol, the configuration process is relatively complex and is not suitable for quick and easy file transfer. So, is there a more convenient and faster way to transfer files? The answer is yes - it is TFTP.
Did you know there's a simpler alternative to the popular file transfer protocol? It's TFTP, and here's how to set it up on Linux.
TFTP (Trivial File Transfer Protocol) was first defined in 1980. It is a fairly old protocol, published as TFTP Protocol Revision 2 in June 1981 by Karen R. Sollins in RFC 783 (Request for Comments).
In the early days, the main goal of TFTP was to send and receive files over the network. In particular, it is used to transfer files required during boot to enable the system to boot over the network.
The following describes how to set up a TFTP server on a Linux machine.
What is TFTP?
TFTP is still used for file transfer purposes, with no fundamental changes to the functionality it supports. TFTP is used to download and send files over UDP/IP. It does not have additional features such as identity and authorization controls, file listing, deletion or renaming that are common in other file transfer protocols.
Unlike the Advanced File Transfer Protocol, which uses TCP at the transport layer, it works on the UDP protocol and does not have functions such as checking whether data packets belonging to files will be sent to the other end. Because of this limitation, it is more suitable for use in a LAN rather than the Internet or WAN.
Despite all of these seemingly disadvantageous properties listed above, one aspect of the TFTP protocol that is very powerful is its simplicity. Compared to its alternatives, this protocol is very easy to implement, even for environments without an operating system. Due to this feature, it has a wide range of uses in embedded systems.
Install TFTP server on Linux
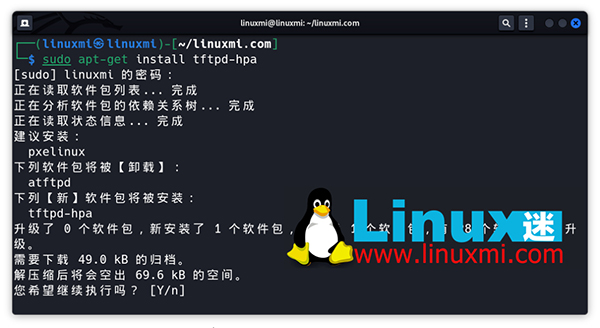
When using embedded devices, it is important to install the TFTP server service. On Linux systems, it is possible to run multiple TFTP server implementations. If you are using a Debian-based distribution, you can install the tftpd-hpa, tftpd or atftpd packages. If you are not sure which one to choose, consider installing the tftpd-hpa package.
┌──(linuxmi㉿linuxmi)-[~/linuxmi.com]
└─$ sudo apt-get install tftpd-hpa

After installation, the TFTP service will start listening on UDP port 69. To serve files to other systems via a TFTP server, you need to remember some prerequisites:
The first is to copy the required files to the TFTP home directory or a directory under that home directory, and the second is to make the file permissions visible to the public
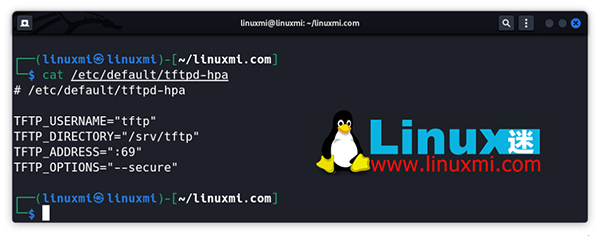
To find out what the TFTP server home directory is, you can look at the TFTP_DIRECTORY variable in the /etc/default/tftpd-hpa file. Typically, you'll see directories like /var/lib/tftpboot or /srv/tftp. If necessary, you can change this directory and restart the service.
┌──(linuxmi㉿linuxmi)-[~/linuxmi.com]
└─$ cat /etc/default/tftpd-hpa

For ease of use, if you change the owner of the relevant TFTP home directory to your user account, you do not need to add the sudo prefix to every command you run. Use the chown command to change ownership from root to the current user:
sudo chown -R $USER /srv/tftp
The TFTP server package name and default home directory may vary depending on the Linux distribution used.
Use TFTP server to send files
Sometimes there are situations where TFTP is the only option for moving files from an embedded Linux system to an external environment. For example, sometimes the system may not support any writable media that can be used to transfer files.
In this case, since the TFTP client may be compiled in busybox, you can send the files saved in the system to the TFTP server on the network.
To use the TFTP client application, issue the busybox tftp command:
busybox tftp
To send the sample file to the TFTP server, you need to use the following command:
busybox tftp -l example.bin -p 192.168.1.111
Although the above command is correct, an error will occur while transferring the file to the TFTP server. Since the error message returned is not self-explanatory, it can be difficult to understand what the real problem is.
The problem here is because of some security procedures on the TFTP server. TFTP requires that a file with the same name should be located in the directory where the file will be written, as a prerequisite for file upload, and that write permissions for the file should be available to everyone.
In other words, files that do not exist on the TFTP server cannot be uploaded through the TFTP client. If you create an empty file with the same name and edit its access permissions, the above upload process will succeed. To do this, you must run the following command in the relevant TFTP server home directory:
cd /srv/tftp
touch example.bin
chmod 666 example.bin
Now you can perform the upload successfully.
It is also possible to disable the above security measures and let the TFTP server create a file that does not exist. To do this, you can use the -c or --create parameter when starting the tftpd-hpa application. It is sufficient to add this parameter to the existing TFTPD_OPTIONS variable in the /etc/default/tftpd-hpa file:
# /etc/default/tftpd-hpa
TFTP_USERNAME="tftp"
TFTP_DIRECTORY="/srv/tftp"
TFTP_ADDRESS="0.0.0.0:69"
TFTP_OPTIONS="--secure --create"
为什么使用 TFTP 服务器进行文件传输?
TFTP 最重要的优点是速度快,并且可以帮助您节省时间。它是将网络设备的配置文件传输到其他系统的理想选择。此外,它具有非常简单的使用标准。它可以与基于 Windows 和 Linux 的操作系统上的软件一起轻松运行。最后,在技术上无法使用 FTP 的情况下,TFTP 总是可以挽救局面。
当然,最大的缺点是不安全。因此,使用 TFTP 服务器传输文件时必须非常小心。
除了文件传输之外,您不能使用 TFTP 服务器执行文件删除、编辑和修改等功能。对于那些使用或寻求高级系统的人来说,此功能是一个主要缺点。最后,它不需要身份验证,如果您认真对待自己的安全性,这是一个主要缺点。
在其他操作系统上设置 TFTP
如果要在 Windows 上使用 TFTP,则无需安装任何第三方软件。您可以使用控制面板中的打开或关闭 Windows 功能选项启用 TFTP。
本文介绍了Linux系统中TFTP(Trivial File Transfer Protocol)的使用方法和特点。与FTP相比,TFTP具有更加简单、快速、轻量级的特点,既不需要繁琐的配置,也不会占用大量的系统资源。通过学习TFTP的使用方法,我们可以实现快速简便的文件传输,提高工作效率。因此,TFTP绝对是每个Linux用户都值得了解和掌握的重要工具!
The above is the detailed content of Fast and easy file transfer – learn about Linux TFTP. For more information, please follow other related articles on the PHP Chinese website!

Hot AI Tools

Undresser.AI Undress
AI-powered app for creating realistic nude photos

AI Clothes Remover
Online AI tool for removing clothes from photos.

Undress AI Tool
Undress images for free

Clothoff.io
AI clothes remover

AI Hentai Generator
Generate AI Hentai for free.

Hot Article

Hot Tools

Notepad++7.3.1
Easy-to-use and free code editor

SublimeText3 Chinese version
Chinese version, very easy to use

Zend Studio 13.0.1
Powerful PHP integrated development environment

Dreamweaver CS6
Visual web development tools

SublimeText3 Mac version
God-level code editing software (SublimeText3)

Hot Topics
 1377
1377
 52
52
 How to solve permission issues when using python --version command in Linux terminal?
Apr 02, 2025 am 06:36 AM
Using python in Linux terminal...
 How to open web.xml
Apr 03, 2025 am 06:51 AM
To open a web.xml file, you can use the following methods: Use a text editor (such as Notepad or TextEdit) to edit commands using an integrated development environment (such as Eclipse or NetBeans) (Windows: notepad web.xml; Mac/Linux: open -a TextEdit web.xml)
 Four ways to implement multithreading in C language
Apr 03, 2025 pm 03:00 PM
Multithreading in the language can greatly improve program efficiency. There are four main ways to implement multithreading in C language: Create independent processes: Create multiple independently running processes, each process has its own memory space. Pseudo-multithreading: Create multiple execution streams in a process that share the same memory space and execute alternately. Multi-threaded library: Use multi-threaded libraries such as pthreads to create and manage threads, providing rich thread operation functions. Coroutine: A lightweight multi-threaded implementation that divides tasks into small subtasks and executes them in turn.
 Can the Python interpreter be deleted in Linux system?
Apr 02, 2025 am 07:00 AM
Regarding the problem of removing the Python interpreter that comes with Linux systems, many Linux distributions will preinstall the Python interpreter when installed, and it does not use the package manager...
 What is the Linux best used for?
Apr 03, 2025 am 12:11 AM
Linux is best used as server management, embedded systems and desktop environments. 1) In server management, Linux is used to host websites, databases, and applications, providing stability and reliability. 2) In embedded systems, Linux is widely used in smart home and automotive electronic systems because of its flexibility and stability. 3) In the desktop environment, Linux provides rich applications and efficient performance.
 How is Debian Hadoop compatibility
Apr 02, 2025 am 08:42 AM
DebianLinux is known for its stability and security and is widely used in server, development and desktop environments. While there is currently a lack of official instructions on direct compatibility with Debian and Hadoop, this article will guide you on how to deploy Hadoop on your Debian system. Debian system requirements: Before starting Hadoop configuration, please make sure that your Debian system meets the minimum operating requirements of Hadoop, which includes installing the necessary Java Runtime Environment (JRE) and Hadoop packages. Hadoop deployment steps: Download and unzip Hadoop: Download the Hadoop version you need from the official ApacheHadoop website and solve it
 Do I need to install an Oracle client when connecting to an Oracle database using Go?
Apr 02, 2025 pm 03:48 PM
Do I need to install an Oracle client when connecting to an Oracle database using Go? When developing in Go, connecting to Oracle databases is a common requirement...
 Unable to log in to mysql as root
Apr 08, 2025 pm 04:54 PM
The main reasons why you cannot log in to MySQL as root are permission problems, configuration file errors, password inconsistent, socket file problems, or firewall interception. The solution includes: check whether the bind-address parameter in the configuration file is configured correctly. Check whether the root user permissions have been modified or deleted and reset. Verify that the password is accurate, including case and special characters. Check socket file permission settings and paths. Check that the firewall blocks connections to the MySQL server.


