uStart windows8pe toolbox
For people nowadays, it is not difficult to reinstall the system, and there are many methods available online. However, for some novices, it is not easy to install a reliable system, and it is easy to get into trouble. So how can a novice reinstall the computer system more reliably and easily? The following will teach you how to reinstall the system suitable for novices.
Method/steps:
Method 1: Use the micro-pe tool to create a USB disk installation system
The specific operation can be divided into three major steps. The sequence is to make a boot disk - download the image - enter the PE installation system. The specific steps are as follows:
Make a boot disk:
1. Download and install the micro PE toolbox to the U disk (this The process will format the USB flash drive and the data on the USB flash drive will be cleared).

#2. Select [exFAT] as the format here.
Explanation: FAT32 type (a single partition cannot exceed 32G, a single file cannot exceed 4G) exFAT, NTFS type (computers with old motherboards may not recognize U disks)
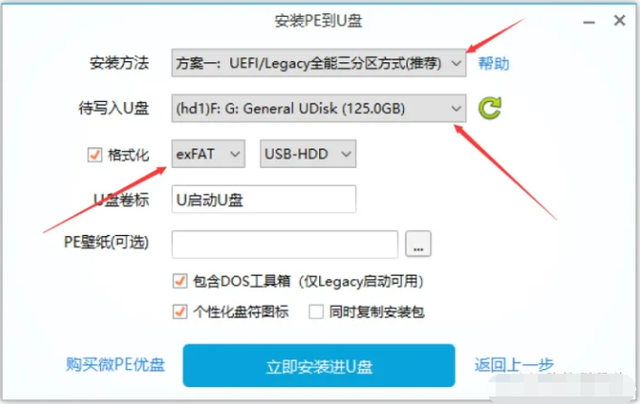
3. Wait for the installation to complete.

Download the system image and put it into the boot disk
1. After entering the MSDN website, click [Operating System] to select the system image to be installed. , copy and paste the [ed2k] download code into Thunder download.
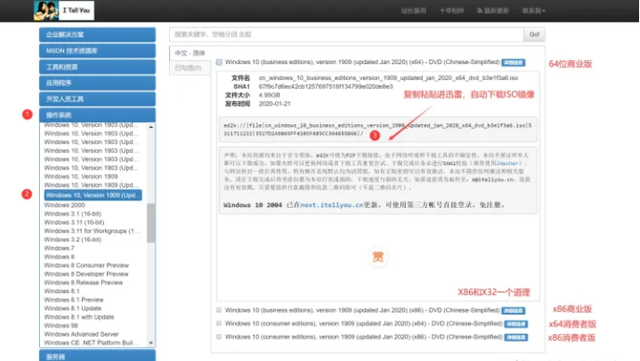
#2. Put the downloaded ISO image file into the [Boot U disk]. (It is forbidden to put it in the EFI disk)
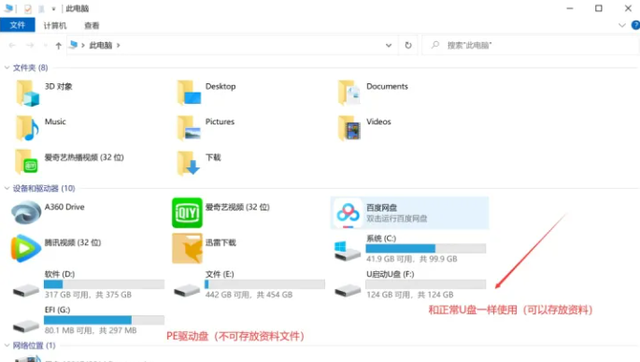
Boot into the PE system and install it
1. Insert the startup disk into the computer and restart it, and set the U disk Entering the PE system is the first startup item. (Before entering the PE system, you need to know the shortcut keys for entering the Bios interface of each motherboard)
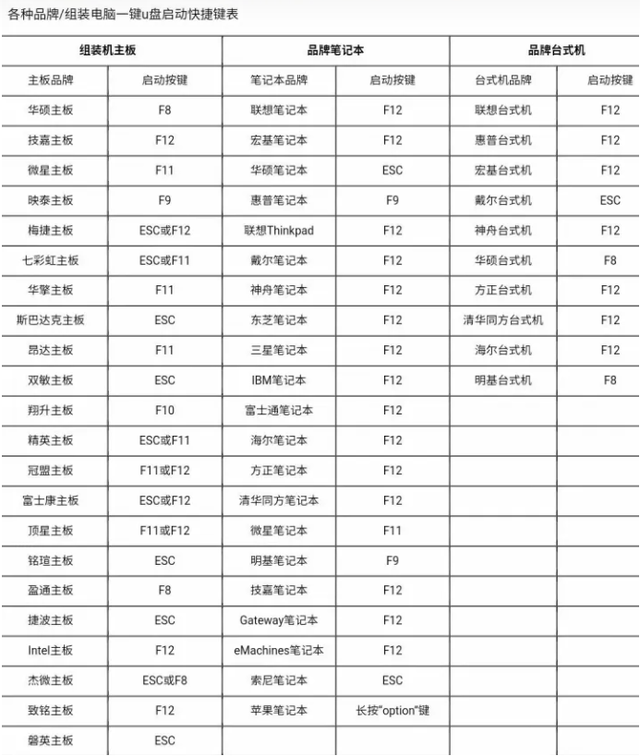
2. If it is an old motherboard, take Dell notebook as an example. Then just turn on the computer and keep pressing [F12].

#3. There is no graphical interface in the Bios of this old notebook. It is recommended to use Legacy as the boot. (The boot partition method corresponding to the boot must be correct, otherwise the computer will not be able to recognize the USB boot disk, resulting in the inability to enter the PE interface)
The boot methods are divided into Legacy and UEFI boot, follow the data storage structure in the figure below Just choose.

4. Click [Enter Set up] to enter the advanced settings and set the U disk as the first startup item. (No matter what the boot method is, Secure Boot# must be turned off, otherwise the boot disk cannot be recognized)
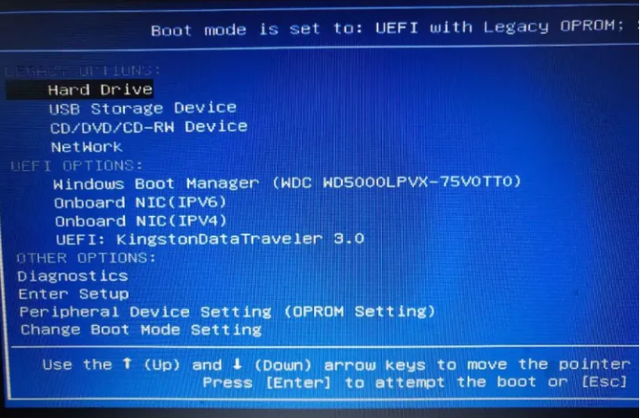
5. After setting the option of Bios to enter the PE interface , press [F10] to save the settings, and then press [ESC] to exit.
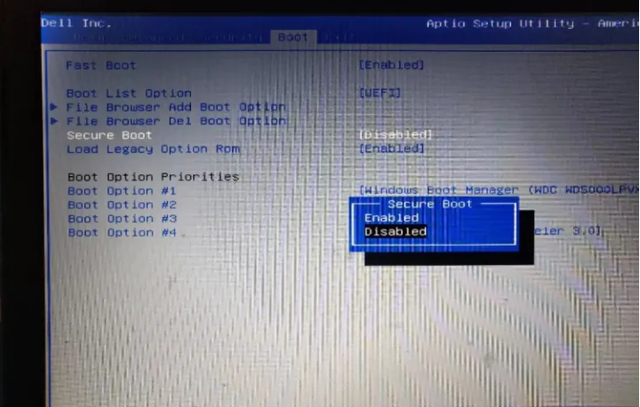
#6. In the pe system, you need to partition the disk first, open the [Partition Tool] on the desktop, and do the computer disk C/D/E/F Settings for frequently used preferences.
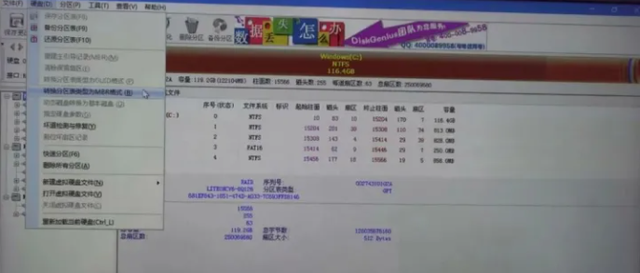
PS: The disk boot format here is the Mbr format corresponding to the data type Legacy explained by the editor above)
7. The next step is Partitioned, the details are as follows:
(1)Windows installation folder#Select the system image you just downloaded in the USB flash drive.
(2)Boot drive #(Because the notebook is set to Legacy boot, the disk type is Mbr format), select to save to the [C] drive.
If it is UEFI boot, you need to create another logical partition (esp) of about 200-300Mb.
(3) The location of the installation disk #It is the disk on the computer where the system image is installed. Generally, the default is [C] disk (system disk).
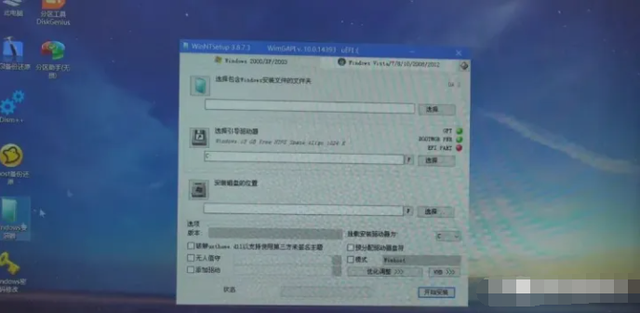
8. If the partition format for UEFI boot is GUID, then you need to create a logical partition (Esp) next to the C drive, which is about 300M or less, and then Save the boot driver to (local disk Z). Just change the step (2) just now, as shown in the figure below.
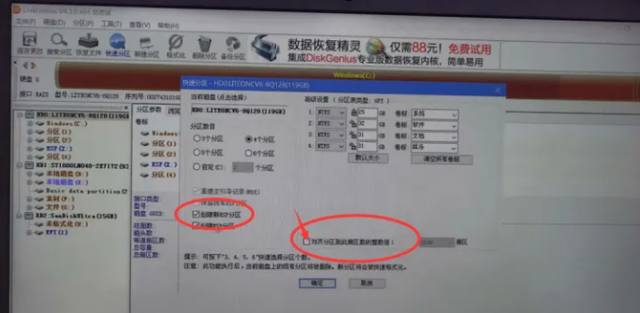
#9. Remember to align 4k sectors or 2048 (these two options are generally the default). PS: Remember to check Align Sectors, otherwise it will cause damage to the hard drive, reduce its service life, and may even cause data loss.
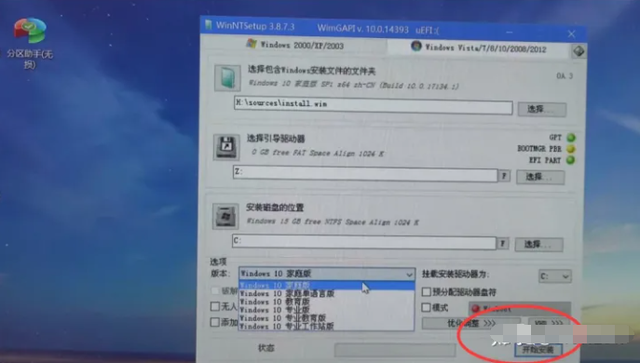
10. Выберите версию, установленную системой, нажмите [Начать установку], после чего вы сможете войти в новую систему.
Тогда давайте поговорим о том, как настроить загрузочный USB-диск для новой материнской платы UEFI? Сочетания клавиш для входа в интерфейс BIOS такие же, как и в предыдущих шагах. Просто нажмите и удерживайте соответствующую клавишу быстрого доступа. (PS: Потому что здесь была заменена только новая материнская плата) 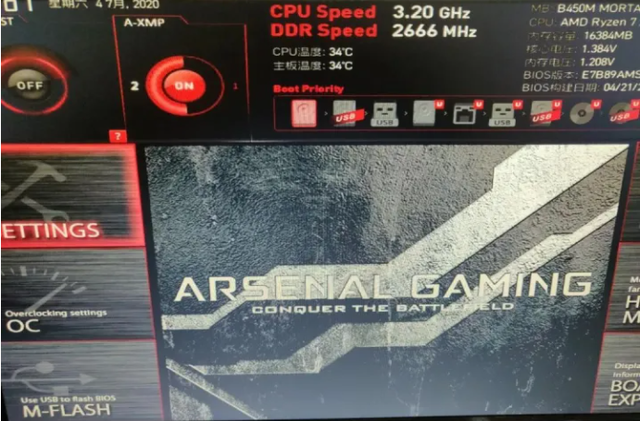
Затем нажмите [F7], чтобы войти в дополнительные настройки, и установите параметр загрузки с U-диска # 1 вперед Вот и все. (PS: Система BIOS новых материнских плат обычно устанавливает загрузку UEFI по умолчанию, и все они поддерживают графические интерфейсы. Вы также можете изменить английский на китайский, что очень интуитивно понятно) 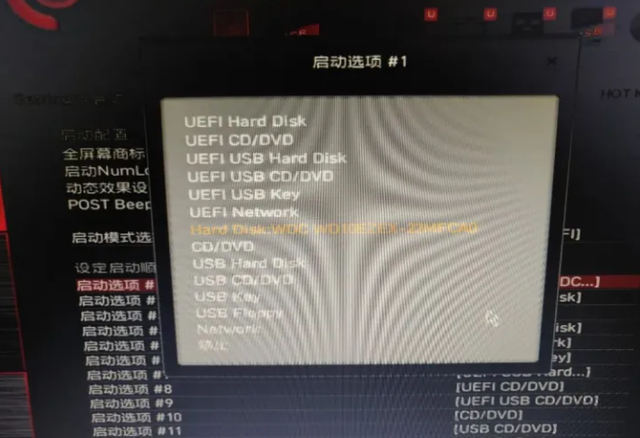
###
The above is the detailed content of uStart windows8pe toolbox. For more information, please follow other related articles on the PHP Chinese website!

Hot AI Tools

Undresser.AI Undress
AI-powered app for creating realistic nude photos

AI Clothes Remover
Online AI tool for removing clothes from photos.

Undress AI Tool
Undress images for free

Clothoff.io
AI clothes remover

AI Hentai Generator
Generate AI Hentai for free.

Hot Article

Hot Tools

Notepad++7.3.1
Easy-to-use and free code editor

SublimeText3 Chinese version
Chinese version, very easy to use

Zend Studio 13.0.1
Powerful PHP integrated development environment

Dreamweaver CS6
Visual web development tools

SublimeText3 Mac version
God-level code editing software (SublimeText3)

Hot Topics
 1377
1377
 52
52
 How to use sql datetime
Apr 09, 2025 pm 06:09 PM
The DATETIME data type is used to store high-precision date and time information, ranging from 0001-01-01 00:00:00 to 9999-12-31 23:59:59.99999999, and the syntax is DATETIME(precision), where precision specifies the accuracy after the decimal point (0-7), and the default is 3. It supports sorting, calculation, and time zone conversion functions, but needs to be aware of potential issues when converting precision, range and time zones.
 Can I retrieve the database password in Navicat?
Apr 08, 2025 pm 09:51 PM
Navicat itself does not store the database password, and can only retrieve the encrypted password. Solution: 1. Check the password manager; 2. Check Navicat's "Remember Password" function; 3. Reset the database password; 4. Contact the database administrator.
 How to view database password in Navicat for MariaDB?
Apr 08, 2025 pm 09:18 PM
Navicat for MariaDB cannot view the database password directly because the password is stored in encrypted form. To ensure the database security, there are three ways to reset your password: reset your password through Navicat and set a complex password. View the configuration file (not recommended, high risk). Use system command line tools (not recommended, you need to be proficient in command line tools).
 Navicat's method to view PostgreSQL database password
Apr 08, 2025 pm 09:57 PM
It is impossible to view PostgreSQL passwords directly from Navicat, because Navicat stores passwords encrypted for security reasons. To confirm the password, try to connect to the database; to modify the password, please use the graphical interface of psql or Navicat; for other purposes, you need to configure connection parameters in the code to avoid hard-coded passwords. To enhance security, it is recommended to use strong passwords, periodic modifications and enable multi-factor authentication.
 How to delete rows that meet certain criteria in SQL
Apr 09, 2025 pm 12:24 PM
Use the DELETE statement to delete data from the database and specify the deletion criteria through the WHERE clause. Example syntax: DELETE FROM table_name WHERE condition; Note: Back up data before performing a DELETE operation, verify statements in the test environment, use the LIMIT clause to limit the number of deleted rows, carefully check the WHERE clause to avoid misdeletion, and use indexes to optimize the deletion efficiency of large tables.
 How to add columns in PostgreSQL?
Apr 09, 2025 pm 12:36 PM
PostgreSQL The method to add columns is to use the ALTER TABLE command and consider the following details: Data type: Select the type that is suitable for the new column to store data, such as INT or VARCHAR. Default: Specify the default value of the new column through the DEFAULT keyword, avoiding the value of NULL. Constraints: Add NOT NULL, UNIQUE, or CHECK constraints as needed. Concurrent operations: Use transactions or other concurrency control mechanisms to handle lock conflicts when adding columns.
 How to recover data after SQL deletes rows
Apr 09, 2025 pm 12:21 PM
Recovering deleted rows directly from the database is usually impossible unless there is a backup or transaction rollback mechanism. Key point: Transaction rollback: Execute ROLLBACK before the transaction is committed to recover data. Backup: Regular backup of the database can be used to quickly restore data. Database snapshot: You can create a read-only copy of the database and restore the data after the data is deleted accidentally. Use DELETE statement with caution: Check the conditions carefully to avoid accidentally deleting data. Use the WHERE clause: explicitly specify the data to be deleted. Use the test environment: Test before performing a DELETE operation.
 How to roll back a database by navicat
Apr 08, 2025 pm 11:33 PM
Roll back the database in Navicat: Make sure you are connected to the database. Right-click the database name and select Rollback. Select the time point to roll back and click OK. The rollback operation affects changes made after the selected time point. The rollback operation is irreversible and may lead to data loss. It is recommended to back up the data before rollback.


