
 Software Tutorial
Computer Software
How to disable automatic updates in Edge browser? Tutorial on how to disable it
Software Tutorial
Computer Software
How to disable automatic updates in Edge browser? Tutorial on how to disable it
How to disable automatic updates in Edge browser? Tutorial on how to disable it

php editor Xiaoxin brings you a tutorial on how to disable automatic updates of the Edge browser. As a new browser launched by Microsoft, the Edge browser has many advanced features and experiences, but sometimes automatic updates may interfere with our work or user experience. In this tutorial, we’ll detail how to turn off the Edge browser’s auto-update feature, giving you the freedom to choose when to update to better suit your needs. Let’s take a look at the specific operation method!
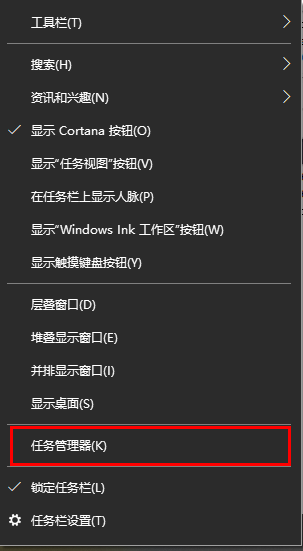
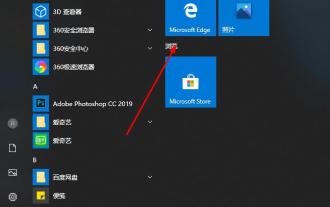
1. First, right-click [Taskbar] to open [Task Manager]
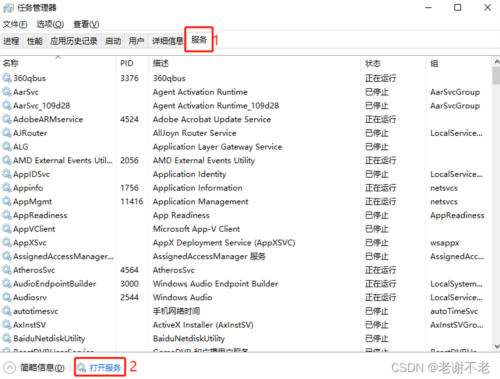
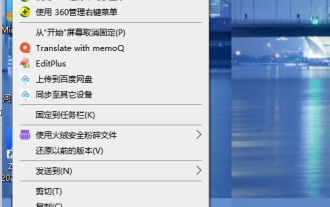
2. Find [Task Manager] above Service] to enter, click [Open Service] at the bottom
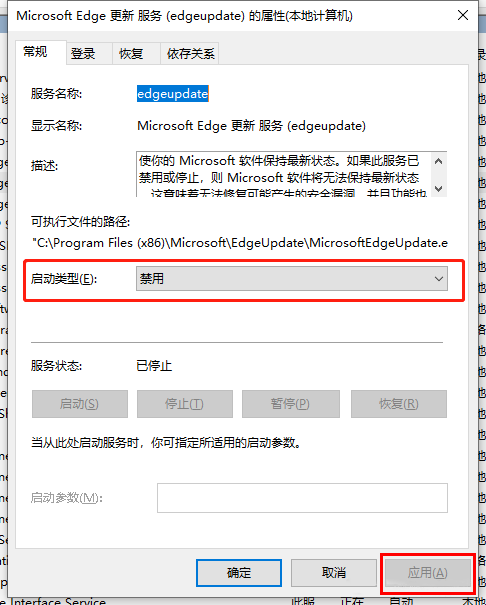
3. Find [Microsoft Edge Update Service (edgeupdate)] and [Microsoft Edge Update] in the pop-up window Service(edgeupdatem)】Two services

Fourth, right-click the mouse respectively, open [Properties], find the [Startup Type] drop-down selection in [General] [Disable], click [Apply] below after the settings are completed (remember that both services must be operated!!!)
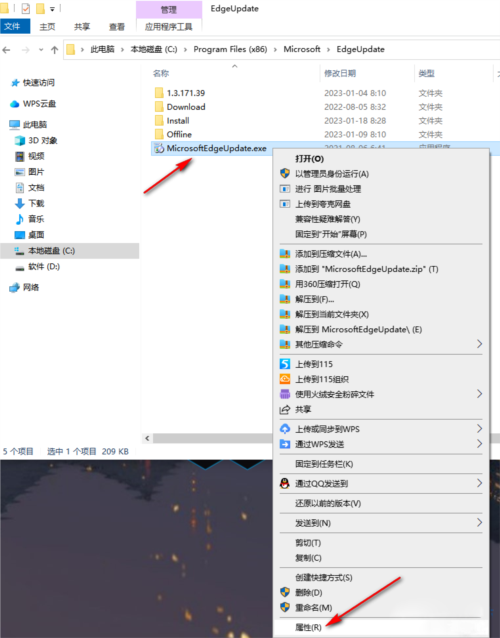
5. In the folder Enter the path [C:\Program Files (x86)\Microsoft\EdgeUpdate] and click Enter to enter, find the [MicrosoftEdgeUpdate.exe] file, right-click the file, and select [Properties]
6. After entering the window, click [Security], click [Edit]
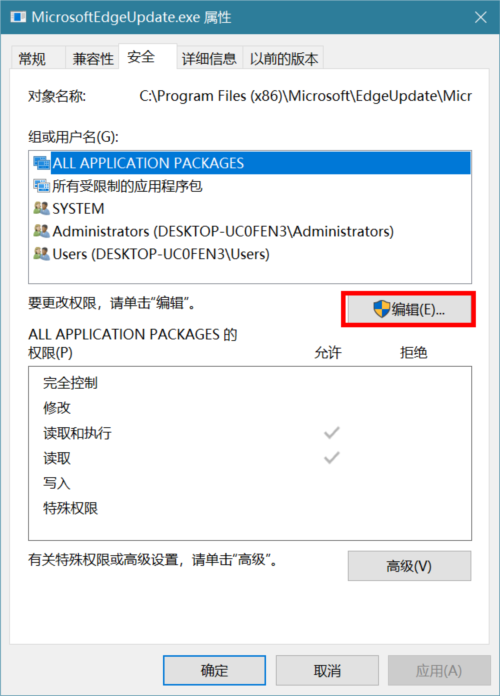
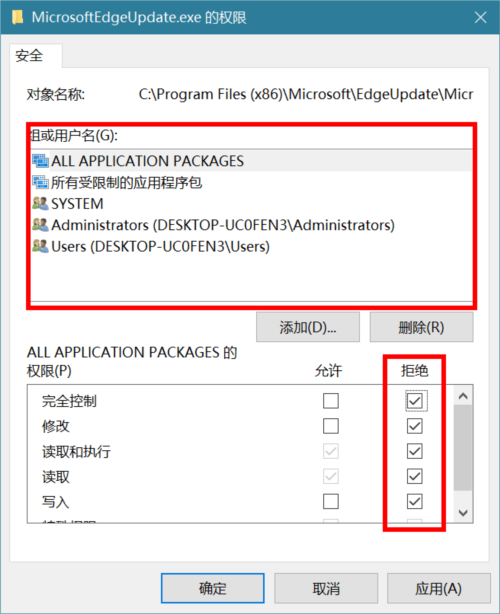
7. After entering the interface, change all The permissions of [Group or User Name] are all set to [Deny]
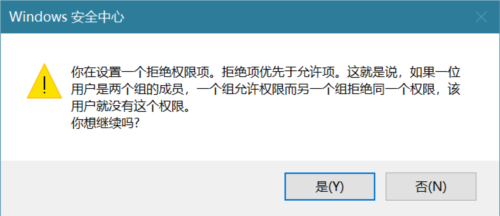
8. After clicking [OK], a security center pop-up will appear on the page. box, we click [Yes] in the pop-up box
9. Then open edge and find that the update failed and the setting was successful
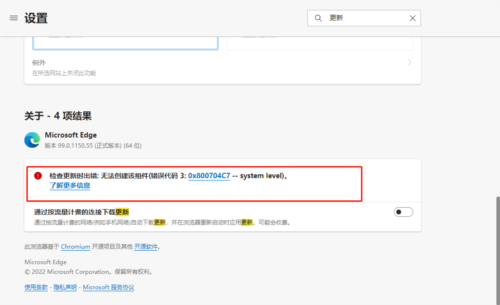
After the setting is completed, automatic updates will not occur in the future. For most users, the most important thing is that the browser is usable and stable, and frequent forced updates will only make people bored. The above are the relevant settings of the edge browser that I have brought to you. I hope it can help you.
The above is the detailed content of How to disable automatic updates in Edge browser? Tutorial on how to disable it. For more information, please follow other related articles on the PHP Chinese website!

Hot AI Tools

Undresser.AI Undress
AI-powered app for creating realistic nude photos

AI Clothes Remover
Online AI tool for removing clothes from photos.

Undress AI Tool
Undress images for free

Clothoff.io
AI clothes remover

Video Face Swap
Swap faces in any video effortlessly with our completely free AI face swap tool!

Hot Article
Hot Tools

Notepad++7.3.1
Easy-to-use and free code editor

SublimeText3 Chinese version
Chinese version, very easy to use

Zend Studio 13.0.1
Powerful PHP integrated development environment

Dreamweaver CS6
Visual web development tools

SublimeText3 Mac version
God-level code editing software (SublimeText3)
Hot Topics
 1386
1386
 52
52

 How to set up automatic refresh in Edge browser
Apr 15, 2024 pm 02:55 PM
How to set up automatic refresh in Edge browser
Apr 15, 2024 pm 02:55 PM
Some friends need the Edge browser to automatically refresh itself, so how to set up the automatic refresh of the Edge browser? Below, the editor will bring you a tutorial on setting up automatic refresh in Edge browser. Friends who need it can take a look. 1. Double-click to open the software, click the "Extension" icon in the upper toolbar, and then click "Open Microsoft Edge Add-in" in the option list below. 2. After entering the new window interface, enter "RefreshlessforMicrosoftEdge" in the search box in the upper left corner and press Enter to search. 3. Then find the program and click the "Get" button
 How does IDM extend to the browser? How to add IDM extension to browser
Apr 10, 2024 pm 04:19 PM
How does IDM extend to the browser? How to add IDM extension to browser
Apr 10, 2024 pm 04:19 PM
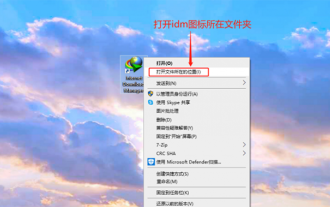
How to extend IDM to browser? In fact, generally speaking, if the user installs the IDM software in the default path, the IDM extension plug-in can be automatically installed on the default browser. However, if the plug-in cannot be installed, then you need to do it manually. Here I will introduce the browser to my friends. How to add IDM extension plug-in, I hope it will be helpful to you. Manually install the idm extension If the idm plug-in is not successfully installed in the browser due to operational errors, you can also install it manually through the following methods. Right-click the idm icon on the desktop and click "Open the location of the folder". In the installation directory of idm. Find ".crx" and ".ldq"
 How to add trusted sites in edge browser? How to set up a trusted site in edge
Apr 25, 2024 pm 05:30 PM
How to add trusted sites in edge browser? How to set up a trusted site in edge
Apr 25, 2024 pm 05:30 PM
How to add trusted sites in edge browser? When you surf the Internet, you may encounter the problem that some sites are not trusted and cannot be accessed normally. You want to know how to make the website trusted. If users can really ensure that the URL is trustworthy, then share edge with friends here How to set up a trusted site, I hope it will be helpful to everyone. How to set up a trusted site on edge 1. First, we double-click the edge browser directly on the computer desktop to enter the browser interface. 2. Click the three-dot icon button in the upper right corner of the interface and select [Internet Options] in [More Tools]. 3. After clicking to open it, we switch to the [Security] tab and click [Trusted
 How to set full screen in Edge browser How to set full screen in Edge browser
May 09, 2024 am 10:40 AM
How to set full screen in Edge browser How to set full screen in Edge browser
May 09, 2024 am 10:40 AM
1. Use the shortcut key [Win+Shift+Enter]. 2. After entering full screen, click F11 to exit. Method 2: 1. Enter the browser and click the three dots in the upper right corner. 2. Click the magnification arrow behind zoom. 3. Press F11 after entering full screen to exit.
 How to set up microsoft edge autofill_microsoft edge autofill setting tutorial
May 09, 2024 pm 01:22 PM
How to set up microsoft edge autofill_microsoft edge autofill setting tutorial
May 09, 2024 pm 01:22 PM
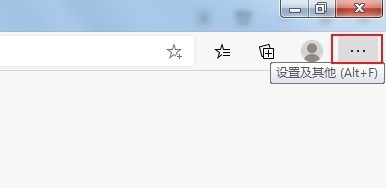
1. First open Microsoft Edge, click the [...] button, and then click the [Settings] option button. 2. Then click the [Password and Autofill] button. 3. The last step is the Microsoft Edge auto-fill setting area.
 How to enable microphone permission in Edge browser How to enable microphone permission
May 09, 2024 pm 04:40 PM
How to enable microphone permission in Edge browser How to enable microphone permission
May 09, 2024 pm 04:40 PM
1. First, click Start, right-click and select [Microsoft Edge]. 2. Then, click [More] to open [App Settings]. 3. Next, find and enter [Application Permissions]. 4. Then, find [Microphone] in the permissions below. 5. Finally, turn on the switch behind the microphone.
 How to set the Edge browser to open in full screen by default
Apr 20, 2024 pm 12:43 PM
How to set the Edge browser to open in full screen by default
Apr 20, 2024 pm 12:43 PM
Some friends want to know how to set the default full-screen opening of the Edge browser. For this reason, the editor will bring you the method of setting the default full-screen opening of the Edge browser. Friends in need can take a look. 1. Find the software icon on the desktop, right-click and select "Properties" in the option list. 2. In the window interface that opens, find the "Run Mode" column and click the drop-down button of the option box. 3. Then select "Maximize" in the option list below, and finally click "OK" to save.
 How to close the desktop search bar in Microsoft Edge browser_How to close the desktop search bar in Microsoft Edge browser
Apr 02, 2024 pm 06:46 PM
How to close the desktop search bar in Microsoft Edge browser_How to close the desktop search bar in Microsoft Edge browser
Apr 02, 2024 pm 06:46 PM
1. Double-click to enter the software and click the [...] icon button at the top of the page (as shown in the picture). 2. Then click [Settings] in the menu options below to open it (as shown in the picture). 3. In the entered interface, click the [Privacy, Search and Services] option on the left (as shown in the picture). 4. Then find the [Address Bar and Search] option under [Services] (as shown in the picture). 5. Finally, turn off the switch button on the right side of [Use the characters I type to display search and site suggestions] (as shown in the picture).
