

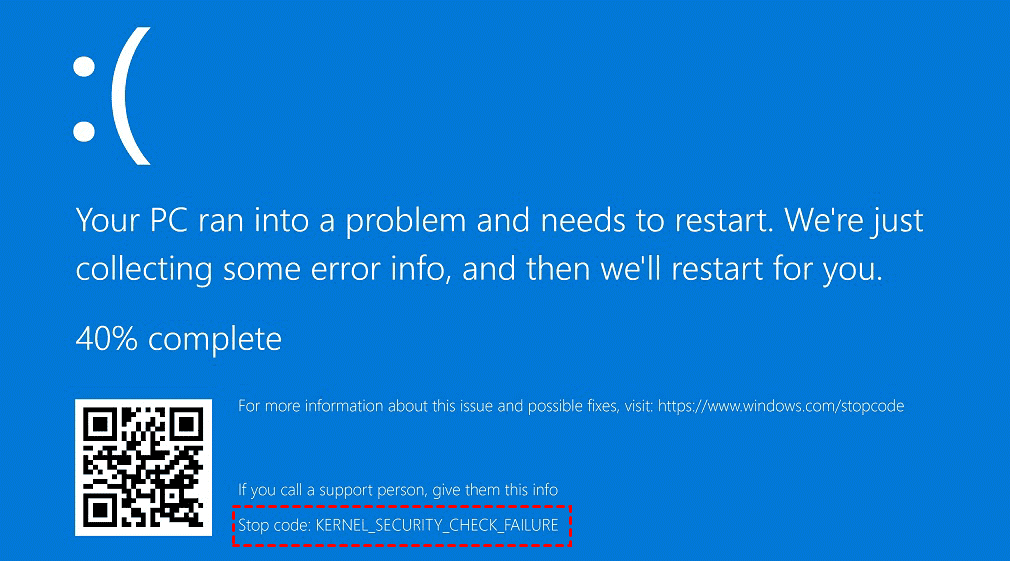
17 ways to solve the kernel_security_check_failure blue screen

php editor Yuzai brings you 17 ways to solve the kernel_security_check_failure blue screen. Blue screen errors are one of the common problems in Windows systems, causing inconvenience and trouble to users. This article will introduce you to 17 effective solutions to help you get rid of the blue screen problem easily. Whether it's by updating drivers, repairing system files, installing the latest patches, or performing hardware checks and optimizations, we'll detail the steps and considerations so you can resolve the issue quickly and safely. Follow our guide to keep your computer running smoothly and no longer suffer from blue screens.
17 solutions to the blue screen of kernel_security_check_failure
Method 1: Remove all external devices When any external device you are using is incompatible with your version of Windows , a Kernel security check failure blue screen error may occur. To do this, you need to unplug all external devices before trying to restart your computer.
Step 1. Completely shut down the computer and unplug all devices connected to the computer in sequence, including keyboards, headphones, external hard drives, etc.
Step 2. Restart the computer again to see if you still receive the blue screen message. If you don't receive a blue screen error message, connect all unplugged devices in order to confirm which device is causing the error. If you still receive a blue screen error message, the error is not caused by an external device, please move on to the next solution.
Method 2: Enable Legacy Advanced Boot According to some user feedback, enabling the legacy Advanced Boot menu can help fix the "Kernel Security Check Failed" error. Here are the detailed steps.
Step 1. Restart the computer, wait for the Windows logo to appear, long press the power button to force shut down the computer, repeat this operation 3 times, and then the system will enter the "automatic repair" state (which is what we call Windows recovery Environment), at this time you can click the "Advanced Options" button in the lower right corner of this interface.
Step 2. Click "Troubleshoot" > "Advanced Options" > "Command Prompt".
Step 3. Enter the following commands in the command prompt window, and press the Enter key once after each line of commands to execute.
C:
BCDEDIT /SET {DEFAULT} BOOTMENUPOLICY LEGACY


Step 3. Find any device that may cause the blue screen, right-click on it and select the "Uninstall device" option in the drop-down menu.
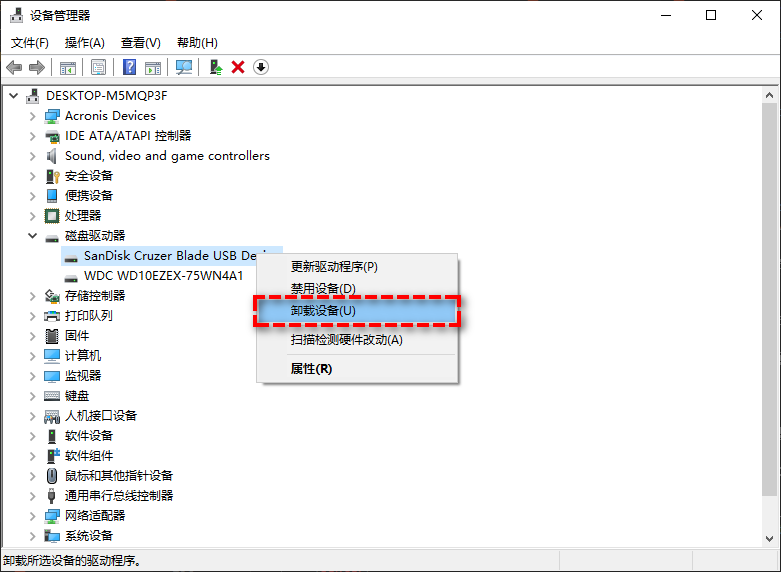
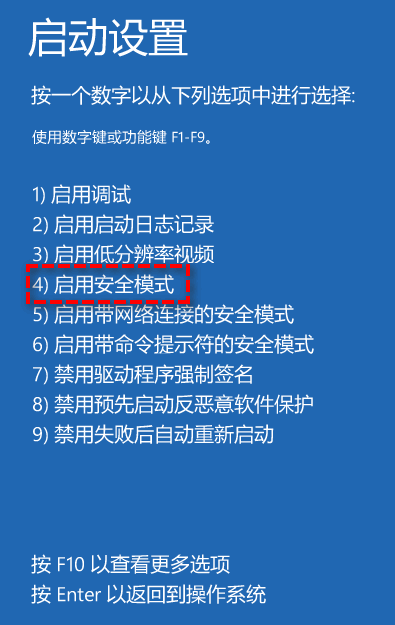
Step 4. Right-click the top computer name and select "Scan for hardware changes" in the expanded menu to reinstall the deleted driver. Exit safe mode, restart your computer and see if the Kernel security check failure blue screen issue is fixed, if not, move on to the next method.
Method 5: Windows Memory Diagnostics When your computer's memory fails, it can also cause a "Kernel security check failed" error. Therefore, you need to test your computer's memory through Windows' built-in memory diagnostic tool.
Step 1. Enter Windows safe mode in the same way, then press Win R to enter mdsched.exe and press Enter to open Windows memory diagnostics.
Step 2. Select "Restart now and check for problems" in the Windows Memory Diagnostic window.

Step 3. This tool will show if there are any hardware issues. If a memory failure is displayed, remove the memory from the motherboard and replace it with new memory, restart the computer again to check if the problem has been resolved.
Method 6: Troubleshoot disk errors When the disk is damaged, it is likely to cause the blue screen error code Kernel security check failure. Therefore, you need to check and fix the errors present on the disk.
Step 1. Enter the Windows recovery environment in the same way.
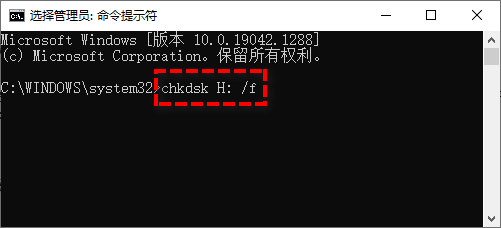
Step 2. Click "Troubleshoot" > "Advanced Options" > "Command Prompt".
Step 3. In the command prompt window, enter chkdsk H: /f and press the Enter key to execute (note that the H here refers to the disk drive letter you want to detect and repair, you can replace and change it yourself) .
Method 7: SFC Repair File System Windows System File Checker (SFC) is a utility that can help you check and repair damaged system files. Since corrupted system files are also one of the important causes of computer blue screen errors, you can use the SFC command to fix this error.
Step 1. Enter Windows safe mode in the same way, press Win S to open the search box, enter cmd and run the command prompt as an administrator.
Step 2. Enter sfc /scannow in the command prompt and press Enter. This will take some time.

#Method 8: Update and restore the system version. The outdated or advanced Windows version may have compatibility issues and cause a Kernel security check failure blue screen error in Windows. If you recently updated Windows, restore it to a previous version. If Windows has not been updated for a long time, please update it in time.
Update Windows version
Step 1. Enter Windows safe mode in the same way, press Win I to open the Windows settings interface, and click "Update and Security".
Step 2. Go to the Windows Update tab and click the "Check for Updates" option in the right panel.
Step 3. If there is an update available, the system will automatically download it. After waiting for the download to complete, restart your computer and select the "Update and Restart" option to complete the Windows update.
Rolling back the Windows version
Step 1. Enter Windows safe mode in the same way, press Win I to open the Windows settings interface, and click "Update and Security".
Step 2. Select the Recovery tab in the left panel, and then click "Start" in the Rollback to the previous Windows version area in the right panel.
Method 9: Remove Viruses and Malware Certain viruses or malware can also be the trigger for blue screen errors on your computer. Therefore, you need to scan and remove these viruses and malware.
Step 1. Enter Windows safe mode in the same way, press Win S to open the search box and enter "Windows Security Center Settings" and open it.
Step 2. Click "Virus and Threat Protection" in the Windows Security Center settings window.

Step 3. In the Current Threats section, click "Scan Options", then select "Full Scan" and click the "Scan Now" button.
Method 10: Windows Troubleshooter Windows 10 has a built-in troubleshooter that can help you solve most problems, which is also a method worth trying.
Step 1. Enter Windows safe mode in the same way, press Win I to open the Windows settings interface, and then select "Update and Security".
Step 2. Click the Troubleshooting tab in the left panel, and then click "Other Troubleshooting" in the right panel.
Step 3. Find the blue screen option on the next page, click it and select "Run Troubleshooter".
Method 11: Temporarily disable anti-virus software Sometimes, third-party anti-virus software may also prevent your Windows system from running normally, resulting in a Kernel security check failure blue screen error. To do this, you need to temporarily disable third-party antivirus software.
Step 1. Enter Windows safe mode in the same way.
Step 2. Press Ctrl Shift Esc to open the Task Manager and go to the "Startup" tab.
Step 3. Find the anti-virus application, then click the "Disable" button in the lower right corner, and then restart the computer.

Method 12: Windows System Restore If you have created a system restore point before the blue screen problem occurred, you can use the system restore method to restore the computer to the previous normal operation. time and fix the error.
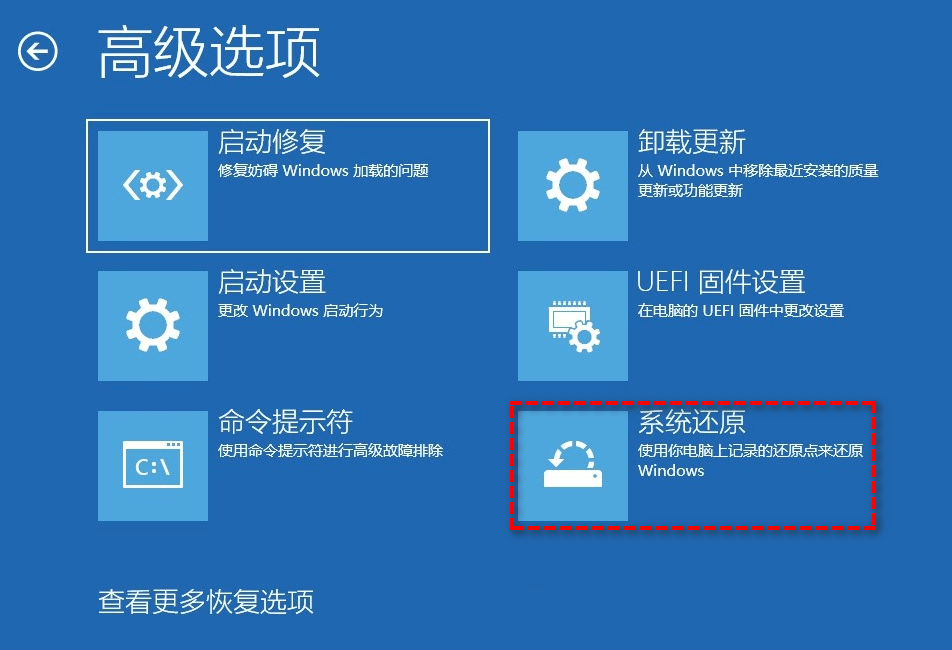
Step 1. Enter the Windows recovery environment in the same way.
Step 2. Click "Troubleshoot" > "Advanced Options" > "System Restore", then select the appropriate system restore point and follow the prompts to restore.
#Method 13: Free up disk space Insufficient disk space can cause many problems and can be the trigger for the blue screen Kernel security check failure error in your computer. To do this, you need to free up disk space. For this, you can choose to upload the data directly to an external hard drive or the cloud, or use Windows' built-in disk cleaner to free up disk space. Below we will clean up the C drive space as an example:
Step 1. Enter Windows safe mode in the same way, and then press Win E to open Windows Explorer.
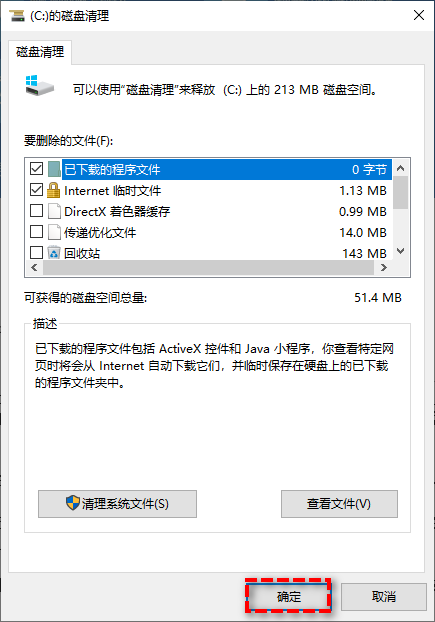
Step 2. Right-click local disk C, select "Properties" in the expanded menu and go to the "General" tab, and then click "Disk Cleanup".
Step 3. After the scan is completed, select the files you want to delete, and then click "OK" to clean up and free up disk space.
Method 14: Verify Drivers Windows has a built-in Driver Verifier Manager that tests all installed drivers and helps you identify corrupted ones. driver, which can help you fix similar blue screen errors.
Step 1. Enter Windows safe mode in the same way, then press Win S to open the search box, enter cmd and run the command prompt as an administrator.
Step 2. Enter verifier in the command prompt window and press Enter to open the driver verification program manager.
Step 3. Select "Create Standard Settings" in the Driver Verifier Manager window, and then click "Next Page".
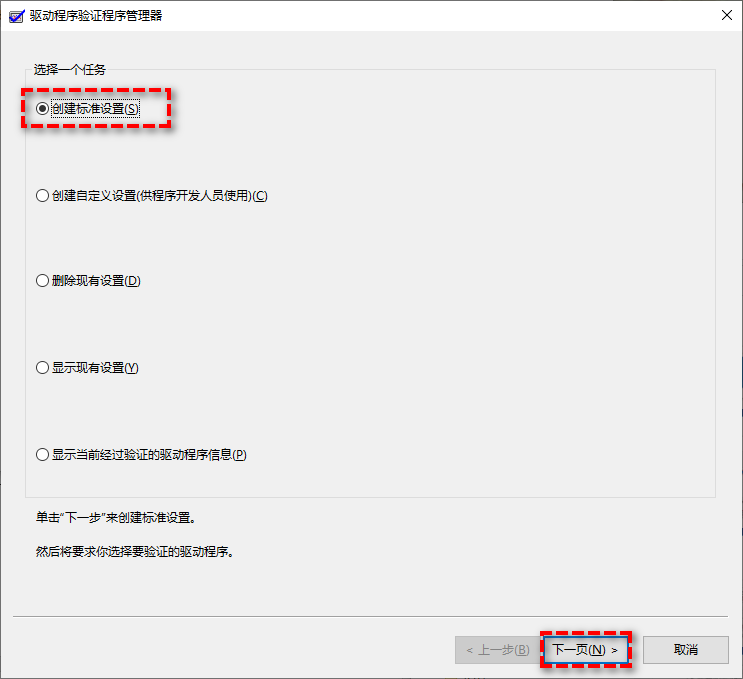
Step 4. Select "Automatically select all drivers installed on this computer" and click "Finish" to start verification.

Note: If you can determine which driver is causing the problem, you can select the "Select driver name from a list" option.
Method 15: Perform a clean boot Clean boot is also a Windows diagnostic mode, similar to Safe Mode, but you need to manually disable third-party apps and services. However, please note that this method requires you to be able to enter the Windows system normally.
Step 1. Press Win R to enter msconfig and press Enter to open the system configuration.
Step 2. Switch to the "Services" tab, select the "Hide all Microsoft services" checkbox in the lower left corner, and then click the "Disable All" button.

#Step 3. On the "Startup" tab of the system configuration, select "Open Task Manager".
Step 4. In the startup tab list, select each startup item in turn and click the "Disable" button in turn, and then close the Task Manager.
Step 5. Return to the "Startup" tab of the system configuration, and then click the "OK" button.
Method 16: View the event log file You can view the event log file to see the cause of the blue screen error code Kernel security check failure problem so that you can take measures more accurately.
Step 1. Enter Windows Safe Mode in the same way, right-click the "Start" button and select "Event Viewer" from the expanded menu.
Step 2. Click "Windows Log" > "System" in the left panel, and then you can find the error event in the system log list and view its description.

Method 17: Reinstall the system
This site provides you with two system installation methods. Local hard disk installation is the simplest installation method. It is recommended to make a U disk boot tool before using the hard disk installation. If the hard disk installation fails, or your computer cannot be turned on, is stuck at the welcome interface, cannot enter the desktop, or has a blue screen, etc., then you need to choose the U disk to reinstall the system. .
Warm reminder: When reinstalling the system, the current system disk (usually the C drive) will be formatted. Be sure to back up the data on the C drive and desktop in advance.
The above is the detailed content of 17 ways to solve the kernel_security_check_failure blue screen. For more information, please follow other related articles on the PHP Chinese website!

Hot AI Tools

Undresser.AI Undress
AI-powered app for creating realistic nude photos

AI Clothes Remover
Online AI tool for removing clothes from photos.

Undress AI Tool
Undress images for free

Clothoff.io
AI clothes remover

Video Face Swap
Swap faces in any video effortlessly with our completely free AI face swap tool!

Hot Article
Hot Tools

Notepad++7.3.1
Easy-to-use and free code editor

SublimeText3 Chinese version
Chinese version, very easy to use

Zend Studio 13.0.1
Powerful PHP integrated development environment

Dreamweaver CS6
Visual web development tools

SublimeText3 Mac version
God-level code editing software (SublimeText3)
Hot Topics


 How to connect Redmi Note13RPro to the computer?
May 09, 2024 pm 06:52 PM
How to connect Redmi Note13RPro to the computer?
May 09, 2024 pm 06:52 PM
The phone Redmi Note13RPro has been very popular recently. Many consumers have purchased this phone. However, many users are using this phone for the first time, so they don’t know how to connect the Redmi Note13RPro to the computer. In this regard, the editor is here to explain to you Detailed tutorial introduction is provided. How to connect Redmi Note13RPro to the computer? 1. Use a USB data cable to connect the Redmi phone to the USB interface of the computer. 2. Open the phone settings, click Options, and turn on USB debugging. 3. Open the device manager on your computer and find the mobile device option. 4. Right-click the mobile device, select Update Driver, and then select Automatically search for updated drivers. 5. If the computer does not automatically search for the driver,
 Laptop power on but black screen
May 09, 2024 am 09:04 AM
Laptop power on but black screen
May 09, 2024 am 09:04 AM
What should I do if the laptop power-on indicator light comes on and the screen goes black? It may be caused by poor contact. It is recommended to restart the laptop. If the problem still cannot be solved, the monitor is broken and it is recommended to go to a repair shop for repair. When the notebook is turned on, the screen is black, but there is sound entering the system, and the external monitor is still abnormal. It may be a problem with the graphics card or motherboard. Just remove and replace it. Start switch problem. Black screen when booting, no self-test. Use the meter pin to short-circuit the startup terminal on the motherboard, and it will start normally. Memory stick problem. There will be a long beep when the screen is black when the phone is turned on. Just take out the memory stick, clean it and then plug it back in. cpu problem. It is recommended to use an external monitor of the computer, which is a general desktop monitor, and connect it to the external display interface of the notebook. If a
 How to assemble an acer desktop computer?
May 08, 2024 pm 08:25 PM
How to assemble an acer desktop computer?
May 08, 2024 pm 08:25 PM
How to assemble an acer desktop computer? The assembly method of Acer desktop computer is as follows: open the case, install the power supply into the case, and tighten the screws. Install the CPU onto the motherboard, making sure the pins on the CPU are aligned with the slots on the motherboard, and tighten the screws on the CPU heat sink. Install the memory module onto the motherboard, making sure that the bumps on the memory module are aligned with the slots on the motherboard. Press down hard until you hear a "pop" sound to complete the installation. Install graphics cards, sound cards, network cards and other boards onto the motherboard, making sure the screws on the boards are tightened. Install storage devices such as hard drives and optical drives into the chassis, making sure the screws are tightened. Connect the motherboard to the chassis, including power cables, hard drive cables, optical drive cables, etc. Finally, close the chassis cover and tighten the screws to complete the assembly. exist
 What should I do if the Win11 taskbar does not display the time? Introduction to the most effective solutions
May 09, 2024 pm 01:13 PM
What should I do if the Win11 taskbar does not display the time? Introduction to the most effective solutions
May 09, 2024 pm 01:13 PM
The win11 taskbar is very unique. Many users will also adjust the transparency of the taskbar to beautify the taskbar. However, they don’t know what to do when the win11 taskbar does not display the time? Let’s take a look below! 1. Restart Windows 11: Sometimes, restarting the system can solve the taskbar display problem. 2. Check the taskbar settings: right-click an empty space on the taskbar and select "Taskbar Settings". Make sure the "Show time" option is enabled. If it's not enabled, toggle the switch to enable it. 3. Check your date and time settings: Open the Settings app, select Time & Language, then select Date & Time. Make sure the date, time and time zone are set correctly. 4. Update operating system: Make sure your Wind
 China Telecom Tiantong satellite covers Hong Kong! Xiaomi Mi 14 Ultra officially announced that it supports two-way satellite communication
May 09, 2024 am 09:01 AM
China Telecom Tiantong satellite covers Hong Kong! Xiaomi Mi 14 Ultra officially announced that it supports two-way satellite communication
May 09, 2024 am 09:01 AM
According to news on May 8, China Telecom held a launch conference for the direct-connect mobile phone satellite service in Hong Kong today, officially announcing the launch of the direct-connect mobile phone satellite service based on Tiantong Satellite System in Hong Kong. According to Xiaomi Mobile’s official WeChat account, Xiaomi Mi 14 Ultra currently supports two-way satellite communication in Hong Kong, China. Users only need to use a China Telecom or China Telecom (Hong Kong) SIM card and activate the direct connection satellite service of their mobile phones. It is worth noting that Xiaomi 14 Ultra needs to be the version sold in mainland China, and the system version must be upgraded to V1.0.9.0. Because only the version sold in the mainland of Xiaomi Mi 14 Ultra previously supported satellite communications, other versions did not support this function in hardware. Only telecom cards are supported because Tiantong satellite is operated by China Telecom. It is reported that
 What systems does oracle database support?
May 10, 2024 am 02:06 AM
What systems does oracle database support?
May 10, 2024 am 02:06 AM
Operating systems supported by Oracle Database include Unix systems (such as Linux, Solaris), Windows systems (such as Windows Server, Windows 11), z/OS, and macOS, with specific requirements varying by database version and operating system. Supported platforms include x86, x86-64, ARM, SPARC, and POWER, depending on database version and compatibility. Factors such as hardware compatibility, performance, security, usability, and budget constraints should be considered when selecting an operating system.
 Do laptop graphics card drivers need to be up to date?
May 10, 2024 am 12:54 AM
Do laptop graphics card drivers need to be up to date?
May 10, 2024 am 12:54 AM
Yes, laptop graphics card driver updates are necessary because it improves performance, resolves glitches, and supports new technologies. Update methods include: 1. Manually visit the official website of the graphics card to download and install the driver; 2. Use driver update software to automatically scan and install the latest driver. When updating, pay attention to driver compatibility and create system restore points. You need to restart the computer after updating.
 BubblePal AI companion toy for kids launches with eerily similar concept to sci-fi flick M3GAN
Aug 15, 2024 pm 12:53 PM
BubblePal AI companion toy for kids launches with eerily similar concept to sci-fi flick M3GAN
Aug 15, 2024 pm 12:53 PM
BubblePal, a newly launched AI-based interactive toy, appears to be something that could have inspired the writers of the 2022 sci-fi/horror flick M3GAN, if it hadn’t just been launched last week. Based on large language model (LLM) technology, the ‘
