
 System Tutorial
LINUX
Easily learn file packaging and compression under Linux - comprehensive understanding of the tar command
System Tutorial
LINUX
Easily learn file packaging and compression under Linux - comprehensive understanding of the tar command
Easily learn file packaging and compression under Linux - comprehensive understanding of the tar command

In Linux systems, file packaging and compression are extremely common and necessary operations, and the tar command is a powerful tool. Not only can it pack multiple files into one, but it can also compress and decompress files. For Linux newbies, it is very important to be familiar with the tar command, because it will greatly improve our work efficiency. In this article, we will fully understand how to use the tar command, so that you can easily learn file packaging and compression techniques under Linux.

In short, an archive is a single file that contains a series of files and/or directories. Archive files are typically used for transfer locally or over the Internet, or as a backup copy of a series of files and directories, allowing you to work with a single file (if compressed, its size will be smaller than the sum of all files). Likewise, archives are used for software application packaging. This single file can be easily compressed for transport, while the files in the archive retain their original structure and permissions.
We can use the tar tool to create, list and extract files in the archive. Archives produced with tar are often called "tar files", "tar archives" or "tar packages" (because all archived files are combined into one file).
This tutorial shows how to use tar to create, list, and extract the contents of an archive. All three operations use two common options -f and -v: use -f to specify the name of the archive file, and use the -v ("redundant") option to cause tar to output the file name when processing the file. Although the -v option is not required, it allows you to observe the progress of the tar operation.
In the following parts of this tutorial, 3 topics will be covered: 1. Creating an archive file; 2. Listing the contents of the archive file; 3. Extracting the contents of the archive file. Additionally we will conclude this tutorial by answering 6 practical questions about archive management. What you learn from this tutorial is critical to performing tasks related to cybersecurity and cloud technologies.
1. Create an archive file
To create an archive using tar, use the -c ("create") option, followed by the -f option to specify the name of the archive to be created. Common practice is to use a name with a .tar extension, such as my-backup.tar. Note that all commands and parameters used in the remainder of this article are in lowercase unless otherwise specifically stated. Remember, when entering the commands for this article into your terminal, you do not need to enter the $ prompt at the beginning of each command line.
Enter the name of the file to be archived as a parameter; if you want to create an archive file containing all files and their subdirectories, provide the directory name as a parameter.
To archive the contents of the project directory, enter:
$ tar -cvf project.tar project
This command will create an archive file named project.tar, containing all the contents of the project directory, while the original directory project will remain unchanged.
Use the -z option to compress the archive, which produces the same output as creating an uncompressed archive and then compressing it with gzip, but it eliminates the extra step.
To create a project.tar.gz compressed package from the project directory, enter:
$ tar -zcvf project.tar.gz project
This command will create a project.tar.gz compressed package containing all the contents of the project directory, while the original project directory will remain unchanged.
Note: When using the -z option, you should use the .tar.gz extension instead of the .tar extension to indicate compression. Although not required, it is a good practice.
gzip is not the only form of compression, there are also bzip2 and xz. When we see a file with an extension of .xz, we know that the file is compressed using xz, and a file with an extension of .bz2 is compressed using bzip2. As bzip2 is no longer maintained, we will move away from it and focus on xz. When using xz compression, it takes longer. However, the wait is usually worth it, as the compression is much better, meaning the archive is usually smaller than with other forms of compression. Even better, there's not much difference in decompressing or extracting files between different compression forms. Below we will see an example of how to use xz when compressing a file using tar:
$ tar -Jcvf project.tar.xz project
We just need to convert the -z option of gzip to the uppercase -J of xz. Here is some output showing the differences between the compressed forms: 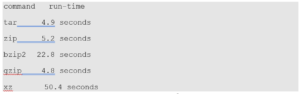
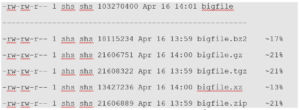
As you can see, xz takes the longest to compress. However, it does the best job of reducing file size, so it's worth the wait. The larger the file, the better the compression.
2. List the contents of archive files
To list the contents of a tar archive without extracting it, use the -t option.
To list the contents of project.tar, enter:
$ tar -tvf project.tar
这个命令列出了 project.tar 归档的内容。-v 和 -t 选项一起使用会输出每个文件的权限和修改时间,以及文件名。这与 ls 命令使用 -l 选项时使用的格式相同。
要列出 project.tar.gz 压缩包的内容,输入:
$ tar -tzvf project.tar.gz
3、从归档中提取内容
要提取(解压)tar 归档文件中的内容,使用 -x(“提取”)选项。
要提取 project.tar 归档的内容,输入:
$ tar -xvf project.tar
这个命令会将 project.tar 归档的内容提取到当前目录。
如果一个归档文件被压缩,通常来说它的扩展名为 .tar.gz 或 .tgz,请包括 “-z” 选项。
要提取 project.tar.gz 压缩包的内容,输入:
$ tar -zxvf project.tar.gz
注意: 如果当前目录中有文件或子目录与归档文件中的内容同名,那么在提取归档文件时,这些文件或子目录将被覆盖。如果你不知道归档中包含哪些文件,请考虑先查看归档文件的内容。
在提取归档内容之前列出其内容的另一个原因是,确定归档中的内容是否包含在目录中。如果没有,而当前目录中包含许多不相关的文件,那么你可能将它们与归档中提取的文件混淆。
要将文件提取到它们自己的目录中,新建一个目录,将归档文件移到该目录,然后你就可以在新目录中提取文件。
FAQ
现在我们已经学习了如何创建归档文件并列出和提取其内容,接下来我们可以继续讨论 Linux 专业人员经常被问到的 9 个实用问题。
可以在不解压缩的情况下添加内容到压缩包中吗?
很不幸,一旦文件将被压缩,就无法向其添加内容。你需要解压缩或提取其内容,然后编辑或添加内容,最后再次压缩文件。如果文件很小,这个过程不会花费很长时间,否则请等待一会。
可以在不解压缩的情况下删除归档文件中的内容吗?
这取决压缩时使用的 tar 版本。较新版本的 tar 支持 -delete 选项。
例如,假设归档文件中有 file1 和 file2,可以使用以下命令将它们从 file.tar 中删除:
$ tar -vf file.tar –delete file1 file2
删除目录 dir1:
$ tar -f file.tar –delete dir1/*
压缩和归档之间有什么区别?
查看归档和压缩之间差异最简单的方法是查看其解压大小。归档文件时,会将多个文件合并为一个。所以,如果我们归档 10 个 100kb 文件,则最终会得到一个 100kb 大小的文件。而如果压缩这些文件,则最终可能得到一个只有几 kb 或接近 100kb 的文件。
如何压缩归档文件?
如上所说,你可以使用带有 cvf 选项的 tar 命令来创建和归档文件。要压缩归档文件,有两个选择:通过压缩程序(例如 gzip)运行归档文件,或在使用 tar 命令时使用压缩选项。最常见的压缩标志 -z 表示 gzip,-j 表示 bzip,-J 表示 xz。例如:
$ gzip file.tar
或者,我们可以在使用 tar 命令时使用压缩标志,以下命令使用 gzip 标志 z:
$ tar -cvzf file.tar /some/directory
如何一次创建多个目录和/或文件的归档?
一次要归档多个文件,这种情况并不少见。一次归档多个文件和目录并不像你想的那么难,你只需要提供多个文件或目录作为 tar 的参数即可:
tar -cvzf file.tar file1 file2 file3
创建归档时如何跳过目录和/或文件?
你可能会遇到这样的情况:要归档一个目录或文件,但不是所有文件,这种情况下可以使用 –exclude 选项:
$ tar –exclude ‘/some/directory’ -cvf file.tar /home/user
在示例中,/home/user 目录中除了 /some/directory 之外都将被归档。将 –exclude 选项放在源和目标之前,并用单引号将要排除的文件或目录引起来,这一点很重要。
本文详细介绍了tar命令的使用方法和参数。通过学习,我们已经掌握了如何使用tar命令来实现文件的打包、压缩和解压缩操作。在日常工作中,熟练掌握这些技巧能够使我们更加高效地管理文件和数据,节约时间和资源。希望本文能够对您有所帮助,也希望大家能够通过实践不断提高自己的技能水平。
The above is the detailed content of Easily learn file packaging and compression under Linux - comprehensive understanding of the tar command. For more information, please follow other related articles on the PHP Chinese website!

Hot AI Tools

Undresser.AI Undress
AI-powered app for creating realistic nude photos

AI Clothes Remover
Online AI tool for removing clothes from photos.

Undress AI Tool
Undress images for free

Clothoff.io
AI clothes remover

Video Face Swap
Swap faces in any video effortlessly with our completely free AI face swap tool!

Hot Article
Hot Tools

Notepad++7.3.1
Easy-to-use and free code editor

SublimeText3 Chinese version
Chinese version, very easy to use

Zend Studio 13.0.1
Powerful PHP integrated development environment

Dreamweaver CS6
Visual web development tools

SublimeText3 Mac version
God-level code editing software (SublimeText3)
Hot Topics


 What computer configuration is required for vscode
Apr 15, 2025 pm 09:48 PM
What computer configuration is required for vscode
Apr 15, 2025 pm 09:48 PM
VS Code system requirements: Operating system: Windows 10 and above, macOS 10.12 and above, Linux distribution processor: minimum 1.6 GHz, recommended 2.0 GHz and above memory: minimum 512 MB, recommended 4 GB and above storage space: minimum 250 MB, recommended 1 GB and above other requirements: stable network connection, Xorg/Wayland (Linux)
 vscode cannot install extension
Apr 15, 2025 pm 07:18 PM
vscode cannot install extension
Apr 15, 2025 pm 07:18 PM
The reasons for the installation of VS Code extensions may be: network instability, insufficient permissions, system compatibility issues, VS Code version is too old, antivirus software or firewall interference. By checking network connections, permissions, log files, updating VS Code, disabling security software, and restarting VS Code or computers, you can gradually troubleshoot and resolve issues.
 How to run java code in notepad
Apr 16, 2025 pm 07:39 PM
How to run java code in notepad
Apr 16, 2025 pm 07:39 PM
Although Notepad cannot run Java code directly, it can be achieved by using other tools: using the command line compiler (javac) to generate a bytecode file (filename.class). Use the Java interpreter (java) to interpret bytecode, execute the code, and output the result.
 Can vscode be used for mac
Apr 15, 2025 pm 07:36 PM
Can vscode be used for mac
Apr 15, 2025 pm 07:36 PM
VS Code is available on Mac. It has powerful extensions, Git integration, terminal and debugger, and also offers a wealth of setup options. However, for particularly large projects or highly professional development, VS Code may have performance or functional limitations.
 Linux Architecture: Unveiling the 5 Basic Components
Apr 20, 2025 am 12:04 AM
Linux Architecture: Unveiling the 5 Basic Components
Apr 20, 2025 am 12:04 AM
The five basic components of the Linux system are: 1. Kernel, 2. System library, 3. System utilities, 4. Graphical user interface, 5. Applications. The kernel manages hardware resources, the system library provides precompiled functions, system utilities are used for system management, the GUI provides visual interaction, and applications use these components to implement functions.
 What is vscode What is vscode for?
Apr 15, 2025 pm 06:45 PM
What is vscode What is vscode for?
Apr 15, 2025 pm 06:45 PM
VS Code is the full name Visual Studio Code, which is a free and open source cross-platform code editor and development environment developed by Microsoft. It supports a wide range of programming languages and provides syntax highlighting, code automatic completion, code snippets and smart prompts to improve development efficiency. Through a rich extension ecosystem, users can add extensions to specific needs and languages, such as debuggers, code formatting tools, and Git integrations. VS Code also includes an intuitive debugger that helps quickly find and resolve bugs in your code.
 How to use VSCode
Apr 15, 2025 pm 11:21 PM
How to use VSCode
Apr 15, 2025 pm 11:21 PM
Visual Studio Code (VSCode) is a cross-platform, open source and free code editor developed by Microsoft. It is known for its lightweight, scalability and support for a wide range of programming languages. To install VSCode, please visit the official website to download and run the installer. When using VSCode, you can create new projects, edit code, debug code, navigate projects, expand VSCode, and manage settings. VSCode is available for Windows, macOS, and Linux, supports multiple programming languages and provides various extensions through Marketplace. Its advantages include lightweight, scalability, extensive language support, rich features and version
 How to check the warehouse address of git
Apr 17, 2025 pm 01:54 PM
How to check the warehouse address of git
Apr 17, 2025 pm 01:54 PM
To view the Git repository address, perform the following steps: 1. Open the command line and navigate to the repository directory; 2. Run the "git remote -v" command; 3. View the repository name in the output and its corresponding address.
