 Software Tutorial
 Computer Software
 How to create wrinkle effect in CorelDRAW with just a few simple steps
How to create wrinkle effect in CorelDRAW with just a few simple steps
php Xiaobian Youzi will introduce you to a method that can easily create a pleated effect in a few simple steps. CorelDRAW is a powerful graphic design software that allows you to add detail and texture to your designs to make your work more vivid with some simple techniques. In this tutorial, we'll show you how to use CorelDRAW to create a wrinkle effect to make your designs more colorful. Just follow these few simple steps and you can easily master this technique. let's start!
The specific operation methods are as follows:
1. Effect tools:
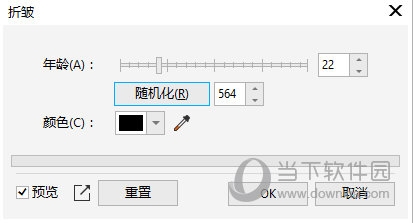
1) Open the CorelDRAW software and click [Effect]-[Shading]-[ in the menu bar. Wrinkles]

#2) Set [Age] The larger the age value, the more obvious the wrinkle effect

2. Transparency Tools:
1) Import a picture with wrinkles, such as wrinkled cloth, and adjust the size so that the wrinkle picture can cover the rendering. Click [Wrinkle Map], select [Transparency Tool], click [Uniform Transparency], select [Reduce] for the merge mode, adjust to an appropriate value, and set the transparency target to [All]

2) Select [Crop Tool] to capture the required part

3) Then click [Select Image], select the image, and press [Ctrl G] to cut the image Combination

Although the effect tool is convenient and quick to use, the wrinkle texture cannot be customized. When processing some pictures, the effect will be unnatural or even invalid. It depends on the user's own situation. , the above is the CorelDRAW related tutorial brought by the editor, I hope it can help everyone!
The above is the detailed content of How to create wrinkle effect in CorelDRAW with just a few simple steps. For more information, please follow other related articles on the PHP Chinese website!

Hot AI Tools

Undresser.AI Undress
AI-powered app for creating realistic nude photos

AI Clothes Remover
Online AI tool for removing clothes from photos.

Undress AI Tool
Undress images for free

Clothoff.io
AI clothes remover

AI Hentai Generator
Generate AI Hentai for free.

Hot Article

Hot Tools

Notepad++7.3.1
Easy-to-use and free code editor

SublimeText3 Chinese version
Chinese version, very easy to use

Zend Studio 13.0.1
Powerful PHP integrated development environment

Dreamweaver CS6
Visual web development tools

SublimeText3 Mac version
God-level code editing software (SublimeText3)

Hot Topics
 how to unlink rockstar account from steam
Mar 11, 2025 pm 07:39 PM
This article explains how to unlink a Rockstar Games Social Club account from Steam. The process involves using the Rockstar Games Launcher to manage linked accounts, removing the Steam connection without impacting game progress or future Steam purc
![[PROVEN] Steam Error e87 Fix: Get Gaming Again in Minutes!](https://img.php.cn/upload/article/202503/18/2025031817560457401.jpg?x-oss-process=image/resize,m_fill,h_207,w_330) [PROVEN] Steam Error e87 Fix: Get Gaming Again in Minutes!
Mar 18, 2025 pm 05:56 PM
[PROVEN] Steam Error e87 Fix: Get Gaming Again in Minutes!
Mar 18, 2025 pm 05:56 PM
Article discusses causes of Steam Error e87, including network issues, security software, server problems, outdated clients, and corrupted files. Offers prevention and solution strategies.[159 characters]
 why is steam downloading so slow
Mar 11, 2025 pm 07:36 PM
Slow Steam downloads stem from various factors: network congestion (home or ISP), Steam/game server issues, limited bandwidth, high latency, and computer hardware limitations. Troubleshooting involves checking internet speed, optimizing Steam settin
 Steam Error e87: What It Is & How to Fix It
Mar 18, 2025 pm 05:51 PM
Steam Error e87 occurs during Steam client updates or launches due to connection issues. Fix it by restarting devices, checking server status, changing DNS, disabling security software, clearing cache, or reinstalling Steam.
 Easy Fix: Steam Error e87 Explained & Solved
Mar 18, 2025 pm 05:53 PM
Steam Error e87, caused by connectivity issues, can be fixed without reinstalling by restarting, checking internet, and clearing cache. Adjusting Steam settings helps prevent future occurrences.
 how to add page numbers in google docs
Mar 14, 2025 pm 02:57 PM
The article details how to add, customize, start from a specific page, and remove page numbers in Google Docs using step-by-step instructions.
 How to Fix Steam Error Code e87: The ULTIMATE Guide
Mar 18, 2025 pm 05:51 PM
Article discusses fixing Steam Error Code e87, caused by network issues, corrupt files, or client problems. Provides troubleshooting steps and prevention tips.
 Steam Error e87: Why It Happens & 5 Ways to Fix It
Mar 18, 2025 pm 05:55 PM
Steam Error e87 disrupts gaming on Steam due to connectivity issues. The article discusses causes like unstable internet and server overload, and offers fixes like restarting Steam and checking for updates.


