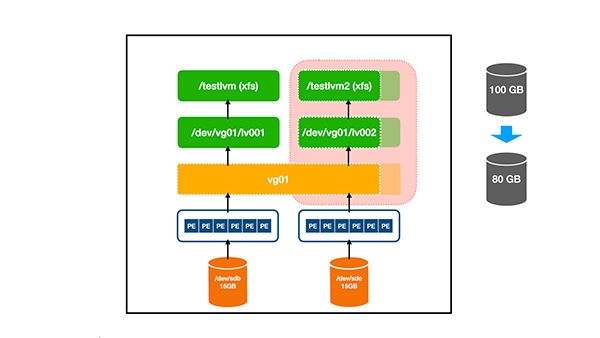
As a Linux system administrator, managing storage space is a very important task. As your business expands, managing hard drive space becomes increasingly difficult. In the case of traditional partitioning, you have to manage the entire partition, but in Linux LVM, you can set up the storage space more flexibly and easily expand or reduce it when needed.
Reducing/shrinking logical volumes poses the highest risk of data corruption. So, try to avoid this if possible, but if there is no other option, go ahead.
Before shrinking LVM, it is recommended to make a backup first. When you run out of disk space in LVM, you can make some free space on the volume group by shrinking the existing LVM that is not using all the space, rather than adding a new physical disk. Note: Shrinking is not supported on GFS2 or XFS file systems.
If you are new to Logical Volume Management (LVM), I recommend you start with our previous article.

Part 1: How to create/configure LVM (Logical Volume Management) in Linux Part 2: How to extend/increase LVM (Logical Volume Adjustment) in Linux

Reducing logical volumes involves the following steps:
Unmount the file system Check the file system for any errors Reduce the size of the file system Reduce the size of the logical volume Recheck the file system for errors (optional) Mount the file system Check the reduced file system size
For example: You have a 100GB LVM that is not using all the space, and you want to reduce it to 80GB so that 20GB can be used for other purposes.
# df -h /testlvm1

Filesystem              Size Used Avail Use% Mounted on
/dev/mapper/vg01-lv002  100G 15G  85G   12%  /testlvm1
Uninstall file system
Use the umount command to unmount the file system:
# umount /testlvm1
Check the file system for any errors
Use the e2fsck command to check the file system for errors:
# e2fsck -f /dev/mapper/vg01-lv002

e2fsck 1.42.9 (28-Dec-2013)
Pass 1: Checking inodes, blocks, and sizes
Pass 2: Checking directory structure
Pass 3: Checking directory connectivity
Pass 4: Checking reference counts
Pass 5: Checking group summary information
/dev/mapper/vg01-lv002: 13/6553600 files (0.0% non-contiguous), 12231854/26212352 blocks
Shrink the file system
The following command will shrink the testlvm1 file system from 100GB to 80GB.
Common syntax for file system resizing (resize2fs):
resize2fs [现有逻辑卷名] [新的文件系统大小]
The actual command is as follows:
# resize2fs /dev/mapper/vg01-lv002 80G

resize2fs 1.42.9 (28-Dec-2013)
Resizing the filesystem on /dev/mapper/vg01-lv002 to 28321400 (4k) blocks.
The filesystem on /dev/mapper/vg01-lv002 is now 28321400 blocks long.
Reduce logical volume (LVM) capacity
Now use the lvreduce command to reduce the size of the logical volume (LVM). With the following command, /dev/mapper/vg01-lv002 will shrink the logical volume (LVM) from 100GB to 80GB.
Common syntax for LVM reduction (lvreduce):
lvreduce [新的 LVM 大小] [现有逻辑卷名称]
The actual command is as follows:
# lvreduce -L 80G /dev/mapper/vg01-lv002

WARNING: Reducing active logical volume to 80.00 GiB
THIS MAY DESTROY YOUR DATA (filesystem etc.)
Do you really want to reduce lv002? [y/n]: y
Reducing logical volume lv002 to 80.00 GiB
Logical volume lv002 successfully resized
Optional: Check the file system for errors
Check the file system again for errors after shrinking LVM:
# e2fsck -f /dev/mapper/vg01-lv002

e2fsck 1.42.9 (28-Dec-2013)
Pass 1: Checking inodes, blocks, and sizes
Pass 2: Checking directory structure
Pass 3: Checking directory connectivity
Pass 4: Checking reference counts
Pass 5: Checking group summary information
/dev/mapper/vg01-lv002: 13/4853600 files (0.0% non-contiguous), 1023185/2021235 blocks
Mount the file system and check the reduced size
Finally mount the file system and check the reduced file system size.
Use the mount command to mount a logical volume:
# mount /testlvm1
Use the df command to check the mounted volume.
# df -h /testlvm1

Filesystem              Size Used Avail Use% Mounted on
/dev/mapper/vg01-lv002  80G  15G  65G   18%  /testlvm1
Through the introduction of this article, I believe you have mastered the skills on how to reduce Linux LVM storage space. Not only does it help you manage storage space more efficiently, it also allows you to respond to changing needs more flexibly. Whether you are an experienced system administrator or a beginner, reducing storage space in Linux LVM is a skill that must be mastered, which can bring more convenience and efficiency to your work.
The above is the detailed content of Streamline storage space and easily manage Linux LVM. For more information, please follow other related articles on the PHP Chinese website!


