

Lenovo bios cannot boot from USB disk

php editor Youzi will introduce to you the problem that Lenovo computer bios cannot start the U disk. When using Lenovo computers, we sometimes encounter situations where it cannot be booted through a USB flash drive, which brings inconvenience to our work and life. But, don’t worry, there are some simple things we can do to fix this problem. Next, we will explain in detail the reasons why Lenovo computer bios cannot boot the USB flash drive and the solutions. Let’s take a look!
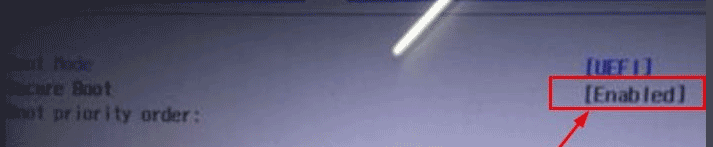
1: Generally, when you turn on a Lenovo machine, you press F12 to enter the bios. When entering the bios, we use the cursor to move to the Security option, which means security. Then use the arrow keys to move the cursor to the Security Boot option, which means safe boot. Then press the Enter key on your keyboard. 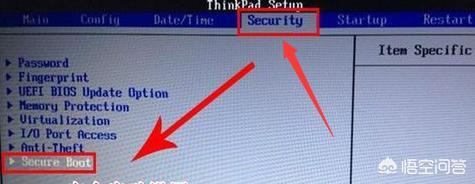
2: Then select the Secure Boot option, press the Enter key on the keyboard, then select Disabled to close this item, and press the Enter key on the keyboard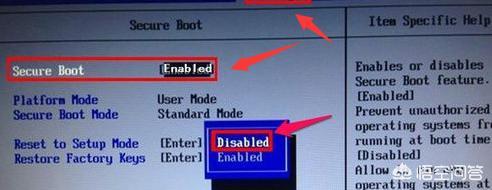
3: Then select the Startup option again, first select the UEFI/Legacy Boot option, which means the new UEFI and traditional startup methods. Now it shows the UEFI Only single UEFI mode. We At this moment, select the compatibility mode, which means it is compatible with the traditional BIOS mode, so press Enter to enter, select the Both item, and press the Enter key on the keyboard to confirm. 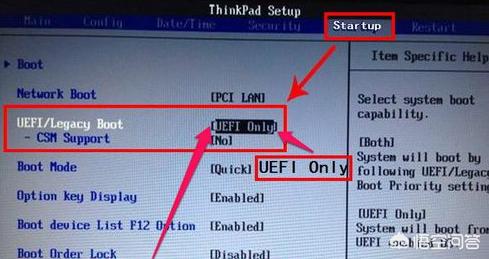
4: Then select the UEFI/Legacy Boot Priority option to enter, then press Enter to select the Legacy First option, which means that the traditional boot mode is listed first, and then press the keyboard Enter key. Confirm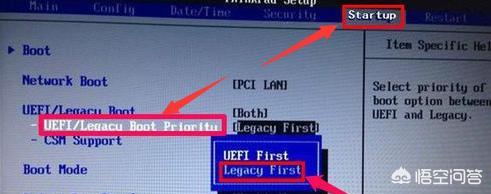
First, restart the computer and press the F12 key to enter the startup options. Then, select the boot device in the BOOT option and press the Enter key to confirm the selection. Please note that some computers may have the F12 key disabled, so you need to enable it in the BIOS settings. After making sure the F12 key is set to enabled, save the settings and restart the computer.
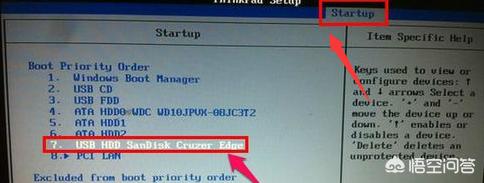
#After setting the startup item, select the U disk startup item, usually USB HDD SanDisk Cruzer Edge. Then use your keyboard's plus and minus keys to move the option to the top and press Enter to confirm. Please note that depending on the BIOS version and model of your computer, the options displayed may be different. If you want to boot from a USB flash drive, select the USB-HDD option. If you want to boot from a disc, select the ATAPI CD0 HL-DT-ST DVDRAM GU70M option. If you want to return to hard disk booting, select the ATA HDD0 HGST HT3541010A9E600 option. Again, use the plus and minus keys to move them to the top and press Enter to confirm.
#7: Then press F10 to save and exit. Restart the computer to enter the U disk or CD to install the system.
In addition, some additional information needs to be added. On some computers, you press the DEL key to enter the BIOS, while on others you press the F12 key. After entering the BIOS, find the "Restart" option and change its "OS Optimized Defaults" (that is, the default settings for operating system optimization) to "Disabled" to turn off this function. Next, enter the "Startup" option, set "UEFI/Legacy Boot" to "Legacy First", and then press the F10 key to save the settings. After exiting the BIOS, you can use the USB boot disk to start the computer.
The problem is the hard disk mode, because some older systems, including a large part of XP systems, do not have SATA drives in their systems, so they are using an old-fashioned Ghost or PE When installing the system (old PEs do not come with SATA drivers, and most new PEs come with SATA drivers), the hard disk will not be found. The general problem is that the hard disk mode setting in the BIOS is incorrect. To correctly set the hard disk mode, first enter the Configuration item and change its mode from AHCI to Compatible (compatibility mode), so that the hard disk can be displayed in PE. After installing the system, change back to AHCI. Why should you change back? Because AHCI hard disk mode has better performance and faster speed.
I hope my answer is useful to you!
The above is the detailed content of Lenovo bios cannot boot from USB disk. For more information, please follow other related articles on the PHP Chinese website!

Hot AI Tools

Undresser.AI Undress
AI-powered app for creating realistic nude photos

AI Clothes Remover
Online AI tool for removing clothes from photos.

Undress AI Tool
Undress images for free

Clothoff.io
AI clothes remover

AI Hentai Generator
Generate AI Hentai for free.

Hot Article
Hot Tools

Notepad++7.3.1
Easy-to-use and free code editor

SublimeText3 Chinese version
Chinese version, very easy to use

Zend Studio 13.0.1
Powerful PHP integrated development environment

Dreamweaver CS6
Visual web development tools

SublimeText3 Mac version
God-level code editing software (SublimeText3)
Hot Topics
 1378
1378
 52
52

 Ventoy secure boot settingsSecure Boot
Jun 18, 2024 pm 09:00 PM
Ventoy secure boot settingsSecure Boot
Jun 18, 2024 pm 09:00 PM
Ventoy is a USB boot tool that can directly boot ISO/WIM/IMG/VHD(x)/EFI and other types of files in the USB flash drive. It is very easy to use. Laptops have secure boot turned on by default. If they are not turned off or cannot be turned off, they cannot be booted from a USB device. Ventoy also supports secure boot. The principle is to inject a GRUB installation certificate into the current computer. As long as your computer After being injected once, any USB disk PE booted based on grub can pass. The official description of Ventoy is a GIF image. The playback speed is too fast and you may not be able to remember it. The editor has divided the GIF image to make it easier to understand. Ventoy secure boot has EnrollKey and Enro
 Acer laptop disables secure boot and removes password in Bios
Jun 19, 2024 am 06:49 AM
Acer laptop disables secure boot and removes password in Bios
Jun 19, 2024 am 06:49 AM
I repaired an Acer laptop and had to turn off secure boot when entering PE. I recorded how to turn off secure boot and remove the password from Bios. Turn on the computer and when the screen is not on, keep pressing the F2 key to enter the BIOS. On Acer laptops, turn off Secure Boot and press the arrow keys to switch to Boot. If SecureBoot is gray and unclickable, switch to the Security page, select SetSupervisorPassword and press Enter to set the password. Then switch to Boot, SecureBoot can be selected as Disabled, and press F10 to save. Modify and clear the BIOS password on your Acer notebook. Switch to the Security menu and select SetSupervisorPasswo.
 The all-round center for learning and entertainment - new Lenovo Xiaoxin Pad Pro 12.7 Comfort Edition hands-on experience
Aug 05, 2024 pm 04:28 PM
The all-round center for learning and entertainment - new Lenovo Xiaoxin Pad Pro 12.7 Comfort Edition hands-on experience
Aug 05, 2024 pm 04:28 PM
Thanks to netizen Nobilta for submitting the clue! Today, with the rapid development of smart hardware, when we think about prioritizing productivity, notebooks must be a topic that cannot be avoided. However, as the performance of the Arm architecture becomes more and more powerful, tablets between mobile phones and notebooks have gradually become one of the productivity choices for more people. As an old giant, Lenovo undoubtedly firmly occupies a dominant position in the PC field. Can the just-launched Lenovo tablet Xiaoxin PadPro 2025 shoulder the "glory of the big brother" and become an important part of Lenovo's ecology and serve as the "student party"? ”, a productivity tool for “beating workers”? Let’s experience it together. Unboxing & Appearance: This time I received Lenovo Xiaoxin PadPro 12.7 (second generation) Comfort Edition +
 The system has posted in safe mode ASUS motherboard
Jun 19, 2024 am 07:35 AM
The system has posted in safe mode ASUS motherboard
Jun 19, 2024 am 07:35 AM
After the computer is turned on, it prompts The system has posted in safe mode. You can set it in the BIOS to ignore the F1 error. Although it does not prompt, it directly enters the BIOS when it is turned on. Sometimes F1 is useless every time it is turned on. Then you need to restart the BIOS, and then exit the BIOS to enter the system. . thesystemhaspostedinsafemode=The system is in safe mode. This problem is relatively common on ASUS motherboards. As long as you turn off the XMP of the memory and adjust the memory frequency back to normal, you can boot normally without the thesystemhaspostedinsafemode error. Updating the latest motherboard BIOS should be OK.
 Huawei mobile phone USB sharing network to computer
May 08, 2024 am 08:25 AM
Huawei mobile phone USB sharing network to computer
May 08, 2024 am 08:25 AM
How to connect a Huawei phone to a computer via USB to access the Internet. First, we open the phone settings and search for "HDB". Then we click to open "Mobile Network Sharing" in More. Then we can click to open "USB Sharing Network" in the pop-up window. Summary First, connect the Huawei mobile phone to the computer through the data cable. Open "Settings" on your phone and enter the settings interface. Click "Personal Hotspot", select "USB tethering" and click the switch button at the back to turn it on. First click "Settings About Phone", then click "Version Number" 7 times in succession. You will be prompted to enter developer mode. Then return to the "Settings" list, "Developer Options" will appear, then click to enter "Developer Options", turn on the "USB Debugging" switch, and click
 MSI motherboard boot logo
May 08, 2024 pm 02:20 PM
MSI motherboard boot logo
May 08, 2024 pm 02:20 PM
How to cancel the MSI motherboard icon when booting 1. Press the DEL key when booting to enter the BIOS. Generally, in the "Advanced Features" item, you can find the words MSI motherboard LOGO screen. Select DISABLED, save and exit. There will no longer be this MSI motherboard LOGO screen when you turn on the computer in the future. MSI motherboard refers to the motherboard brand developed by MSI (MSI Technology Company). 2. The logo displayed when the computer is turned on is basically that of the motherboard manufacturer. You can set QUICKPOST to DISENABLE in the BIOS, so that the logo will generally no longer be displayed. It will display computer configuration-related information and give you more details. 3. First, teach you how to flash the BIOS in Windows environment. First: Go online
 ASUS releases BIOS update for Z790 motherboards to alleviate instability issues with Intel's 13th/14th generation Core processors
Aug 09, 2024 am 12:47 AM
ASUS releases BIOS update for Z790 motherboards to alleviate instability issues with Intel's 13th/14th generation Core processors
Aug 09, 2024 am 12:47 AM
According to news from this website on August 8, MSI and ASUS today launched a beta version of BIOS containing the 0x129 microcode update for some Z790 motherboards in response to the instability issues in Intel Core 13th and 14th generation desktop processors. ASUS's first batch of motherboards to provide BIOS updates include: ROGMAXIMUSZ790HEROBetaBios2503ROGMAXIMUSZ790DARKHEROBetaBios1503ROGMAXIMUSZ790HEROBTFBetaBios1503ROGMAXIMUSZ790HEROEVA-02 joint version BetaBios2503ROGMAXIMUSZ790A
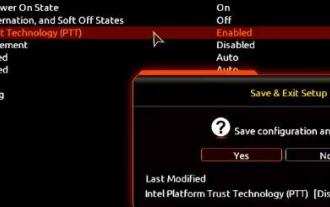 How to enable tpm2.0 in win11_How to enable tpm2.0 in win11
May 08, 2024 pm 06:10 PM
How to enable tpm2.0 in win11_How to enable tpm2.0 in win11
May 08, 2024 pm 06:10 PM
1. Gigabyte motherboard 1. First, we restart the computer and use the keyboard [DEL] to enter the BIOS settings when restarting. 2. Find and enter the [Settings] tab above. 3. Then find and enter [Miscellaneous] under settings. 4. Set [Intel Platform Trust Technology (PTT)] to [Enabled]. 5. After the settings are completed, use the keyboard [F10] to save, and then click [YES] to exit. 2. ASUS motherboard 1. First restart the computer and continuously tap [del] on the keyboard to enter the bios settings when booting. 2. Click [AdvancedMode] or press [F7] to find [A
