

Introduction to the Linux input subsystem

The Linux input subsystem is a set of drivers that supports all input devices on the Linux system, including keyboards, mice, touch screens, tablets, game controllers, etc. The core of the input subsystem is the input module, which is responsible for passing events between the two types of modules:
- Device driver modules: These modules communicate with the hardware (e.g. via USB) and provide events (key presses, mouse movements, etc.) to the input module.
- Event handling modules: These modules get events from the input module and pass them to where they are needed (e.g. kernel, GPM, X, etc.) through various interfaces.
In this article, we will introduce the basic concepts and structure of the Linux input subsystem, as well as some commonly used commands and tools. We'll be using Ubuntu 20.04 as the example system, but the content applies to other Linux distributions as well.
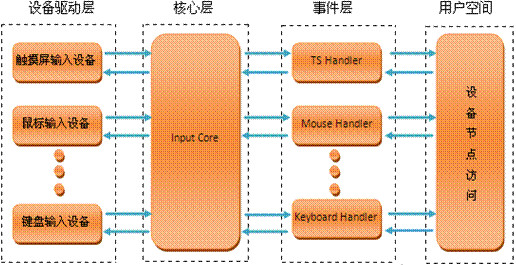
Driver layer
Convert the underlying hardware input into a unified event form and report it to the Input Core.
Input subsystem core layer
It provides the driver layer with input device registration and operation interfaces, such as: input_register_device; notifies the event processing layer to process the event; generates corresponding device information under /Proc.
Event processing layer
Mainly interacts with user space (in Linux, all devices are treated as files in user space, because the fops interface is provided in general drivers, and the corresponding device file nod is generated under /dev , these operations are completed by the event processing layer in the input subsystem).
Device Description
The input_dev structure is to implement the core work of the device driver: reporting key presses, touch screens and other input events (events, described through the input_event structure) to the system, and no longer need to care about the file operation interface. The driver reports events to the user space through inputCore and Eventhandler.
Register input device function:
int input_register_device(struct input_dev *dev)
Unregister input device function:
void input_unregister_device(struct input_dev *dev)
Driver implementation - initialization (event support) set_bit() tells the input input subsystem which events and which keys are supported. For example:
set_bit(EV_KEY,button_dev.evbit) (其中button_dev是struct input_dev类型)
There are two members in struct input_dev****:
**1)** evbit event type (including EV_RST, EV_REL, EV_MSC, EV_KEY, EV_ABS, EV_REP, etc.).
**2)**keybit key type (including BTN_LEFT, BTN_0, BTN_1, BTN_MIDDLE, etc. when the event type is EV_KEY).
Driver implementation - reporting events The functions used to report EV_KEY, EV_REL, EV_ABS events are:
void input_report_key(struct input_dev *dev,unsigned int code,int value)
void input_report_rel(struct input_dev *dev,unsigned int code,int value)
void input_report_abs(struct input_dev *dev,unsigned int code,int value)
Driver implementation - report end input_sync() synchronization is used to tell the input core subsystem that the report has ended. In the touch screen device driver, the entire reporting process of one click is as follows:
input_reprot_abs(input_dev,ABS_X,x);   //x坐标
input_reprot_abs(input_dev,ABS_Y,y);   // y坐标
input_reprot_abs(input_dev,ABS_PRESSURE,1);
input_sync(input_dev);//同步结束
Example analysis (key interrupt program):
//按键初始化
static int __init button_init(void)
{//申请中断
    if(request_irq(BUTTON_IRQ,button_interrupt,0,”button”,NUll))
        return –EBUSY;
    set_bit(EV_KEY,button_dev.evbit); //支持EV_KEY事件
    set_bit(BTN_0,button_dev.keybit); //支持设备两个键
    set_bit(BTN_1,button_dev.keybit); //
    input_register_device(&button_dev);//注册input设备
}
/*在按键中断中报告事件*/
Static void button_interrupt(int irq,void *dummy,struct pt_regs *fp)
{
    input_report_key(&button_dev,BTN_0,inb(BUTTON_PORT0));//读取寄存器BUTTON_PORT0的值
    input_report_key(&button_dev,BTN_1,inb(BUTTON_PORT1));
    input_sync(&button_dev);
}
Summary: The input subsystem is still a character device driver, but the amount of code is much reduced. The ****input subsystem only needs to complete two tasks: initialization and events. Reporting (this is achieved through interrupts in linux****).
Example
#include
#include
#include
#include
#include
#include
#include
#include
#include
#include
#include
#include
#include
#include
#include
#include

struct input_dev *button_dev;
struct button_irq_desc {
    int irq;
    int pin;
    int pin_setting;
    int number;
    char *name;
};

/*定义一个结构体数组*/
static struct button_irq_desc button_irqs [] = {
    {IRQ_EINT8 , S3C2410_GPG0 , S3C2410_GPG0_EINT8 , 0, "KEY0"},
    {IRQ_EINT11, S3C2410_GPG3 , S3C2410_GPG3_EINT11 , 1, "KEY1"},
    {IRQ_EINT13, S3C2410_GPG5 , S3C2410_GPG5_EINT13 , 2, "KEY2"},
    {IRQ_EINT14, S3C2410_GPG6 , S3C2410_GPG6_EINT14 , 3, "KEY3"},
    {IRQ_EINT15, S3C2410_GPG7 , S3C2410_GPG7_EINT15 , 4, "KEY4"},
    {IRQ_EINT19, S3C2410_GPG11, S3C2410_GPG11_EINT19, 5, "KEY5"},
};

static int key_values = 0;
static irqreturn_t buttons_interrupt(int irq, void *dev_id)
{
    struct button_irq_desc *button_irqs = (struct button_irq_desc *)dev_id;
    int down;
    udelay(0);
/*获取按键值*/
down = !s3c2410_gpio_getpin(button_irqs->pin); //down: 1(按下),0(弹起)
if (!down) {
    /*报告事件*/
    key_values = button_irqs->number;
    //printk("====>rising key_values=%d\n",key_values);
    if(key_values==0)
        input_report_key(button_dev, KEY_1, 0);
    if(key_values==1)
        input_report_key(button_dev, KEY_2, 0);
    if(key_values==2)
        input_report_key(button_dev, KEY_3, 0);
    if(key_values==3)
        input_report_key(button_dev, KEY_4, 0);
    if(key_values==4)
        input_report_key(button_dev, KEY_5, 0);
    if(key_values==5)
        input_report_key(button_dev, KEY_6, 0);
    /*报告结束*/
    input_sync(button_dev);
    }
else {
    key_values = button_irqs->number;
    //printk("====>falling key_values=%d\n",key_values);
    if(key_values==0)
        input_report_key(button_dev, KEY_1, 1);
    if(key_values==1)
        input_report_key(button_dev, KEY_2, 1);
    if(key_values==2)
        input_report_key(button_dev, KEY_3, 1);
    if(key_values==3)
        input_report_key(button_dev, KEY_4, 1);
    if(key_values==4)
        input_report_key(button_dev, KEY_5, 1);
    if(key_values==5)
        input_report_key(button_dev, KEY_6, 1);
    input_sync(button_dev);
    }
    return IRQ_RETVAL(IRQ_HANDLED);
}
static int s3c24xx_request_irq(void)
{
    int i;
    int err = 0;
    for (i = 0; i if (button_irqs[i].irq continue;
        }
        /* IRQ_TYPE_EDGE_FALLING,IRQ_TYPE_EDGE_RISING,IRQ_TYPE_EDGE_BOTH */
        err = request_irq(button_irqs[i].irq, buttons_interrupt, IRQ_TYPE_EDGE_BOTH,
        button_irqs[i].name, (void *)&button_irqs[i]);
        if (err)
            break;
    }
    /*错误处理*/
    if (err) {
        i--;
        for (; i >= 0; i--) {
            if (button_irqs[i].irq continue;
            }
            disable_irq(button_irqs[i].irq);
          free_irq(button_irqs[i].irq, (void *)&button_irqs[i]);
        }
        return -EBUSY;
    }
    return 0;
}
static int __init dev_init(void)
{
    /*request irq*/
    s3c24xx_request_irq();
    /* Initialise input stuff */
    button_dev = input_allocate_device();
    if (!button_dev) {
        printk(KERN_ERR "Unable to allocate the input device !!\n");
        return -ENOMEM;
    }
    button_dev->name = "s3c2440_button";
    button_dev->id.bustype = BUS_RS232;
    button_dev->id.vendor = 0xDEAD;
    button_dev->id.product = 0xBEEF;
    button_dev->id.version = 0x0100;

    button_dev->evbit[0] = BIT_MASK(EV_KEY) | BIT(EV_SYN);
    //set_bit(EV_KEY, button_dev->evbit)//支持EV_KEY事件
    /*设置支持哪些按键*/
    set_bit(KEY_1, button_dev->keybit);
    set_bit(KEY_2, button_dev->keybit);
    set_bit(KEY_3, button_dev->keybit);
    set_bit(KEY_4, button_dev->keybit);
    set_bit(KEY_5, button_dev->keybit);
    set_bit(KEY_6, button_dev->keybit);
    //printk("KEY_RESERVED=%d ,KEY_1=%d",KEY_RESERVED,KEY_1);
    input_register_device(button_dev); //注册input设备

    printk ("initialized\n");

    return 0;
}

static void __exit dev_exit(void)
{
    int i;

    for (i = 0; i if (button_irqs[i].irq continue;
        }
        free_irq(button_irqs[i].irq, (void *)&button_irqs[i]);
    }

    input_unregister_device(button_dev);
}

module_init(dev_init);
module_exit(dev_exit);
MODULE_LICENSE("GPL");
MODULE_AUTHOR("David Xie");
In this article, we learned the basic concepts and structure of the Linux input subsystem, as well as some commonly used commands and tools. We learned how to view and control the properties and status of input devices, and how to use the evtest and libinput tools to test and debug input devices. We also learned how to use udev rules to customize the behavior and configuration of input devices.
The Linux input subsystem is a powerful and flexible framework that allows you to better manage and use your input devices. By using the Linux input subsystem, you can improve your productivity and user experience. We recommend that when using a Linux system, you often use the Linux input subsystem to optimize your input devices.
The above is the detailed content of Introduction to the Linux input subsystem. For more information, please follow other related articles on the PHP Chinese website!

Hot AI Tools

Undresser.AI Undress
AI-powered app for creating realistic nude photos

AI Clothes Remover
Online AI tool for removing clothes from photos.

Undress AI Tool
Undress images for free

Clothoff.io
AI clothes remover

Video Face Swap
Swap faces in any video effortlessly with our completely free AI face swap tool!

Hot Article
Hot Tools

Notepad++7.3.1
Easy-to-use and free code editor

SublimeText3 Chinese version
Chinese version, very easy to use

Zend Studio 13.0.1
Powerful PHP integrated development environment

Dreamweaver CS6
Visual web development tools

SublimeText3 Mac version
God-level code editing software (SublimeText3)
Hot Topics
 1386
1386
 52
52

 How to use docker desktop
Apr 15, 2025 am 11:45 AM
How to use docker desktop
Apr 15, 2025 am 11:45 AM
How to use Docker Desktop? Docker Desktop is a tool for running Docker containers on local machines. The steps to use include: 1. Install Docker Desktop; 2. Start Docker Desktop; 3. Create Docker image (using Dockerfile); 4. Build Docker image (using docker build); 5. Run Docker container (using docker run).
 Difference between centos and ubuntu
Apr 14, 2025 pm 09:09 PM
Difference between centos and ubuntu
Apr 14, 2025 pm 09:09 PM
The key differences between CentOS and Ubuntu are: origin (CentOS originates from Red Hat, for enterprises; Ubuntu originates from Debian, for individuals), package management (CentOS uses yum, focusing on stability; Ubuntu uses apt, for high update frequency), support cycle (CentOS provides 10 years of support, Ubuntu provides 5 years of LTS support), community support (CentOS focuses on stability, Ubuntu provides a wide range of tutorials and documents), uses (CentOS is biased towards servers, Ubuntu is suitable for servers and desktops), other differences include installation simplicity (CentOS is thin)
 What to do if the docker image fails
Apr 15, 2025 am 11:21 AM
What to do if the docker image fails
Apr 15, 2025 am 11:21 AM
Troubleshooting steps for failed Docker image build: Check Dockerfile syntax and dependency version. Check if the build context contains the required source code and dependencies. View the build log for error details. Use the --target option to build a hierarchical phase to identify failure points. Make sure to use the latest version of Docker engine. Build the image with --t [image-name]:debug mode to debug the problem. Check disk space and make sure it is sufficient. Disable SELinux to prevent interference with the build process. Ask community platforms for help, provide Dockerfiles and build log descriptions for more specific suggestions.
 How to view the docker process
Apr 15, 2025 am 11:48 AM
How to view the docker process
Apr 15, 2025 am 11:48 AM
Docker process viewing method: 1. Docker CLI command: docker ps; 2. Systemd CLI command: systemctl status docker; 3. Docker Compose CLI command: docker-compose ps; 4. Process Explorer (Windows); 5. /proc directory (Linux).
 What computer configuration is required for vscode
Apr 15, 2025 pm 09:48 PM
What computer configuration is required for vscode
Apr 15, 2025 pm 09:48 PM
VS Code system requirements: Operating system: Windows 10 and above, macOS 10.12 and above, Linux distribution processor: minimum 1.6 GHz, recommended 2.0 GHz and above memory: minimum 512 MB, recommended 4 GB and above storage space: minimum 250 MB, recommended 1 GB and above other requirements: stable network connection, Xorg/Wayland (Linux)
 Detailed explanation of docker principle
Apr 14, 2025 pm 11:57 PM
Detailed explanation of docker principle
Apr 14, 2025 pm 11:57 PM
Docker uses Linux kernel features to provide an efficient and isolated application running environment. Its working principle is as follows: 1. The mirror is used as a read-only template, which contains everything you need to run the application; 2. The Union File System (UnionFS) stacks multiple file systems, only storing the differences, saving space and speeding up; 3. The daemon manages the mirrors and containers, and the client uses them for interaction; 4. Namespaces and cgroups implement container isolation and resource limitations; 5. Multiple network modes support container interconnection. Only by understanding these core concepts can you better utilize Docker.
 vscode cannot install extension
Apr 15, 2025 pm 07:18 PM
vscode cannot install extension
Apr 15, 2025 pm 07:18 PM
The reasons for the installation of VS Code extensions may be: network instability, insufficient permissions, system compatibility issues, VS Code version is too old, antivirus software or firewall interference. By checking network connections, permissions, log files, updating VS Code, disabling security software, and restarting VS Code or computers, you can gradually troubleshoot and resolve issues.
 What is vscode What is vscode for?
Apr 15, 2025 pm 06:45 PM
What is vscode What is vscode for?
Apr 15, 2025 pm 06:45 PM
VS Code is the full name Visual Studio Code, which is a free and open source cross-platform code editor and development environment developed by Microsoft. It supports a wide range of programming languages and provides syntax highlighting, code automatic completion, code snippets and smart prompts to improve development efficiency. Through a rich extension ecosystem, users can add extensions to specific needs and languages, such as debuggers, code formatting tools, and Git integrations. VS Code also includes an intuitive debugger that helps quickly find and resolve bugs in your code.
