
 Computer Tutorials
Computer Knowledge
win10 black screen with white horizontal lines when booting
Computer Tutorials
Computer Knowledge
win10 black screen with white horizontal lines when booting
win10 black screen with white horizontal lines when booting

php editor Banana will answer the question of black screen with white horizontal lines on win10 boot. When using the win10 system, sometimes a black screen and white horizontal lines appear after booting, which causes trouble to users. There may be many reasons for this problem, such as system failure, driver problems, etc. There are many ways to solve this problem. You can try restarting the computer, checking the hardware connection, updating the driver, etc. In the following article, we will introduce you in detail how to solve the problem of black screen with white horizontal lines on win10 boot. We hope it can help you.
1. Analysis of the causes of black screen when the laptop starts up
Hardware causes black screen:
1. Is the laptop battery out of power?
2. Poor contact in the display cable
3. Poor contact in the graphics card
4. Poor contact in the memory
5. There is a problem with the power supply
6. Display The screen is broken
The system causes a black screen:
The system file is lost and causes a black screen. Generally, there are several lines of English in the upper left corner of the screen, or horizontal bars flash, or windows fails. startup, or Windows cannot verify the digital signature of this file.
2. Black screen solution
Solution to black screen caused by hardware:
1. First rule out whether the power supply or battery is powered on. If possible, use a multimeter to check Check whether the rated voltage is reached to troubleshoot the adapter. Then check to see if the battery is dead.
2. Next, check whether the display cable is in poor contact. Generally, the display will not respond at all after plugging in the power. Such a situation generally requires strong hands-on skills and a professional toolbox. If it cannot be repaired by yourself, it is recommended to go to a computer store to fix it.
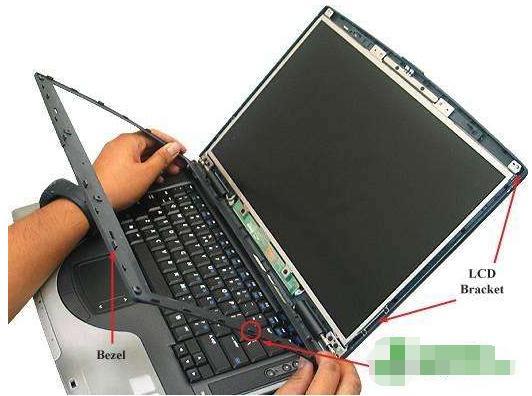
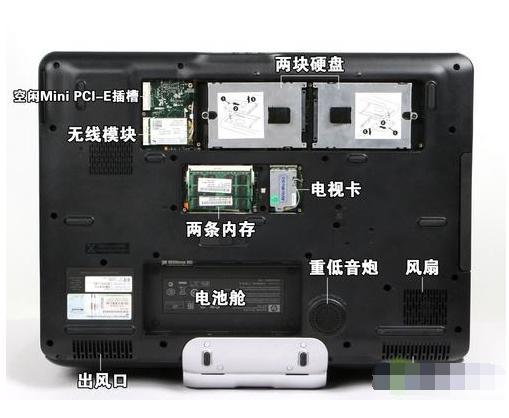
3. The graphics card or memory has poor contact. Generally, try to remove the graphics card or memory module, wipe the metal parts with an eraser, and then plug it in again. This can usually solve the problem.
4. To eliminate the above reasons, it is likely that the display is broken. You can try to turn on the phone and put your ear close to the edge of the screen to listen carefully. If there is a sizzling sound, then there will be no sound. Generally speaking, It is a problem with the high-voltage circuit board. If there is no sound all the time, it may be a problem with the lamp.
If none of the above can be repaired by yourself, it is recommended to send the laptop to a physical store for repair.
Solution to a black screen caused by the system:
The system is broken and a black screen appears due to the inability to enter the system. The general solution is to reinstall the system. Refer to the following solution steps:
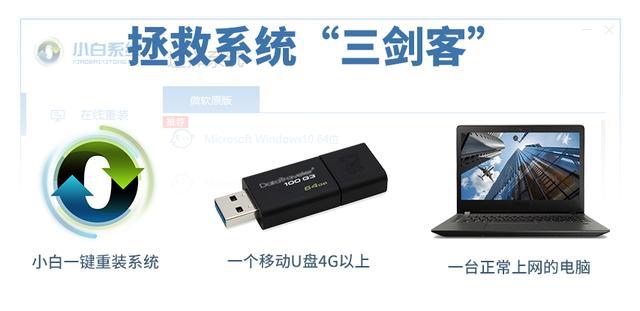
Step 1: Preparing tools before installation
1. Prepare a USB flash drive (4G or more), a computer with normal Internet access, search and download novice tools.
PS: Please ensure that there are at least 2 computer drive letters before installation, and ensure that the U disk data is backed up.
Step 2: Make a U disk startup tool
1. First, insert the 4G U disk into a normal computer. It is recommended to back up the data on the U disk in advance. Next As shown in the picture:
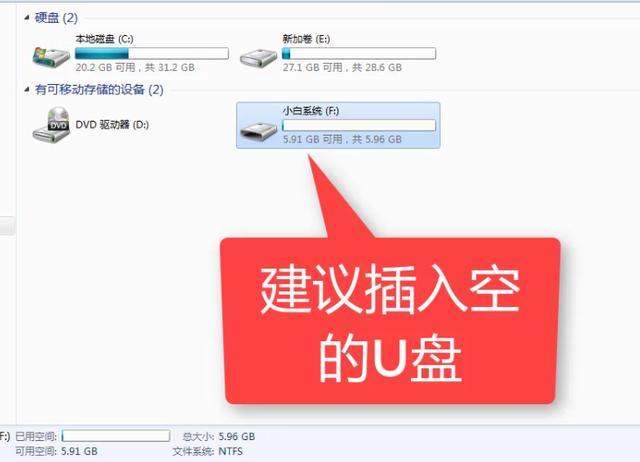
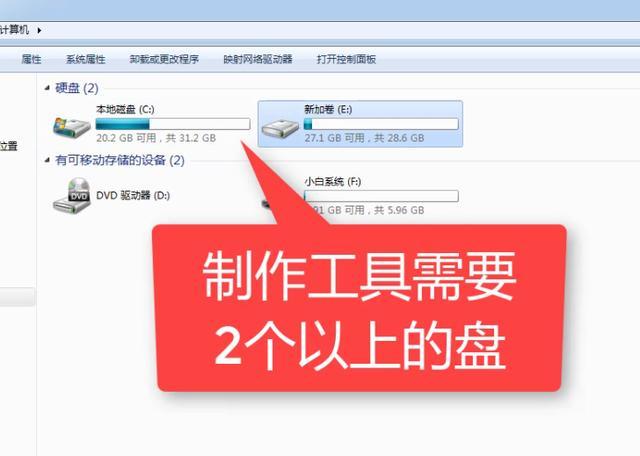
2. Before making the tool, you need more than 2 disks on the computer, as shown in the picture below:
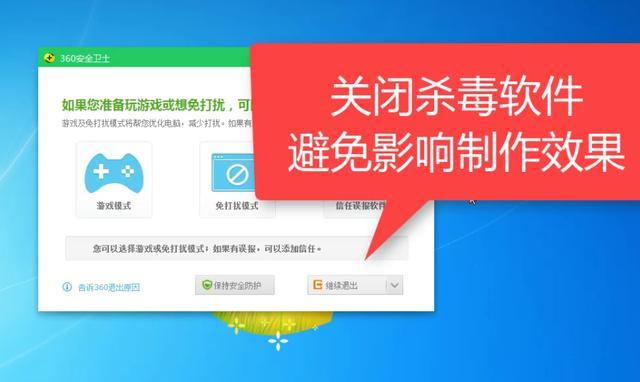
3. Then exit the anti-virus on the computer software to avoid production failure, as shown in the picture below:
4. Double-click to open the Xiaobai tool and wait for the loading to complete, as shown in the picture below:


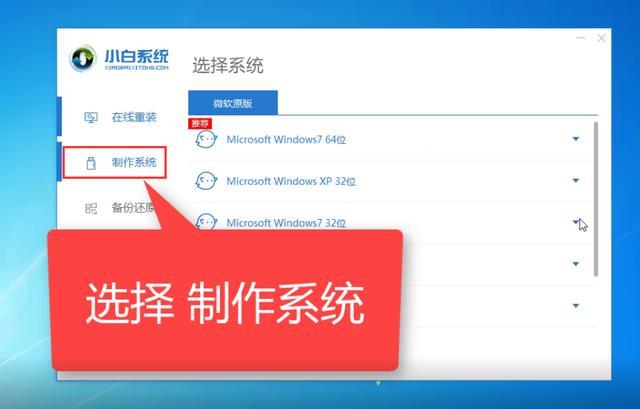
5. Then select the production system option from the novice tool that appears, as shown in the figure below:
6. Then click the Start Production button, as shown in the figure below:
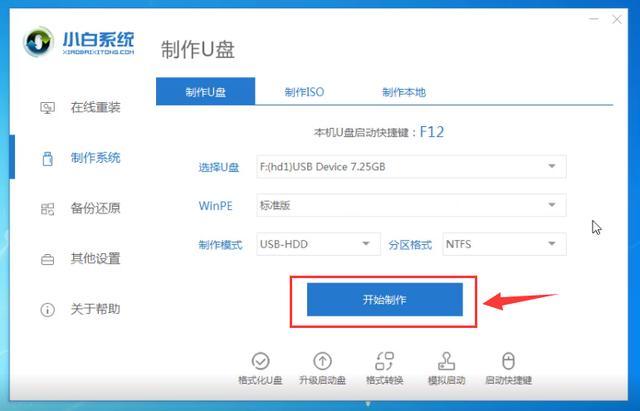
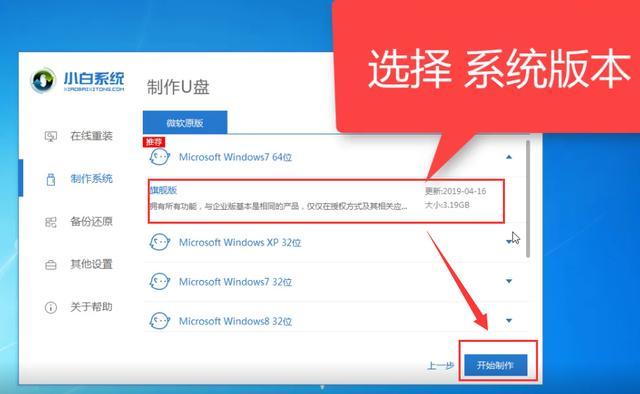
7 , select the system to be installed, and then click to start production, as shown in the figure below:

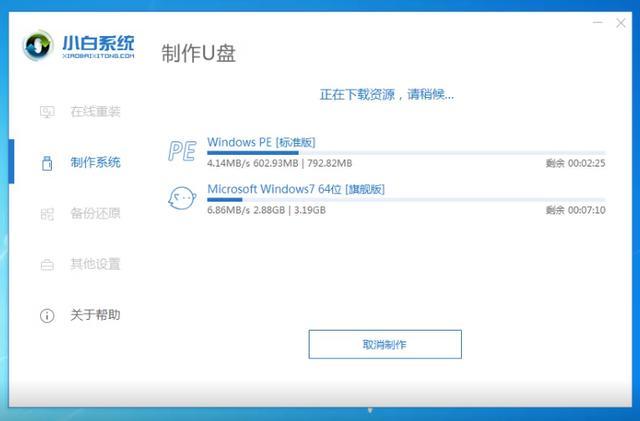
8. Start downloading the system image package and making U disk tools. Do not operate the computer during this period, as shown in the picture below:
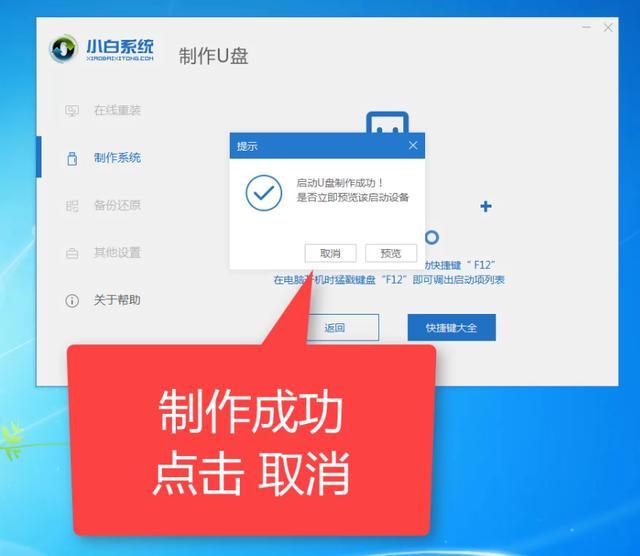
9. Wait for more than half an hour. , found that the production was successful, then click Cancel, as shown in the figure below:
Step 3: Reinstall the system
1. Unplug the successfully produced U disk and insert it into the required On a reinstalled Acer computer, refer to the startup hotkey below, as shown in the picture below:
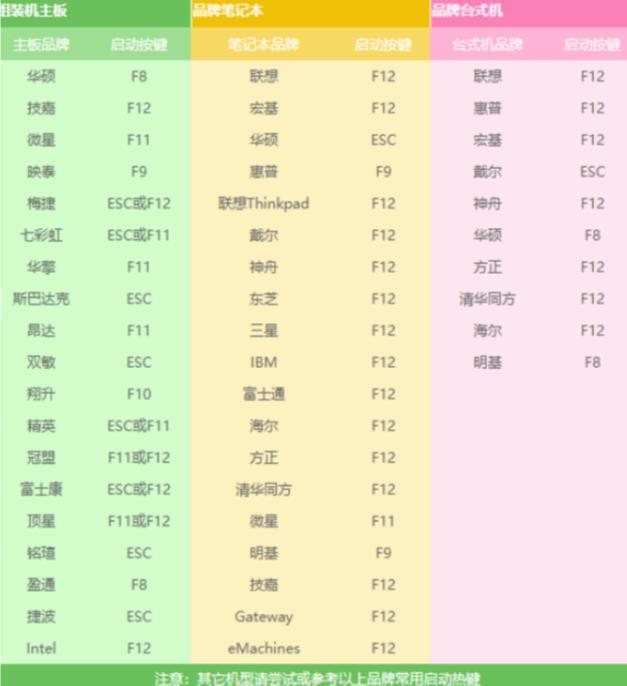
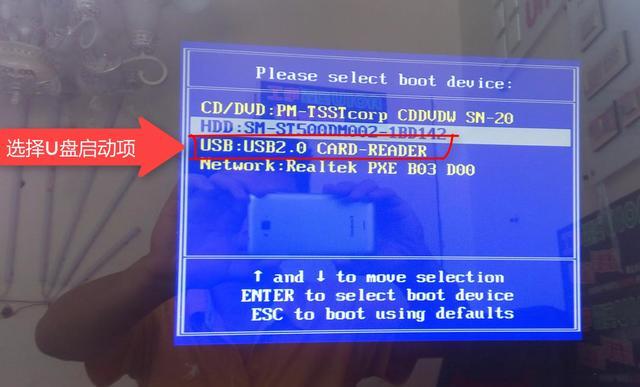
#2. Restart the computer and immediately press the startup hotkey (press in rapid succession) F12, as shown in the picture below:

3. Then the boot menu appears, select the USB option, move up and down with the direction keys, and press the Enter key to select, as shown in the figure below:
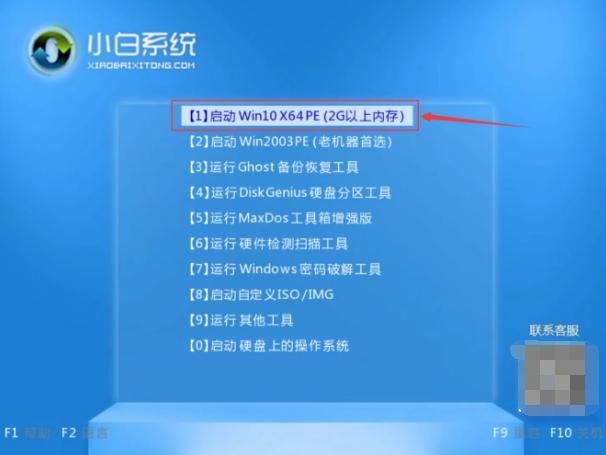
4. The Xiaobai PE system will appear immediately. We use the keyboard arrow keys to select the first item to start win10x64PE, as shown in the figure below:
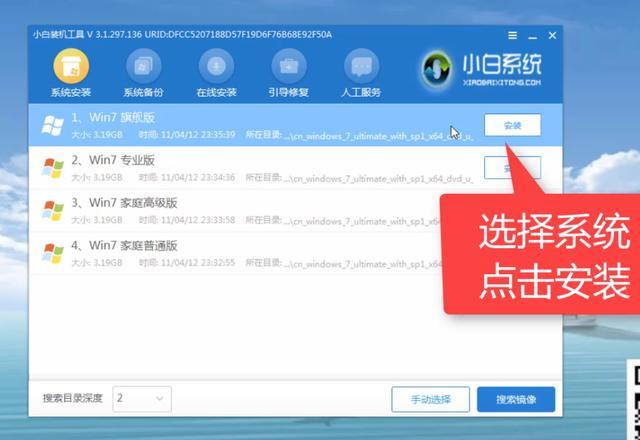
5. After waiting for the loading to complete, select the system win7 that needs to be installed, and then Click the install button, as shown in the picture below:
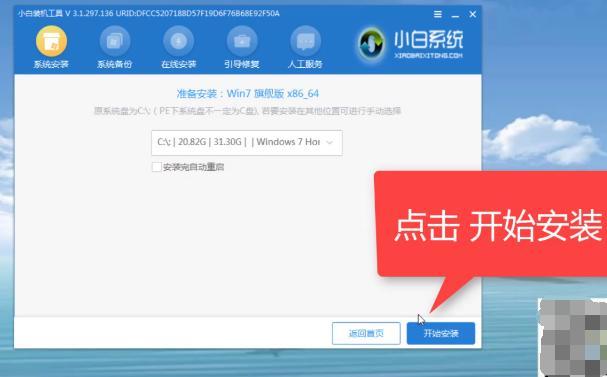
6. Then click the Start Installation button, as shown in the picture below:
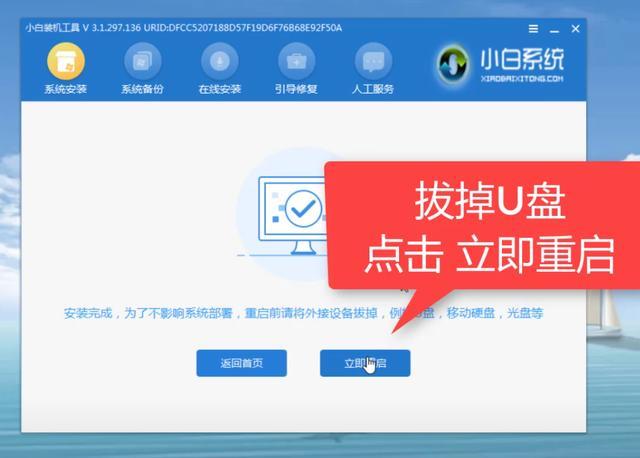
7. After the installation is completed, click to restart the computer immediately. As shown in the picture below:
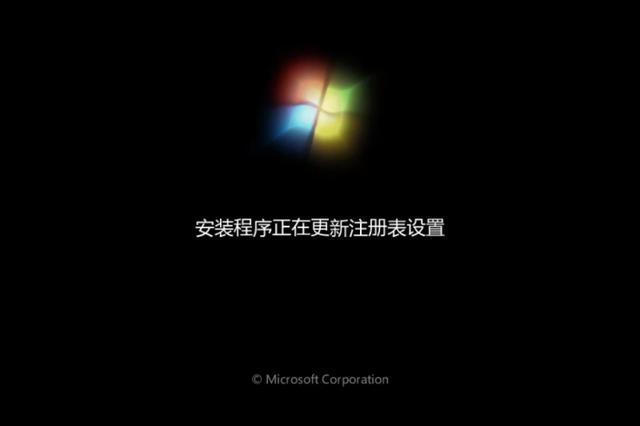
8. After the computer restarts, start installing the program and its related settings. Wait patiently for ten minutes, as shown in the picture below:
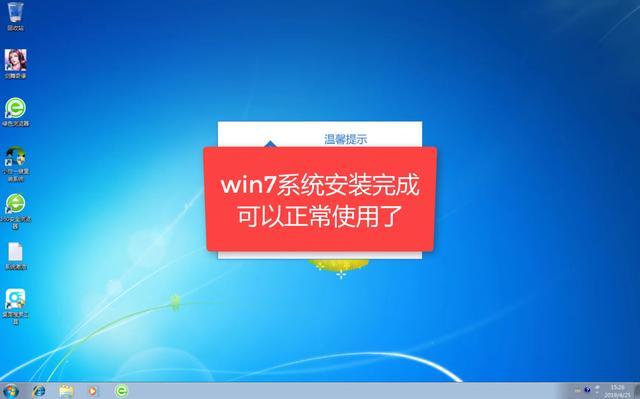
9. During The computer will be restarted several times, and then the system can be used normally, as shown in the figure below:
---End---
The above is the detailed content of win10 black screen with white horizontal lines when booting. For more information, please follow other related articles on the PHP Chinese website!

Hot AI Tools

Undresser.AI Undress
AI-powered app for creating realistic nude photos

AI Clothes Remover
Online AI tool for removing clothes from photos.

Undress AI Tool
Undress images for free

Clothoff.io
AI clothes remover

Video Face Swap
Swap faces in any video effortlessly with our completely free AI face swap tool!
Hot Article
Hot Tools

Notepad++7.3.1
Easy-to-use and free code editor

SublimeText3 Chinese version
Chinese version, very easy to use

Zend Studio 13.0.1
Powerful PHP integrated development environment

Dreamweaver CS6
Visual web development tools

SublimeText3 Mac version
God-level code editing software (SublimeText3)
Hot Topics


 System Restore prompts that you must enable system protection on this drive
Jun 19, 2024 pm 12:23 PM
System Restore prompts that you must enable system protection on this drive
Jun 19, 2024 pm 12:23 PM
The computer has a restore point, and when the system is restored, it prompts "You must enable system protection on this drive." This usually means that the system protection function is not turned on. System protection is a feature provided by the Windows operating system that can create system restore points to back up system files and settings. That way, if something goes wrong, you can revert to a previous state. When the system fails and you cannot enter the desktop to start it, you can only try the following method: Troubleshooting-Advanced Options-Command Prompt Command 1 netstartvssrstrui.exe/offline:C:\windows=active Command 2 cd%windir%\system32 \configrenSYSTEMsy
 What should I do if win10 does not switch users? Win10 login interface does not have the option to switch users. Solution
Jun 25, 2024 pm 05:21 PM
What should I do if win10 does not switch users? Win10 login interface does not have the option to switch users. Solution
Jun 25, 2024 pm 05:21 PM
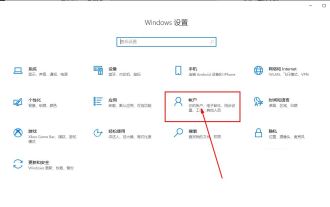
A problem that Windows 10 users may encounter is that they cannot find the switch user option on the login interface. So what should I do if there is no switch user option on the win10 login interface? Let this site give users a detailed explanation of the problem of not switching user options in the win10 login interface. Detailed solution to the problem of switching user options on the Win10 login interface: Check user account settings: First, make sure you have multiple user accounts on your computer and that these accounts are enabled. You can check and enable the account by following these steps: a. Press Win+I keys to open Settings and select "Accounts". b. Select "Family & Others" or &ld in the left navigation bar
 How to permanently turn off real-time protection in win10? How to disable real-time protection function in win10 computer 0
Jun 05, 2024 pm 09:46 PM
How to permanently turn off real-time protection in win10? How to disable real-time protection function in win10 computer 0
Jun 05, 2024 pm 09:46 PM
Although the comprehensive anti-virus software that comes with Windows 10 system can continuously protect the security of your personal computer, sometimes it may also affect certain downloaded files. For some users, it may be more appropriate to temporarily turn off the real-time protection function. But many users don’t know how to permanently turn off the real-time protection feature on win10 system. 1. First, press the "Win+R" keys to open the run window, enter the "gpedit.msc" command to open the local Group Policy Editor interface; 2. Then, in the opened interface, click "Computer Configuration/Administrative Templates/ Windows Components/MicrosoftDef
 How to restore the default wallpaper in win10? One trick to quickly restore the default wallpaper in Windows 10 system
Jun 02, 2024 pm 02:07 PM
How to restore the default wallpaper in win10? One trick to quickly restore the default wallpaper in Windows 10 system
Jun 02, 2024 pm 02:07 PM
In Windows 10 system, if you want to return to the system default wallpaper, you can follow the following steps: 1. Right-click a blank space on the desktop and select Personalize in the pop-up menu. 2. This will open the Personalization window in Settings. In the left menu, click Background. 3. Under the "Background" settings, find and click the drop-down menu next to "Choosepicture", and then select Windows Default (Windows Default) or directly select a picture that looks like the default wallpaper in the picture preview below ( if there are multiple options). 4. If your system has multiple versions
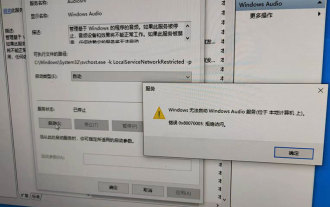 Windows cannot start the Windows Audio service Error 0x80070005
Jun 19, 2024 pm 01:08 PM
Windows cannot start the Windows Audio service Error 0x80070005
Jun 19, 2024 pm 01:08 PM
The guy's computer appears: Windows cannot start the WindowsAudio service (located on the local computer). Error 0x8007005: Access denied. This situation is usually caused by user permissions. You can try the following methods to fix it. Method 1: Modify the registry to add permissions through batch processing, create a new text document on the desktop, save it as .bat, and right-click the administrator to go far. Echo==========================EchoProcessingRegistryPermission.Pleasewait...Echo================== ========subinacl/subkey
 What should I do if Win10 takes a screenshot and crashes? How to solve the problem of Win10 flashing and then disappearing after taking a screenshot?
Jun 02, 2024 pm 12:48 PM
What should I do if Win10 takes a screenshot and crashes? How to solve the problem of Win10 flashing and then disappearing after taking a screenshot?
Jun 02, 2024 pm 12:48 PM
There are many reasons why the screenshot disappears after taking a screenshot in Win10. Users can first check the screenshot save location or adjust the screenshot settings, or check the animation effect to check it. If it really doesn't work, you can also choose to update the driver and operating system to perform the operation. Let this website carefully introduce to users the analysis of the problem of Win10 disappearing after taking a screenshot. Analysis of the problem after win10 takes a picture and it flashes and disappears 1. Check where the screenshot is saved: When you use the Win+PrtSc (PrintScreen) key combination to take a screenshot, the screenshot is usually saved in the C:\Users\YourUsername\Pictures\Screenshots folder. please
 How to connect Redmi Note13RPro to the computer?
May 09, 2024 pm 06:52 PM
How to connect Redmi Note13RPro to the computer?
May 09, 2024 pm 06:52 PM
The phone Redmi Note13RPro has been very popular recently. Many consumers have purchased this phone. However, many users are using this phone for the first time, so they don’t know how to connect the Redmi Note13RPro to the computer. In this regard, the editor is here to explain to you Detailed tutorial introduction is provided. How to connect Redmi Note13RPro to the computer? 1. Use a USB data cable to connect the Redmi phone to the USB interface of the computer. 2. Open the phone settings, click Options, and turn on USB debugging. 3. Open the device manager on your computer and find the mobile device option. 4. Right-click the mobile device, select Update Driver, and then select Automatically search for updated drivers. 5. If the computer does not automatically search for the driver,
 What to do if the Win10 Task Manager crashes? How to fix the Win10 Task Manager crash?
Jun 25, 2024 pm 04:31 PM
What to do if the Win10 Task Manager crashes? How to fix the Win10 Task Manager crash?
Jun 25, 2024 pm 04:31 PM
Hello everyone, have you ever encountered the situation where the Windows 10 Task Manager keeps crashing? This function helps us a lot, allowing us to quickly see all running tasks, which is very convenient to use, right? However, some friends said that they encountered this problem and didn’t know how to solve it, so let me share with you the specific solution! Solution to Win10 Task Manager crash 1. First, press and hold the "Win" + "R" keys on the keyboard to open Run, enter "regedit" and press the Enter key. 2. Expand the folders and find "HKEY_CURRENT_USERSoftwareMicros
