 Computer Tutorials
 Computer Knowledge
 Dell computer USB disk system installation tutorial video
Dell computer USB disk system installation tutorial video
php editor Xinyi has brought you a Dell computer USB disk system installation tutorial video, allowing you to easily learn how to use a USB disk to install the operating system. The video details the preparation work, making a boot disk, setting up the BIOS and installing the system. By following the video tutorial, you can quickly master the skills of installing the USB disk system, eliminating the tedious CD installation process and improving the installation speed. Both novices and users with certain computer skills can easily get started and enjoy a quick system installation experience.
Beginners should first learn the basics:
System source files usually have two formats and installation methods: ISO image installation and Ghost installation. In addition, there is an independent system called PE, which can be installed on a USB flash drive or CD. The PE system has a variety of functions, such as installing the system, disk partitioning, and cracking Windows startup passwords.
1. Preparation work:
U disk 4GB,
Dabaicai PE U disk boot disk creation tool 4.6
windows 7 ultimate version ISO
Driver Wizard offline package (you can keep this in the future).
Download address:
大白菜Download address:
http://down.winbaicai.com:88/大白菜 USB boot creation tool V4.6.exe
Website: http://www.winbaicai.com
windows7 32-bit Thunder or eMule download address: ed2k://|file|cn_windows_7_ultimate_x86_dvd_x15-65907.iso|2604238848|D6F139D7A45E81B76199DDCCDDC4B509|/
Website: http://msdn.itelleyou.cn/?lang=zh-cn
Offline package download address:
http://file.mydrivers.com /DriverGeniusLite_win7x32.exe
Website: http://www.drivergenius.com/
Note, back up the U disk data before making.
2. Make PE tools.
1. Install Chinese cabbage.
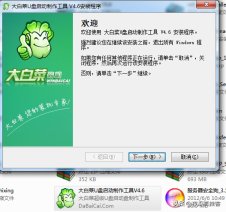
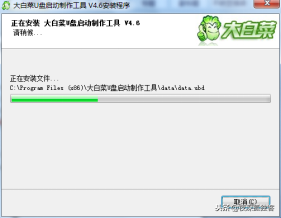
2. After the installation is completed, open the Chinese cabbage software.
Interface:

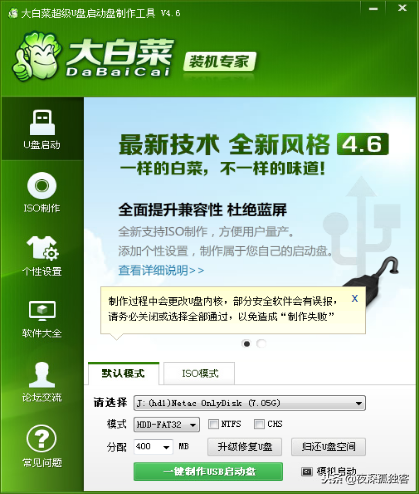
Please select your U disk, don’t make the wrong choice. Create a USB boot disk with one click.
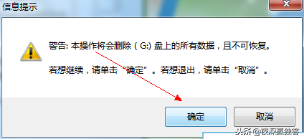
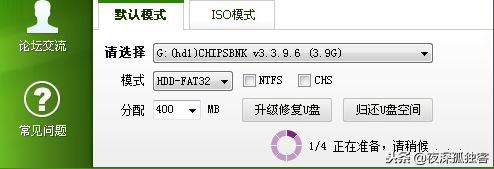
Click OK to format.
wait. ...It will be ready in a while, you can do the test.
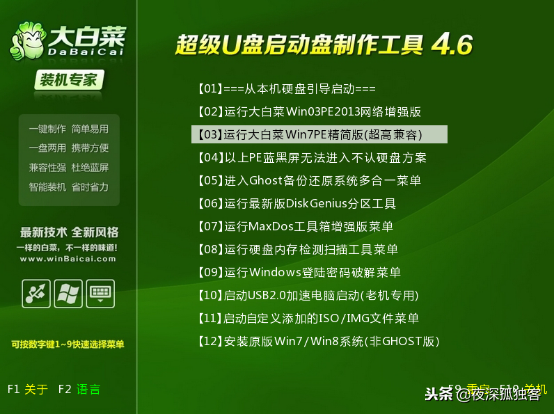
OK, we have finished using the U disk as the boot disk. The next step is to copy the ISO file we downloaded to the U disk, or copy it to the computer disk.
3. Set the U disk as the first boot.
1. After copying the downloaded ISO image to a U disk or computer, we insert the U disk into the computer, turn it on, and set the U disk in the BIOS as the first boot. Here we need to emphasize that setting the BIOS boot The setting method of each computer is different, because the motherboard is different, and the way to open the bios is also different. Here I am the motherboard of the desktop Onda H61. In fact, the settings are pretty much the same. We need to write more here. For novices, English may be a hindrance.
Press and hold F11 when booting, the hardware settings quick boot menu will appear.
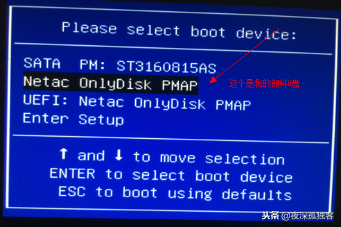
The BIOS quick start menu of laptops like Lenovo Acer all starts by pressing F12. The most commonly used ones are F12 and F10.
The following is for reference: My Baidu.
Motherboard brand startup button Laptop brand startup button Desktop brand startup button
Asus motherboard F8 Lenovo notebook F12 Lenovo desktop F12
Gigabyte motherboard F12 Acer notebook F12 HP desktop F12
MSI motherboard F11 ASUS notebook ESC Acer desktop F12
Biostar motherboard F9 HP notebook F9 Dell desktop ESC
Meijie motherboard ESC or F12 Lenovo Thinkpad F12 Shenzhou desktop Machine F12
Colorful motherboard ESC or F11 Dell notebook F12 ASUS desktop F8
ASRock motherboard F11 Shenzhou notebook F12 Founder desktop F12
Spartak motherboard ESC Toshiba notebook F12 Tsinghua Tongfang desktop F12
Onda motherboard F11 Samsung notebook F12 Haier desktop F12
Shuangming motherboard ESC IBM notebook F12 BenQ desktop F8
ASL motherboard F10 Fujitsu notebook F12
Elite motherboard ESC or F11 Haier notebook F12
Guanmeng motherboard F11 or F12 Founder notebook F12
Foxconn motherboard ESC or F12 Tsinghua Tongfang notebook F12
Topstar motherboard F11 or F12 MSI notebook F11
Mingxuan motherboard ESC BenQ notebook F9
Yeston motherboard F8 Gigabyte notebook F12
Jetway motherboard ESC Gateway notebook F12
Intel motherboard F6 or F12 eMachines notebook F12
Jiewei motherboard ESC or F8 Sony notebook ESC or F2
Zhiming motherboard F12
Panying motherboardESC
Panzheng motherboard ESC
Guanming motherboard F9
Attachment:
BIOS entry shortcut key:
Notebook:
IBM (press F1 during cold boot, some new models can be started by pressing F1 when restarting)
HP HP (press F2, F9, F10 when starting and restarting)
ASUS ASUS (start up Press F2 when the ASUS LOGO appears)
SONY (Press F2 when starting and restarting)
Dell (Press F2 when starting and restarting)
Acer Acer (Press F2 when starting and restarting)
Toshiba (Press ESC and then F1 when booting coldly)
Compaq (Press F10 when the flashing cursor appears in the upper right corner after booting, or Press F10 when booting)
Fujitsu Fujitsu (press F2 when starting and restarting)
Most domestic and Taiwanese brands (press F2 when starting and restarting)
Continue Select your own USB flash drive and press Enter.

Our Chinese cabbage Qidong menu will appear. If it does not appear, you need to reinstall it. Just open Chinese cabbage and rewrite the boot and PE files. See the steps: "2. Make PE tools."
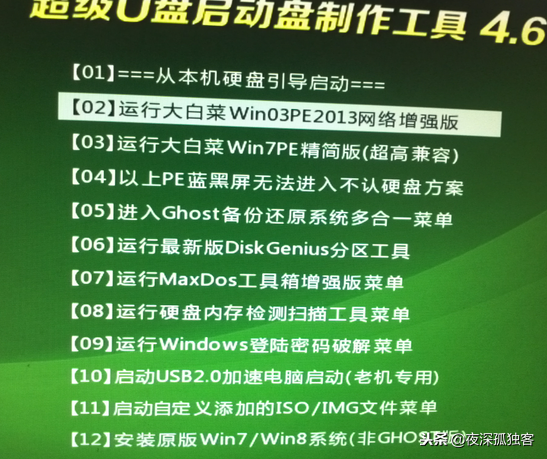
Select 2 here, press key 2 directly. Press Enter to enter PE. If there is a blue screen when you enter, come back and enter 04. Press key 4, and then Enter.
4. PE installs Windows 7 system.
1. After entering the PE system, run the virtual optical drive Virtual DriverManager.
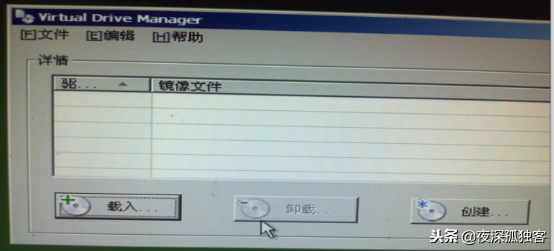
Click "Load" and select the ISO image file just now. I've changed the name here.
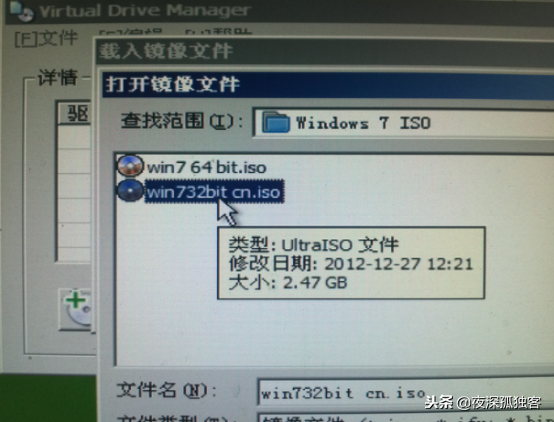
Sure. Do not close Virtual DriverManager. We minimize it in the taskbar.
Then click Start-Programs-System Installation-WinNT6 Quick Installer in the lower left corner.
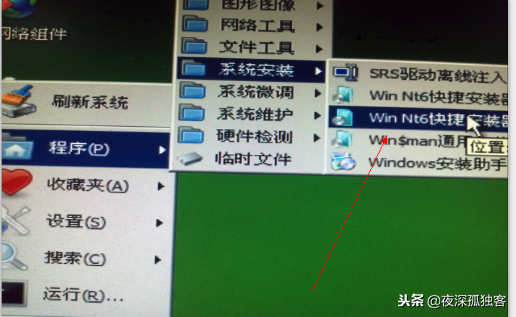
3. Open the NT6 quick installer. There are many quick installers, we will only talk about this one.
Open a single computer and enter the virtual optical drive we just loaded.
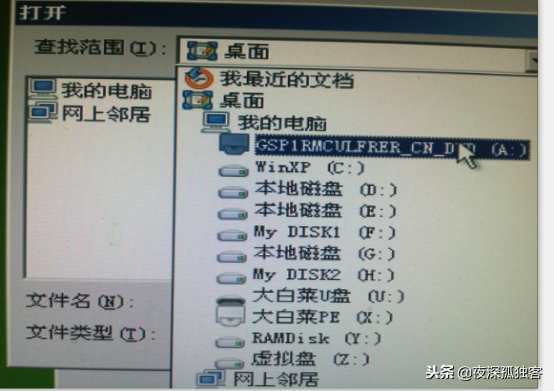
Enter the sources file and double-click the install.wim file.
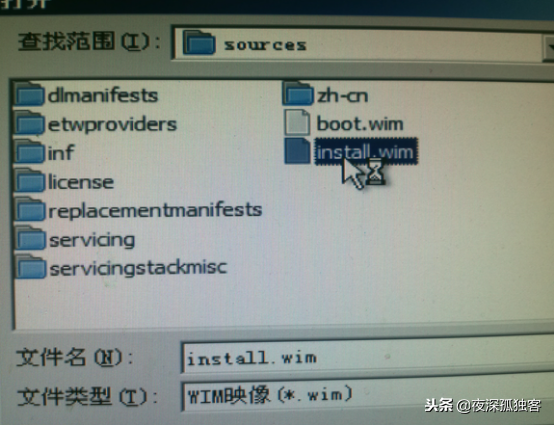
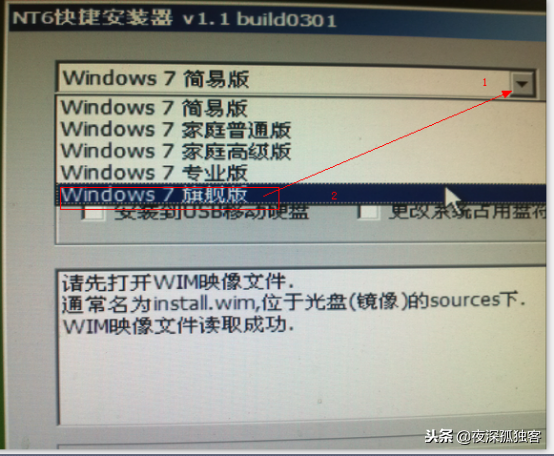
We have opened it. Please note that you must select the flagship version above. The default is the home version. All home versions have fewer functions. It is recommended to install the ultimate version.
OK, we opened it, select the system drive letter where you installed it, the default is C drive, of course you can also choose other, it is recommended to choose C, because C drive is theoretically smaller than other drives , if you don’t understand, take a look at the principle of the hard disk.
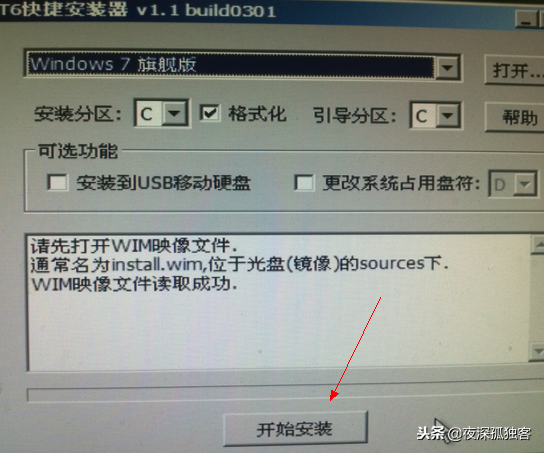
Then click to start the installation. You will be prompted to format in the middle, select quick format, and then the format will start automatically
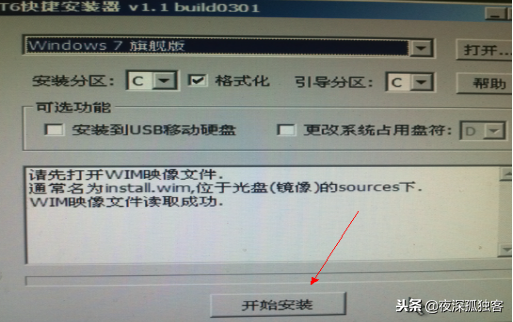
Then the system will copy the files to the C drive by itself and wait for about 3 minutes. A pop-up will pop up asking you to restart. When you click Restart, quickly pull out the USB flash drive. Otherwise, the USB flash drive will boot automatically, and then the system will be installed automatically.
Next step,
Next step,
are all in Chinese, and then choose not to update, which is the bottom one.
Next, you will be asked to enter the activation code. Just go to the next step. Ignore it and enter your user name. I won’t explain it in detail here. Because I haven’t installed it yet, I’m relatively new to it later. The whole process takes about 15 minutes.
Next we need to install the driver. If the machine has a driver, we can install it directly. If not, use our driver wizard offline package. Otherwise, some machines cannot access the Internet without installing the network card driver, so you should just look at them and look for the driver elsewhere.
Let’s learn more about illiteracy here: To access the Internet, you need to install the network card driver, otherwise you will not be able to access the Internet. To play games, you need to install the graphics card driver. Otherwise, many games cannot be played, videos cannot be opened, the system starts slowly, etc. The meaning of drive is like lubricating oil, everyone understands.
The above is the detailed content of Dell computer USB disk system installation tutorial video. For more information, please follow other related articles on the PHP Chinese website!

Hot AI Tools

Undresser.AI Undress
AI-powered app for creating realistic nude photos

AI Clothes Remover
Online AI tool for removing clothes from photos.

Undress AI Tool
Undress images for free

Clothoff.io
AI clothes remover

Video Face Swap
Swap faces in any video effortlessly with our completely free AI face swap tool!

Hot Article

Hot Tools

Notepad++7.3.1
Easy-to-use and free code editor

SublimeText3 Chinese version
Chinese version, very easy to use

Zend Studio 13.0.1
Powerful PHP integrated development environment

Dreamweaver CS6
Visual web development tools

SublimeText3 Mac version
God-level code editing software (SublimeText3)

Hot Topics
 How to install WinNTSetup into Win11 system_How to install WinNTSetup into Win11 system
May 08, 2024 am 11:19 AM
First download the latest Win11 system ISO image, and then in Win10 system, you can directly right-click on the downloaded ISO image file and select [Load]; if it is under WinPE, WinXP, or Win7 system, you need to use the virtual optical drive tool to load the ISO Image; or you can directly decompress the ISO image file without using a virtual optical drive. Then run WinNTSetup. The software interface is as shown in the figure: First locate the location of the install.wim file. You can find the install.wim file in the sources directory of the Win11 ISO image loaded or decompressed by the virtual optical drive. Then set the location of the boot disk and installation disk. Generally, you are going to put W
 How to install Windows system on tablet computer
May 03, 2024 pm 01:04 PM
How to flash the Windows system on BBK tablet? The first way is to install the system on the hard disk. As long as the computer system does not crash, you can enter the system and download things, you can use the computer hard drive to install the system. The method is as follows: Depending on your computer configuration, you can install the WIN7 operating system. We choose to download Xiaobai's one-click reinstallation system in vivopad to install it. First, select the system version suitable for your computer, and click "Install this system" to next step. Then we wait patiently for the installation resources to be downloaded, and then wait for the environment to be deployed and restarted. The steps to install win11 on vivopad are: first use the software to check whether win11 can be installed. After passing the system detection, enter the system settings. Select the Update & Security option there. Click
 How to enter bios after assembling a computer? How to enter bios when assembling a computer?
May 07, 2024 am 09:13 AM
How to enter bios after assembling a computer? Before entering the BIOS, you need to make sure that the computer is completely shut down and powered off. Here are several common ways to enter the BIOS: 1. Use shortcut keys: Most computer manufacturers will display a prompt message at startup telling you which key to press to enter the BIOS settings. Usually the F2, F10, F12 or Delete key. After pressing the appropriate keys, you should be able to see a screen with information about your computer's hardware and BIOS settings. 2. Use the button on the motherboard: Some computer motherboards have a dedicated button for entering BIOS settings. This button is usually labeled "BIOS" or "UEFI". After pressing the button you should be able to see
 How to upgrade Win11 system on old computers_Tutorial on upgrading Win11 system on old computers
May 07, 2024 pm 08:07 PM
1. First we need to download the win11 image file. 2. Put the downloaded win11 image into another disk. 3. Then we find the win11 image file among the searched image files. 4. Then when we come to this interface, we select install.wim to proceed to the next step. 5. Then select the Windows 11 system and click OK to restore the image file. 6. Then we wait for pe to download and install. Wait patiently. After the download is completed, click restart according to the prompts. 7. Then come to this interface, we select the second xiaobaiPE. After selecting, the win11 system will be automatically installed for us. After the installation is completed, click to restart the computer immediately according to the prompts. 8. Finally, the system installation is completed, and we come to
 What you need to know when reinstalling the system from a USB flash drive: How to set up the BIOS correctly
May 06, 2024 pm 03:00 PM
Reinstalling the system is a problem that many computer users often encounter. Whether it is due to system crash, poisoning or wanting to upgrade the system, reinstalling the system is a good choice. However, many people encounter various problems when reinstalling the system, such as not knowing how to set up the BIOS, not knowing how to choose a suitable installation disk, etc. Today, we will talk about some things you must know when reinstalling the system from a USB flash drive, and teach you how to set up the BIOS correctly and successfully complete the system reinstallation. Tool materials: System version: Windows1020H2 Brand model: Lenovo Xiaoxin Air14 Software version: Pocket machine One-click reinstallation of system software v1.0 1. Preparation 1. Prepare a U disk with a capacity of no less than 8GB, preferably USB3. 0, so the speed will be faster
 How to assemble an acer desktop computer?
May 08, 2024 pm 08:25 PM
How to assemble an acer desktop computer? The assembly method of Acer desktop computer is as follows: open the case, install the power supply into the case, and tighten the screws. Install the CPU onto the motherboard, making sure the pins on the CPU are aligned with the slots on the motherboard, and tighten the screws on the CPU heat sink. Install the memory module onto the motherboard, making sure that the bumps on the memory module are aligned with the slots on the motherboard. Press down hard until you hear a "pop" sound to complete the installation. Install graphics cards, sound cards, network cards and other boards onto the motherboard, making sure the screws on the boards are tightened. Install storage devices such as hard drives and optical drives into the chassis, making sure the screws are tightened. Connect the motherboard to the chassis, including power cables, hard drive cables, optical drive cables, etc. Finally, close the chassis cover and tighten the screws to complete the assembly. exist
 Does the newly assembled computer keyboard light not light up?
May 07, 2024 pm 04:40 PM
Does the newly assembled computer keyboard light not light up? The motherboard model should be UEFIbios. First find a keyboard with PS2 port, enter bios, turn off UEFI boot, and change to Legacy mode. If there is fast boot, turn off options like FastBoot, UEFI boot, turn on fast boot, and enter the system. USB interface detection may be turned off before, and USB devices can be used to assemble the computer after entering the system. The mouse and keyboard lights do not light up when the computer is turned on? If the keyboard light does not come on, there is a high possibility of memory failure, or it may be caused by static electricity on the motherboard or the motherboard is faulty. Use an eraser to wipe the gold finger of the memory graphics card, and remove and insert the memory several times. The problem remains. There are dual memory sticks and a single memory stick is used for testing. The problem persists. Re-plug the various cables inside and outside the chassis, and then unplug the connector on the motherboard.
 3D drawing computer configuration and assembly recommendations?
May 04, 2024 am 09:34 AM
3D drawing computer configuration and assembly recommendations? If used for 3D renderings, the laptop configuration requirements are as follows: 1. Operating system: Windows 7 (64-bit is recommended) 2. Memory: at least 2GB (4GB and above are recommended) 3. Graphics card: 1G of video memory and above, bit width 256bit or above, the video memory type is DDR3 or above, it is recommended to use NVIDIA brand graphics card (it is recommended to use professional graphics cards certified by solidworks: such as: NVIDIA Quadro series, ATI FireGL series or Firepro series) 4. CPU: Intel dual-core high frequency 64bit, it is recommended to use i5 series or i7 series, it is recommended that the CPU frequency is higher than 2.8GHz, in the center


