 System Tutorial
 Windows Series
 How to enable built-in positioning in win10? How to set up the built-in positioning function in Windows 10
How to enable built-in positioning in win10? How to set up the built-in positioning function in Windows 10
php editor Baicao will introduce to you how to enable the built-in positioning function of Win10. Win10 system provides built-in positioning function, which can provide users with more accurate location information services. To turn on built-in targeting, just follow these simple steps to set it up. First, click on the Notification Center icon in the lower right corner of the taskbar, then find the "All Settings" option and click on it. In the pop-up window, select the "Privacy" option. Next, select the "Locations" option in the left navigation bar. In the right window, turn the "Location Services" switch to on to turn on the built-in positioning function of Win10 system. Through this simple setting method, you can easily turn on and use the built-in positioning function of Win10 system, providing more convenience for your daily use.
How to set up the built-in positioning function in win10
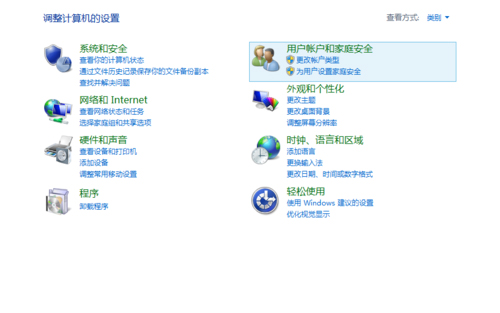
1. First, we open the “Control Panel”.

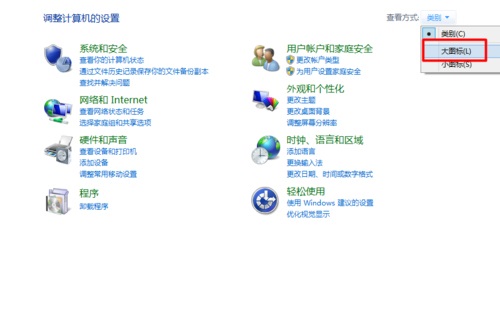
2. Then click the view mode in the upper right corner of the "Control Panel" and change it to "Large Icons" or "Small Icons".

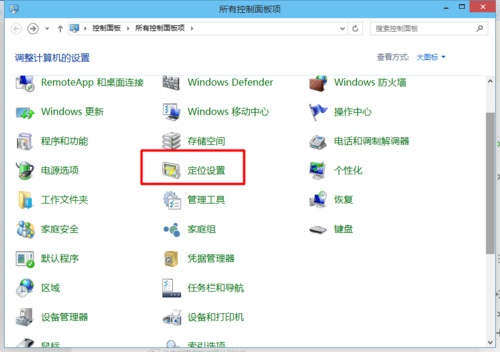
#3. Then find “Set Positioning” and open “Set Positioning”.

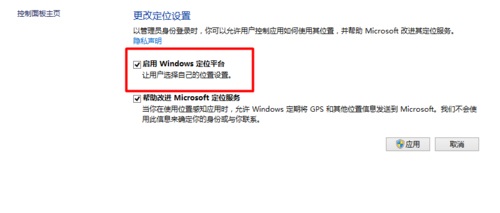
#4. Check "Enable Windows Positioning Platform" in "Set Positioning".

The above is the detailed content of How to enable built-in positioning in win10? How to set up the built-in positioning function in Windows 10. For more information, please follow other related articles on the PHP Chinese website!

Hot AI Tools

Undresser.AI Undress
AI-powered app for creating realistic nude photos

AI Clothes Remover
Online AI tool for removing clothes from photos.

Undress AI Tool
Undress images for free

Clothoff.io
AI clothes remover

AI Hentai Generator
Generate AI Hentai for free.

Hot Article

Hot Tools

Notepad++7.3.1
Easy-to-use and free code editor

SublimeText3 Chinese version
Chinese version, very easy to use

Zend Studio 13.0.1
Powerful PHP integrated development environment

Dreamweaver CS6
Visual web development tools

SublimeText3 Mac version
God-level code editing software (SublimeText3)

Hot Topics
 System Restore prompts that you must enable system protection on this drive
Jun 19, 2024 pm 12:23 PM
The computer has a restore point, and when the system is restored, it prompts "You must enable system protection on this drive." This usually means that the system protection function is not turned on. System protection is a feature provided by the Windows operating system that can create system restore points to back up system files and settings. That way, if something goes wrong, you can revert to a previous state. When the system fails and you cannot enter the desktop to start it, you can only try the following method: Troubleshooting-Advanced Options-Command Prompt Command 1 netstartvssrstrui.exe/offline:C:\windows=active Command 2 cd%windir%\system32 \configrenSYSTEMsy
 What should I do if win10 does not switch users? Win10 login interface does not have the option to switch users. Solution
Jun 25, 2024 pm 05:21 PM
A problem that Windows 10 users may encounter is that they cannot find the switch user option on the login interface. So what should I do if there is no switch user option on the win10 login interface? Let this site give users a detailed explanation of the problem of not switching user options in the win10 login interface. Detailed solution to the problem of switching user options on the Win10 login interface: Check user account settings: First, make sure you have multiple user accounts on your computer and that these accounts are enabled. You can check and enable the account by following these steps: a. Press Win+I keys to open Settings and select "Accounts". b. Select "Family & Others" or &ld in the left navigation bar
 How to permanently turn off real-time protection in win10? How to disable real-time protection function in win10 computer 0
Jun 05, 2024 pm 09:46 PM
Although the comprehensive anti-virus software that comes with Windows 10 system can continuously protect the security of your personal computer, sometimes it may also affect certain downloaded files. For some users, it may be more appropriate to temporarily turn off the real-time protection function. But many users don’t know how to permanently turn off the real-time protection feature on win10 system. 1. First, press the "Win+R" keys to open the run window, enter the "gpedit.msc" command to open the local Group Policy Editor interface; 2. Then, in the opened interface, click "Computer Configuration/Administrative Templates/ Windows Components/MicrosoftDef
 How to restore the default wallpaper in win10? One trick to quickly restore the default wallpaper in Windows 10 system
Jun 02, 2024 pm 02:07 PM
In Windows 10 system, if you want to return to the system default wallpaper, you can follow the following steps: 1. Right-click a blank space on the desktop and select Personalize in the pop-up menu. 2. This will open the Personalization window in Settings. In the left menu, click Background. 3. Under the "Background" settings, find and click the drop-down menu next to "Choosepicture", and then select Windows Default (Windows Default) or directly select a picture that looks like the default wallpaper in the picture preview below ( if there are multiple options). 4. If your system has multiple versions
 What should I do if Win10 takes a screenshot and crashes? How to solve the problem of Win10 flashing and then disappearing after taking a screenshot?
Jun 02, 2024 pm 12:48 PM
There are many reasons why the screenshot disappears after taking a screenshot in Win10. Users can first check the screenshot save location or adjust the screenshot settings, or check the animation effect to check it. If it really doesn't work, you can also choose to update the driver and operating system to perform the operation. Let this website carefully introduce to users the analysis of the problem of Win10 disappearing after taking a screenshot. Analysis of the problem after win10 takes a picture and it flashes and disappears 1. Check where the screenshot is saved: When you use the Win+PrtSc (PrintScreen) key combination to take a screenshot, the screenshot is usually saved in the C:\Users\YourUsername\Pictures\Screenshots folder. please
 Windows cannot start the Windows Audio service Error 0x80070005
Jun 19, 2024 pm 01:08 PM
The guy's computer appears: Windows cannot start the WindowsAudio service (located on the local computer). Error 0x8007005: Access denied. This situation is usually caused by user permissions. You can try the following methods to fix it. Method 1: Modify the registry to add permissions through batch processing, create a new text document on the desktop, save it as .bat, and right-click the administrator to go far. Echo==========================EchoProcessingRegistryPermission.Pleasewait...Echo================== ========subinacl/subkey
 What to do if the Win10 Task Manager crashes? How to fix the Win10 Task Manager crash?
Jun 25, 2024 pm 04:31 PM
Hello everyone, have you ever encountered the situation where the Windows 10 Task Manager keeps crashing? This function helps us a lot, allowing us to quickly see all running tasks, which is very convenient to use, right? However, some friends said that they encountered this problem and didn’t know how to solve it, so let me share with you the specific solution! Solution to Win10 Task Manager crash 1. First, press and hold the "Win" + "R" keys on the keyboard to open Run, enter "regedit" and press the Enter key. 2. Expand the folders and find "HKEY_CURRENT_USERSoftwareMicros
 What should I do if there are no pop-up reminders for calendar events in Win10? How to recover if calendar event reminders are gone in Win10
Jun 09, 2024 pm 02:52 PM
The calendar can help users record your schedule and even set reminders. However, many users are asking what to do if calendar event reminders do not pop up in Windows 10? Users can first check the Windows update status or clear the Windows App Store cache to perform the operation. Let this site carefully introduce to users the analysis of the problem of Win10 calendar event reminder not popping up. To add calendar events, click the "Calendar" program in the system menu. Click the left mouse button on a date in the calendar. Enter the event name and reminder time in the editing window, and click the "Save" button to add the event. Solving the problem of win10 calendar event reminder not popping up


